
Introduction to Dark Chocolate Berry Bliss Balls Recipe
As a passionate home cook, I often find myself on a delightful quest for the perfect snack. You know, the kind that satisfies your sweet tooth while still feeling like a wholesome treat? That’s where my Dark Chocolate Berry Bliss Balls Recipe comes into play! These little bites of joy are not just a feast for the taste buds; they also pack a punch of nutrition.
Let me take you back to the first time I made these bliss balls. It was a rainy afternoon, and I was rummaging through my pantry, searching for something to lift my spirits. I stumbled upon a stash of dark chocolate and some dried berries. Suddenly, inspiration struck! I decided to blend these ingredients into a delicious, no-bake treat. The result? A delightful explosion of flavors that danced on my palate, leaving me craving more.
What I love most about this recipe is its versatility. You can whip it up in no time, and it’s perfect for any occasion—whether you need a quick energy boost before a workout or a sweet treat to share with friends. Plus, they’re so easy to customize! You can add your favorite nuts, seeds, or even a sprinkle of coconut for an extra touch of flair.
So, if you’re ready to embark on a culinary adventure with me, grab your apron and let’s dive into the world of Dark Chocolate Berry Bliss Balls. Trust me, your taste buds will thank you!
Ingredients for Dark Chocolate Berry Bliss Balls Recipe
Before we dive into the delightful process of making these bliss balls, let’s gather our ingredients. I always believe that the quality of ingredients can make or break a recipe. So, let’s ensure we’re using the best! Here’s what you’ll need:
Main Ingredients
- 1 cup rolled oats: I prefer using whole grain oats for added fiber and nutrition.
- 1/2 cup nut butter: Almond or peanut butter works wonders, but feel free to use your favorite!
- 1/4 cup honey or maple syrup: This adds a touch of sweetness. Maple syrup is a great vegan option.
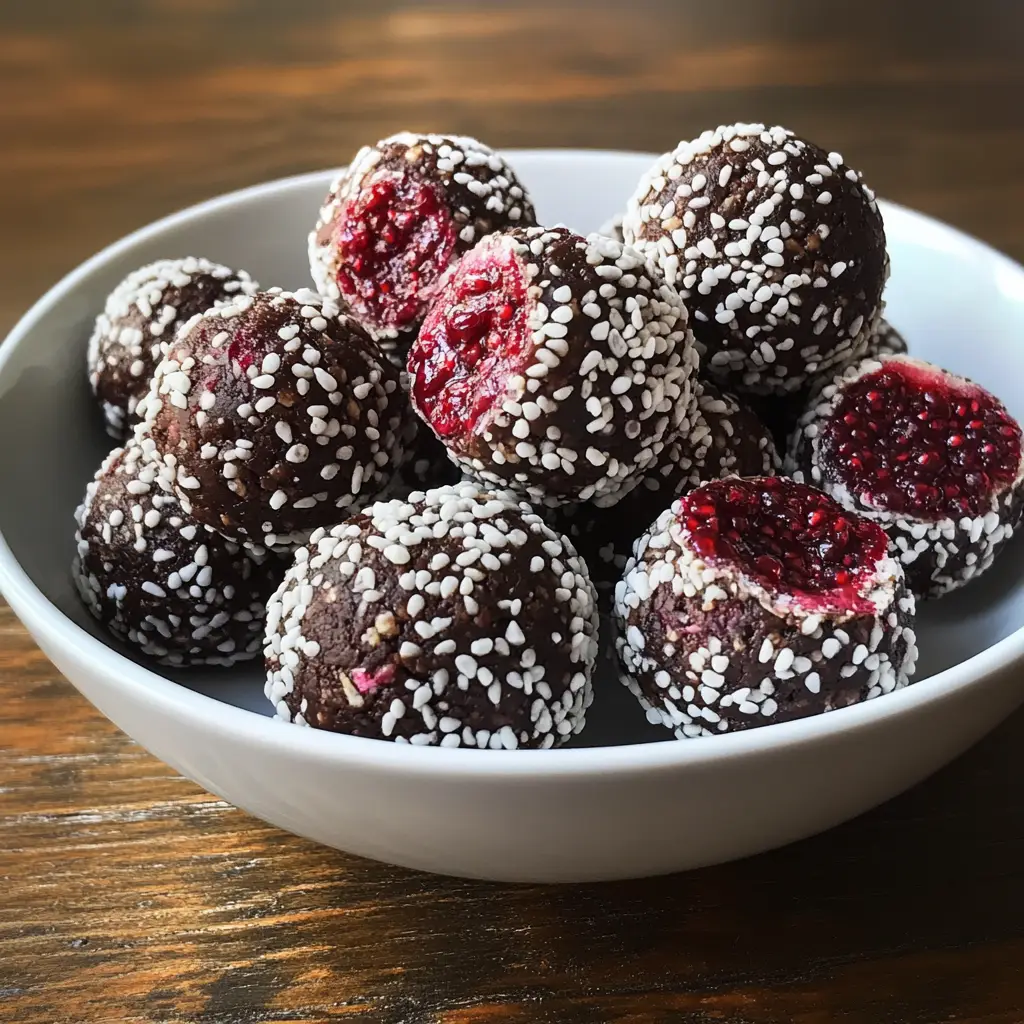
- 1/2 cup dark chocolate chips: Look for at least 70% cocoa for that rich flavor and health benefits.
- 1/2 cup dried berries: I love using a mix of cranberries and blueberries for a burst of flavor.
- 1/4 cup chia seeds: These tiny seeds are packed with nutrients and add a nice crunch!
Optional Add-ons
- 1/4 cup shredded coconut: For a tropical twist, add some unsweetened shredded coconut.
- 1/4 cup chopped nuts: Walnuts or pecans can add a delightful crunch and extra protein.
- 1 teaspoon vanilla extract: A splash of vanilla can elevate the flavor profile.
- Pinch of sea salt: Just a hint can enhance the sweetness and balance the flavors.
When sourcing your ingredients, I recommend checking local markets for fresh, organic options. Not only do they taste better, but they also support local farmers. Plus, it’s always fun to explore new flavors and textures!
How to Prepare Dark Chocolate Berry Bliss Balls Recipe
Now that we have our ingredients ready, it’s time to roll up our sleeves and get cooking! Making these Dark Chocolate Berry Bliss Balls is a fun and straightforward process. I promise you’ll be snacking on these delightful treats in no time. Let’s jump right into the steps!
Step 1: Gather and Measure Ingredients
First things first, let’s gather all our ingredients. I like to lay everything out on the counter, so I can see what I’m working with. It makes the process smoother and more enjoyable!
Tips for Step 1
- Use measuring cups and spoons for accuracy. It really helps in achieving the perfect texture!
- Consider prepping your ingredients ahead of time. This way, you can just mix and go!
Step 2: Blend the Base Ingredients
Next, it’s time to blend our base ingredients. In a large mixing bowl, combine the rolled oats, nut butter, and honey or maple syrup. I love using a spatula to mix everything together until it’s well combined. The nut butter adds a creamy texture that binds everything beautifully.
Tips for Step 2
- If the mixture feels too dry, add a splash of water or more nut butter to help it come together.
- Don’t be afraid to get your hands in there! Sometimes, mixing with your hands gives the best results.
Step 3: Incorporate Dark Chocolate and Berries
Now comes the fun part! Stir in the dark chocolate chips, dried berries, and chia seeds. The chocolate melts slightly, creating a deliciously gooey texture that I can’t resist. Make sure everything is evenly distributed for that perfect bite!
Tips for Step 3
- Chop the dark chocolate into smaller pieces if you prefer a more even distribution.
- Feel free to experiment with different types of berries or even add some fresh fruit if you’re feeling adventurous!
Step 4: Form the Bliss Balls
With our mixture ready, it’s time to form the bliss balls! Take a small amount of the mixture and roll it into a ball about the size of a tablespoon. I like to make them bite-sized, so they’re perfect for snacking!
Tips for Step 4
- Wet your hands slightly to prevent the mixture from sticking to your palms.
- If you want to get fancy, roll the balls in shredded coconut or crushed nuts for an extra layer of flavor!
Step 5: Chill and Serve
Once you’ve formed all the bliss balls, place them on a baking sheet lined with parchment paper. Pop them in the fridge for about 30 minutes to firm up. This step is crucial, as it helps the flavors meld together beautifully.
Tips for Step 5
- Store any leftovers in an airtight container in the fridge. They’ll last for about a week—if they last that long!
- These bliss balls can also be frozen for a quick snack later. Just thaw them in the fridge before enjoying!
And there you have it! Your very own Dark Chocolate Berry Bliss Balls are ready to be devoured. I can’t wait for you to try them!
Equipment Needed for Dark Chocolate Berry Bliss Balls Recipe
Before we dive into the blissful world of making these delightful treats, let’s talk about the equipment you’ll need. Don’t worry; you won’t need any fancy gadgets! Most of the tools are likely already in your kitchen. Here’s what I use:
- Mixing Bowl: A large mixing bowl is essential for combining all your ingredients. I love using a glass bowl because it’s easy to clean and lets me see the beautiful colors of the mixture.
- Measuring Cups and Spoons: Accurate measurements are key to achieving the perfect texture. If you don’t have measuring cups, you can use a regular cup, but keep in mind that it might not be as precise.
- Spatula: A sturdy spatula is perfect for mixing and scraping down the sides of the bowl. It helps ensure that every bit of goodness is incorporated!
- Baking Sheet: You’ll need a baking sheet lined with parchment paper to chill your bliss balls. If you don’t have parchment paper, a silicone baking mat works just as well.
- Refrigerator: This is where the magic happens! Chilling the bliss balls helps them firm up and enhances the flavors.
If you’re missing any of these items, don’t fret! You can always improvise. For example, a large pot can serve as a mixing bowl, and a spoon can replace a spatula in a pinch. The most important thing is to have fun and enjoy the process!
Variations of Dark Chocolate Berry Bliss Balls Recipe
One of the things I adore about my Dark Chocolate Berry Bliss Balls Recipe is how easily it can be adapted to suit different tastes and dietary preferences. It’s like a blank canvas waiting for your creative touch! Here are a few variations that I’ve tried and loved:
- Nut-Free Bliss Balls: If you’re avoiding nuts, simply swap the nut butter for sunflower seed butter. It gives a similar creamy texture without the allergens!
- Protein-Packed Bliss Balls: For an extra boost, add a scoop of your favorite protein powder. It’s a great way to fuel up after a workout!
- Spiced Bliss Balls: Add a pinch of cinnamon or a dash of nutmeg for a warm, cozy flavor. It’s like a hug in a bite!
- Fruit-Infused Bliss Balls: Try incorporating dried mango or apricots instead of berries for a tropical twist. The sweetness is simply divine!
- Chocolate-Coconut Bliss Balls: If you’re a coconut lover, use coconut oil instead of nut butter and roll the balls in shredded coconut for an extra layer of flavor.
These variations not only keep things exciting but also allow you to experiment with different flavors and textures. I encourage you to get creative and make this recipe your own. Who knows? You might just stumble upon your new favorite combination!
Cooking Notes for Dark Chocolate Berry Bliss Balls Recipe
As I’ve journeyed through the delightful world of making Dark Chocolate Berry Bliss Balls, I’ve picked up a few cooking notes that can help elevate your experience. These little nuggets of wisdom can make a big difference in your final product!
- Ingredient Temperature: Make sure your nut butter is at room temperature. It makes mixing so much easier and helps achieve that creamy consistency.
- Chilling Time: Don’t rush the chilling process! Allowing the bliss balls to firm up in the fridge for at least 30 minutes enhances their texture and flavor.
- Mixing Techniques: If you’re using a stand mixer, it can save time and effort. Just be careful not to overmix; you want to keep that delightful texture!
- Storage Tips: For the best taste, store your bliss balls in an airtight container in the fridge. They can also be frozen for up to three months—perfect for those days when you need a quick snack!
- Experiment with Sweetness: If you prefer a sweeter treat, feel free to adjust the amount of honey or maple syrup. Just remember, a little goes a long way!
These cooking notes are like little treasures I’ve gathered along the way. They help ensure that each batch of bliss balls turns out just as delicious as the last. Happy cooking!
Serving Suggestions for Dark Chocolate Berry Bliss Balls Recipe
Now that you’ve crafted your delightful Dark Chocolate Berry Bliss Balls, it’s time to think about how to serve them! I love to get a little creative with presentation, as it can make even the simplest treats feel special. Here are some of my favorite serving suggestions:
- Snack Platter: Arrange the bliss balls on a colorful platter alongside fresh fruit, nuts, and a drizzle of honey. It makes for a beautiful and inviting snack spread!
- On-the-Go Treat: Pack a few bliss balls in a small container for a quick snack during busy days. They’re perfect for stashing in your bag or lunchbox!
- Post-Workout Boost: Enjoy a bliss ball after your workout for a delicious energy boost. Pair it with a smoothie or a glass of almond milk for a satisfying treat.
- Gifts from the Kitchen: These bliss balls make a thoughtful homemade gift! Place them in a decorative jar, tie it with a ribbon, and share with friends or family.
- Sweet Treat for Movie Night: Serve them as a healthier alternative to popcorn during movie night. They’re bite-sized and oh-so-delicious!
These serving suggestions not only enhance the experience of enjoying your bliss balls but also allow you to share the joy with others. Whether you’re indulging solo or with loved ones, these little bites of happiness are sure to bring smiles all around!
Tips for Making Dark Chocolate Berry Bliss Balls Recipe
As I’ve whipped up batch after batch of my Dark Chocolate Berry Bliss Balls, I’ve gathered a treasure trove of tips that can help you create the perfect treat every time. These little nuggets of wisdom can make your cooking experience smoother and more enjoyable. Here’s what I’ve learned:
- Use Fresh Ingredients: Always check the freshness of your dried berries and nuts. Fresh ingredients not only taste better but also enhance the overall flavor of your bliss balls.
- Adjust Sweetness to Taste: Everyone has different preferences when it comes to sweetness. Start with the recommended amount of honey or maple syrup, then taste and adjust as needed!
- Experiment with Textures: Don’t hesitate to mix in different seeds or nuts. They can add a delightful crunch and make each bite unique!
- Chill for Best Results: Patience is key! Chilling the bliss balls not only helps them firm up but also allows the flavors to meld beautifully. Trust me, it’s worth the wait!
- Get Creative with Coatings: Roll your bliss balls in cocoa powder, crushed nuts, or even sprinkles for a fun twist. It adds a pop of color and flavor!
These tips are like little guiding stars on your culinary journey. They’ll help you navigate the process and create bliss balls that are not only delicious but also uniquely yours. Happy cooking!
Breakdown of Time for Dark Chocolate Berry Bliss Balls Recipe
Now that we’ve explored the delightful process of making Dark Chocolate Berry Bliss Balls, let’s take a moment to break down the time involved. I find that knowing how long each step takes helps me plan my cooking adventures better. Here’s a quick overview:
- Prep Time: 15 minutes – This includes gathering and measuring all your ingredients. It’s a great time to get your kitchen organized and ready for some fun!
- Chilling Time: 30 minutes – This step is crucial for allowing the bliss balls to firm up and the flavors to meld together. Patience is key here!
- Total Time: 45 minutes – In just under an hour, you’ll have a batch of delicious bliss balls ready to enjoy!
With this time breakdown, you can easily fit this recipe into your day, whether you’re preparing a quick snack or planning for a gathering. I love how these bliss balls come together so quickly, making them a perfect treat for any occasion!
Nutritional Information for Dark Chocolate Berry Bliss Balls Recipe
As a passionate home cook, I always pay attention to the nutritional value of the treats I make. My Dark Chocolate Berry Bliss Balls not only satisfy my sweet cravings but also provide a healthy dose of nutrients. Here’s a quick breakdown of the nutritional information per bliss ball, assuming you make about 12 balls from the recipe:
- Calories: Approximately 100 calories
- Protein: 3 grams
- Fat: 5 grams (mostly healthy fats from nut butter and chia seeds)
- Carbohydrates: 12 grams
- Fiber: 2 grams
- Sugar: 4 grams (natural sugars from honey or maple syrup and dried berries)
These bliss balls are not only a delicious treat but also a great source of energy, thanks to the combination of oats, nut butter, and dark chocolate. The chia seeds add a nice boost of omega-3 fatty acids, while the dried berries provide antioxidants. It’s a snack that feels indulgent but is packed with wholesome goodness!
So, whether you’re enjoying them as a post-workout snack or a sweet treat during the day, you can feel good about indulging in these Dark Chocolate Berry Bliss Balls. They truly are a guilt-free pleasure!
Frequently Asked Questions about Dark Chocolate Berry Bliss Balls Recipe
As I’ve shared my Dark Chocolate Berry Bliss Balls Recipe with friends and family, I’ve noticed a few common questions pop up. It’s always great to clarify any doubts and help fellow home cooks enjoy this delightful treat to the fullest! Here are some of the most frequently asked questions:
Can I use fresh berries instead of dried ones?
While fresh berries are delicious, I recommend sticking with dried berries for this recipe. Dried berries provide a concentrated flavor and won’t add extra moisture to the mixture. If you want to experiment, you could try adding fresh berries to the mixture, but be prepared for a slightly different texture!
How long do these bliss balls last?
When stored in an airtight container in the fridge, your bliss balls can last up to a week. If you want to keep them longer, you can freeze them for up to three months. Just remember to thaw them in the fridge before enjoying!
Can I make these bliss balls vegan?
Absolutely! To make your bliss balls vegan, simply use maple syrup instead of honey and ensure your dark chocolate chips are dairy-free. There are plenty of delicious vegan chocolate options available!
What can I substitute for nut butter?
If you’re looking for a nut-free option, sunflower seed butter works wonderfully! It has a similar creamy texture and flavor. You can also try tahini or pumpkin seed butter for a unique twist!
Can I add protein powder to the recipe?
Yes, you can! Adding a scoop of your favorite protein powder is a fantastic way to boost the nutritional value of your bliss balls. Just keep in mind that it may alter the texture slightly, so you might need to adjust the amount of nut butter or sweetener accordingly.
These questions are just a few of the many that can arise when making my Dark Chocolate Berry Bliss Balls. I hope this section helps clear up any uncertainties and inspires you to get creative in the kitchen. Happy cooking!
Conclusion on Dark Chocolate Berry Bliss Balls Recipe
As we wrap up our delightful journey through the world of Dark Chocolate Berry Bliss Balls, I can’t help but feel excited about the endless possibilities these little treats offer. They’re not just a snack; they’re a celebration of flavors, textures, and nutrition all rolled into one! Each bliss ball is a perfect blend of rich dark chocolate, chewy berries, and wholesome oats, making them a guilt-free indulgence.
What truly makes this recipe special is its versatility. Whether you’re looking for a quick energy boost, a post-workout snack, or a sweet treat to share with friends, these bliss balls fit the bill. Plus, with the ability to customize ingredients to suit your taste or dietary needs, you can make them uniquely yours!
So, the next time you find yourself in need of a delicious and nutritious snack, remember this Dark Chocolate Berry Bliss Balls Recipe. I hope you enjoy making and sharing them as much as I do. Happy cooking, and may your kitchen always be filled with joy and creativity!


