Introduction to Crunchy Sticky Sensory Balloons
In today’s fast-paced world, finding creative outlets can be a challenge, especially for busy moms and professionals. Crafting offers a wonderful escape, allowing you to express your creativity while creating something fun and engaging. One delightful project that combines creativity and sensory play is making Crunchy Sticky Sensory Balloons. These balloons are not only enjoyable to make but also provide a unique tactile experience for both kids and adults. Let’s dive into this fun DIY craft that can brighten up your day and engage your little ones!
Why You’ll Love This Crunchy Sticky Sensory Balloons
Crunchy Sticky Sensory Balloons are a fantastic way to unleash your creativity without breaking the bank. They are simple to make, requiring just a few materials that you likely already have at home. Plus, they offer endless possibilities for customization, making them perfect for sensory play. Whether you’re looking to entertain your kids or create a stress-relief tool for yourself, these balloons are sure to bring joy and satisfaction.
Materials Needed for Crunchy Sticky Sensory Balloons
To create your Crunchy Sticky Sensory Balloons, you will need the following materials:
- Balloon – 5 (for creating multiple sensory balloons)
- Flour – 1 cup (to create the crunchy texture)
- Water – 1 cup (to mix with flour)
- Food coloring – optional (for added fun)
- Rice or beans – 1 cup (for filling and texture)
- Glitter – optional (for a sparkly touch)
For a printable full list of materials, see below.
Tools Required for Crunchy Sticky Sensory Balloons
Before you start crafting, gather the following tools:
- Mixing bowl (for combining ingredients)
- Spoon (for mixing and filling)
- Funnel (to easily fill the balloons)
- Scissors (for cutting the balloon if needed)
These tools are essential for making the process smooth and enjoyable.
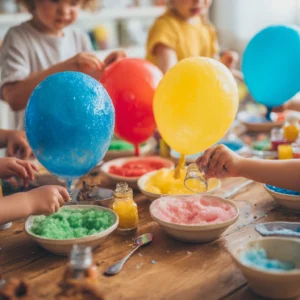
How to Make Crunchy Sticky Sensory Balloons
Now that you have your materials and tools ready, let’s get into the fun part—making your Crunchy Sticky Sensory Balloons! I remember the first time I made these with my kids; it was a delightful mess, but oh, the laughter we shared! Here’s a step-by-step guide to help you create your own sensory balloons.
Step 1: Prepare the Mixture
In a mixing bowl, combine 1 cup of flour and 1 cup of water. Stir until you achieve a smooth paste. This is where the magic begins! The texture of the mixture is so satisfying, and it reminds me of making playdough as a child.
Step 2: Add Color and Sparkle
If you want to add some flair, mix in a few drops of food coloring and glitter. This step is optional but adds a fun visual element. I love watching the colors swirl together; it’s like creating a mini masterpiece!
Step 3: Fill the Balloons
Using a funnel, carefully fill each balloon with the flour mixture until it is about halfway full. This part can be a bit tricky, but take your time. I’ve had my fair share of spills, but that just adds to the fun!
Step 4: Add Texture
Next, add 1 cup of rice or beans to each balloon for an exciting texture. The sound of the rice or beans moving inside the balloon is so satisfying—it’s like a little surprise waiting to be discovered!
Step 5: Inflate and Tie
Carefully inflate the balloon and tie it securely to prevent any leaks. I always double-check my knots; the last thing you want is a balloon bursting during playtime!
Step 6: Repeat
Repeat the process for the remaining balloons until you have a colorful collection of Crunchy Sticky Sensory Balloons. Each one can be unique, and I love how they all turn out differently!
Step 7: Enjoy!
Now it’s time to enjoy your creations! Squeeze, toss, and play with your sensory balloons. Watching my kids giggle and explore with these balloons brings me so much joy. It’s a simple pleasure that reminds me of the beauty of crafting together.
Why You’ll Love This Crunchy Sticky Sensory Balloons
Crunchy Sticky Sensory Balloons are a fantastic way to unleash your creativity without breaking the bank. I remember the first time I made these with my kids; it was a delightful mess, but oh, the laughter we shared! They are simple to make, requiring just a few materials that you likely already have at home. This makes it an ideal project for busy moms like us who want to squeeze in some fun crafting time.
What I love most about these balloons is the endless possibilities for customization. You can experiment with different fillings, colors, and even add glitter for that extra sparkle. Each balloon can be a unique creation, reflecting your personality or the interests of your little ones. Whether you’re looking to entertain your kids or create a stress-relief tool for yourself, these balloons are sure to bring joy and satisfaction.
As a busy mom, I often find myself juggling multiple tasks, and crafting can sometimes feel like a luxury. However, making Crunchy Sticky Sensory Balloons is a quick and enjoyable way to take a break from the chaos. In just 30 minutes, you can create something that not only provides sensory play for your kids but also serves as a delightful stress reliever for you. It’s a win-win!
So, gather your materials and let your creativity flow. You’ll be amazed at how much joy these simple balloons can bring to your day!
Materials Needed for Crunchy Sticky Sensory Balloons
To create your Crunchy Sticky Sensory Balloons, you will need the following materials:
- Balloon – 5 (for creating multiple sensory balloons)
- Flour – 1 cup (to create the crunchy texture)
- Water – 1 cup (to mix with flour)
- Food coloring – optional (for added fun)
- Rice or beans – 1 cup (for filling and texture)
- Glitter – optional (for a sparkly touch)
Gathering these materials is part of the fun! I often find myself rummaging through my pantry and craft supplies, and it’s a great way to get the kids involved. They love picking out the colors and deciding what to fill the balloons with. It’s a wonderful opportunity to teach them about textures and colors while we craft together.
For a printable full list of materials, see below.
Tools Required for Crunchy Sticky Sensory Balloons
Before you start crafting, gather the following tools:
- Mixing bowl (for combining ingredients)
- Spoon (for mixing and filling)
- Funnel (to easily fill the balloons)
- Scissors (for cutting the balloon if needed)
Having the right tools on hand makes all the difference in your crafting experience. I remember the first time I attempted to make Crunchy Sticky Sensory Balloons; I was scrambling around the kitchen looking for a funnel. It turned into a mini scavenger hunt, but it also added to the fun! Now, I always make sure to have everything ready before diving into a project.
The mixing bowl is where the magic begins, as you combine the flour and water to create that delightful paste. I love using a large bowl so I can really get in there and mix without worrying about spills. The spoon is your trusty sidekick, helping you blend everything smoothly. And let’s not forget the funnel—this little tool is a game changer! It makes filling the balloons so much easier and mess-free. Trust me, you’ll thank yourself later for having it!
Lastly, scissors are essential, especially if you need to trim the balloon or cut any strings. I always keep a pair of kid-safe scissors nearby when crafting with my children. It’s a great way to teach them about safety while they help out. So, gather these tools, and let’s get ready to create some amazing Crunchy Sticky Sensory Balloons together!
How to Make Crunchy Sticky Sensory Balloons
Now that you have your materials and tools ready, let’s get into the fun part—making your Crunchy Sticky Sensory Balloons! I remember the first time I made these with my kids; it was a delightful mess, but oh, the laughter we shared! Here’s a step-by-step guide to help you create your own sensory balloons.
Step 1: Prepare the Mixture
In a mixing bowl, combine 1 cup of flour and 1 cup of water. Stir until you achieve a smooth paste. This is where the magic begins! The texture of the mixture is so satisfying, and it reminds me of making playdough as a child.
Step 2: Add Color and Sparkle
If you want to add some flair, mix in a few drops of food coloring and glitter. This step is optional but adds a fun visual element. I love watching the colors swirl together; it’s like creating a mini masterpiece!
Step 3: Fill the Balloons
Using a funnel, carefully fill each balloon with the flour mixture until it is about halfway full. This part can be a bit tricky, but take your time. I’ve had my fair share of spills, but that just adds to the fun!
Step 4: Add Texture
Next, add 1 cup of rice or beans to each balloon for an exciting texture. The sound of the rice or beans moving inside the balloon is so satisfying—it’s like a little surprise waiting to be discovered!
Step 5: Inflate and Tie
Carefully inflate the balloon and tie it securely to prevent any leaks. I always double-check my knots; the last thing you want is a balloon bursting during playtime!
Step 6: Repeat
Repeat the process for the remaining balloons until you have a colorful collection of Crunchy Sticky Sensory Balloons. Each one can be unique, and I love how they all turn out differently!
Step 7: Enjoy!
Now it’s time to enjoy your creations! Squeeze, toss, and play with your sensory balloons. Watching my kids giggle and explore with these balloons brings me so much joy. It’s a simple pleasure that reminds me of the beauty of crafting together.
Tips for Best Results
As I’ve dived into the world of crafting, I’ve learned that a few simple tips can elevate your projects significantly. Here are some of my favorite tips for creating the best Crunchy Sticky Sensory Balloons:
- Experiment with Different Fillings: Don’t be afraid to get creative! Try using different materials like sand, small foam balls, or even dried pasta. Each filling offers a unique texture and sound, making sensory play even more exciting. I once filled a balloon with colorful beads, and the kids loved the way it felt and sounded!
- Use Different Sizes of Balloons: Varying the sizes of your balloons can create different sensory experiences. Larger balloons can hold more filling, while smaller ones are easier for little hands to squeeze. I often find that my kids enjoy the challenge of squeezing the smaller ones, while the larger ones are great for tossing around.
- Tie the Balloons Tightly: This is crucial! Make sure to tie the balloons securely to prevent any leaks during play. I’ve had a few mishaps where a balloon popped unexpectedly, and it can be quite a mess! A good knot will keep your creations intact and ready for fun.
By following these tips, you’ll not only enhance your crafting experience but also ensure that your Crunchy Sticky Sensory Balloons provide endless joy and exploration for your kids. Happy crafting!
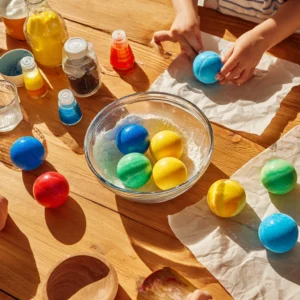
Project Variations
Get creative with your Crunchy Sticky Sensory Balloons! One of the best parts of crafting is the ability to personalize and adapt projects to fit your style and the interests of your kids. Here are some fun variations to try:
- Seasonal Themes: Embrace the changing seasons by using colors and fillings that match the time of year. For example, you can create spooky Crunchy Sticky Sensory Balloons for Halloween by using orange and black balloons filled with black beans or rice. In the spring, consider pastel colors with flower-shaped confetti for a cheerful touch!
- Personalized Designs: Let your creativity shine by adding stickers or painting the outside of the balloons. I love to let my kids decorate their balloons with their favorite characters or designs. It not only makes the balloons unique but also gives them a sense of ownership over their creations.
- Different Fillings: Don’t hesitate to experiment with various fillings! Try using sand for a different weight and texture, colorful beads for a fun sound, or even small toys for a surprise element. I once filled a balloon with tiny dinosaurs, and my kids had a blast discovering them as they played!
These variations not only enhance the sensory experience but also keep the crafting process fresh and exciting. Each time you make Crunchy Sticky Sensory Balloons, you can create something new and delightful. So gather your materials, let your imagination run wild, and enjoy the endless possibilities!
Decoration and Usage Ideas
Once your Crunchy Sticky Sensory Balloons are ready, the fun doesn’t stop there! I’ve discovered that these delightful creations can be used in a variety of ways, making them even more enjoyable for both kids and adults. Here are some of my favorite decoration and usage ideas:
- Sensory Play: These balloons are perfect for sensory bins! Fill a large container with rice, beans, or sand, and let your kids explore the textures while incorporating the Crunchy Sticky Sensory Balloons. They can squeeze, toss, and even bury the balloons, creating an engaging sensory experience that keeps them entertained for hours. I love watching my kids discover new ways to play with them!
- Party Favors: Looking for a unique party favor? These sensory balloons make fantastic gifts for birthdays or playdates! You can personalize each balloon with different colors and fillings to match the theme of the party. I once made a batch for my daughter’s birthday, and the kids were thrilled to take them home. It was a hit!
- Stress Relief: As a busy mom, I often find myself needing a little stress relief. Squeezing these Crunchy Sticky Sensory Balloons can be incredibly calming. I keep a few on my desk for those hectic days when I need a moment to unwind. The satisfying crunch and squish provide a wonderful distraction and help me refocus.
These ideas not only enhance the fun but also allow you to incorporate the Crunchy Sticky Sensory Balloons into various aspects of your life. Whether it’s for play, parties, or personal relaxation, these balloons are versatile and sure to bring joy to everyone involved. So, get creative and enjoy the many ways you can use your sensory balloons!
FAQs about Crunchy Sticky Sensory Balloons
As I’ve shared my love for Crunchy Sticky Sensory Balloons, I often get questions from fellow moms and crafters. Here are some of the most common FAQs that I’ve encountered, along with my answers to help you navigate this fun project:
Q: Are these balloons safe for young children?
A: Yes, but always supervise children while crafting to prevent choking hazards. It’s important to ensure that they understand how to handle the balloons safely, especially during playtime.
Q: What should I do if the balloon pops?
A: If a balloon pops, clean up the pieces immediately to avoid accidents. I always keep a small trash bag nearby when we’re crafting, just in case. It’s a good habit to instill in kids to help them learn about safety and responsibility.
Q: Can I use other materials for filling?
A: Absolutely! Feel free to experiment with different fillings like sand, small foam balls, or even dried pasta. Each material offers a unique texture and sound, making your Crunchy Sticky Sensory Balloons even more exciting. I love trying out new fillings with my kids; it’s always a fun surprise to see how they react!
These FAQs are just a starting point, and I encourage you to explore and ask more questions as you embark on your crafting journey. Remember, crafting is all about creativity and having fun, so don’t hesitate to reach out if you need more tips or ideas!
Final Thoughts
Creating Crunchy Sticky Sensory Balloons is not just a fun DIY project; it’s an opportunity to bond with your children and explore creativity together. I cherish the moments spent crafting with my kids, watching their eyes light up as they mix, fill, and decorate their balloons. It’s a beautiful way to connect amidst our busy lives.
As you craft, you’ll find joy in the process and the satisfaction of making something unique. Each balloon becomes a little masterpiece, reflecting the creativity of everyone involved. I often find myself smiling at the silly designs my kids come up with, and it reminds me that crafting is about having fun, not just perfection.
So gather your materials, unleash your creativity, and enjoy the delightful experience of making these sensory balloons. Whether you’re creating them for playtime, stress relief, or as gifts, these balloons are sure to bring joy to your home.
Remember, crafting is not just about the end product; it’s about the memories you create along the way. Embrace the mess, the laughter, and the shared moments. Happy crafting!
Print
Crunchy Sticky Sensory Balloons for Fun DIY Crafts!
Description
Create fun and engaging crunchy sticky sensory balloons that provide a unique tactile experience for kids and adults alike. These balloons are perfect for sensory play and can be customized with various fillings.
Instructions
- In a mixing bowl, combine flour and water to create a smooth paste.
- Add food coloring and glitter if desired, mixing well.
- Using a funnel, fill each balloon with the flour mixture until it is about halfway full.
- Add rice or beans to the balloon for added texture.
- Carefully inflate the balloon and tie it securely.
- Repeat the process for the remaining balloons.
- Enjoy your crunchy sticky sensory balloons!
Keywords: Crunchy Sticky Sensory Balloons, DIY Crafts, Sensory Play, Kids Activities