Introduction to Color-Changing Crystal Treasure Stones
Crafting is a wonderful way to express your creativity and add a personal touch to your home decor. If you’re a busy mom or professional looking for a fun and engaging project, creating color-changing crystal treasure stones is the perfect solution. I remember the first time I stumbled upon these enchanting stones; they seemed to glow with potential, and I knew I had to try making them myself.
These stunning stones not only serve as beautiful decorative pieces but also make thoughtful gifts for friends and family. I’ve gifted them to my loved ones, and the joy on their faces when they see the color change is priceless! With their magical ability to change color based on temperature, they bring a unique charm to any space. It’s like having a little piece of nature’s wonder right in your home.
As I embarked on this project, I found it to be a delightful escape from my busy routine. The process of mixing the resin and watching the colors come to life was incredibly satisfying. I encourage you to take a break from your hectic schedule and dive into this exciting DIY project that will spark your creativity. Trust me, you’ll be amazed at what you can create!
Why You’ll Love This Color-Changing Crystal Treasure Stones
Creating color-changing crystal treasure stones is a delightful experience that combines creativity, affordability, and simplicity. I remember the first time I mixed the resin and watched the colors swirl together; it felt like I was conjuring magic right in my kitchen! These stunning crafts can easily be made at home without breaking the bank, which is a huge plus for busy moms and professionals like us.
One of the things I love most about this project is how straightforward the process is. Even if you’re new to crafting, you’ll find that the steps are easy to follow. I’ve had friends who were hesitant to try crafting, but after seeing my color-changing crystal treasure stones, they couldn’t resist giving it a go. It’s amazing how a simple project can spark creativity and bring people together!
Not only do these stones enhance your home decor, but they also make memorable gifts. I’ve wrapped them up for birthdays and holidays, and the recipients are always thrilled to receive such a unique and personal gift. The joy of seeing someone’s face light up when they discover the color-changing effect is truly priceless. It’s like giving a little piece of joy that keeps on giving!
So, if you’re looking for a fun and engaging project that fits into your busy schedule, I wholeheartedly recommend diving into the world of color-changing crystal treasure stones. You’ll be amazed at what you can create, and who knows? You might just discover a new favorite hobby along the way!
Materials Needed for Color-Changing Crystal Treasure Stones
To get started on your color-changing crystal treasure stones, gather the following materials:
- Clear resin – 1 cup: This is the base for your stones, providing that beautiful, glossy finish.
- Color-changing pigment – 2 teaspoons: This magical ingredient gives your stones their unique color-changing properties, transforming them with temperature.
- Silicone mold – 1: Choose a mold shape that you love; it could be anything from a simple round to a whimsical star!
- Mixing stick – 1: This handy tool is essential for stirring the resin and pigment together.
- Measuring cup – 1: To accurately measure your resin, ensuring the right proportions for a successful project.
- Gloves – 1 pair: Protect your hands while working with resin; trust me, you’ll want to keep your fingers clean!
- Sandpaper – 1 piece: For smoothing any rough edges after curing, giving your stones a polished look.
*For a printable full list of materials, see below.*
Tools Required for Color-Changing Crystal Treasure Stones
In addition to the materials, you will need the following tools to successfully create your color-changing crystal treasure stones:
- Mixing bowl – 1: This is essential for mixing your resin and pigment together. I recommend using a bowl that you don’t mind getting a little messy, as resin can be tricky to clean up!
- Heat gun (optional) – 1: While not necessary, a heat gun can be a game-changer for removing bubbles from the resin surface. I remember my first attempt without one; I ended up with a few bubbles that I wished I could have avoided. If you have access to a heat gun, it’s worth using!
- Drop cloth – 1: Protecting your workspace is crucial when working with resin. I always lay down a drop cloth to catch any spills or drips. It makes cleanup a breeze and allows me to focus on the fun part—crafting!
Having the right tools on hand can make all the difference in your crafting experience. I’ve learned that being prepared not only saves time but also helps reduce stress, especially when you’re juggling a busy schedule. So gather your tools, and let’s get ready to create some stunning color-changing crystal treasure stones!
How to Make Color-Changing Crystal Treasure Stones
Creating your own color-changing crystal treasure stones is an exciting journey that I can’t wait to share with you! Follow these step-by-step instructions, and soon you’ll have your very own magical stones that change color with temperature.
Step 1: Prepare Your Workspace
First things first, let’s get organized! Lay down a drop cloth to protect your work surface from any resin spills. I can’t stress enough how important this step is. The last thing you want is to be scrubbing resin off your favorite table later!
Step 2: Wear Gloves
Next, put on your gloves. Trust me, this is a must! Resin can be sticky and messy, and I’ve learned the hard way that keeping my hands protected makes the crafting experience much more enjoyable.
Step 3: Measure the Resin
Now it’s time to measure out your materials. Measure 1 cup of clear resin and pour it into your mixing bowl. I love using a measuring cup with clear markings; it makes it so much easier to get the right amount!
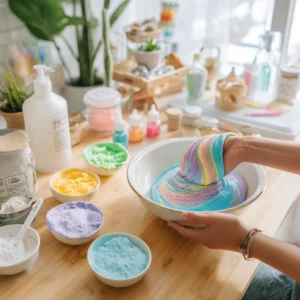
Step 4: Add Color-Changing Pigment
Here comes the fun part! Add 2 teaspoons of color-changing pigment to the resin. As you mix thoroughly with the mixing stick, watch the colors come to life! It’s like a mini science experiment right in your kitchen.
Step 5: Pour into Mold
Carefully pour the mixture into your silicone mold, filling it to the top. I always take my time with this step to avoid spills. The anticipation of seeing how the stones will turn out is so exciting!
Step 6: Remove Bubbles (Optional)
If you have a heat gun, now’s the time to use it! Gently heat the surface to remove any bubbles that may have formed. I remember my first attempt without a heat gun; I ended up with a few bubbles that I wished I could have avoided. If you have one, it’s definitely worth using!
Step 7: Allow to Cure
Patience is key here! Let the resin cure according to the manufacturer’s instructions, usually around 24 hours. I like to set a timer and use this time to plan how I’ll display my new treasures.
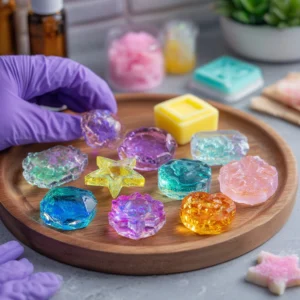
Step 8: Remove from Mold
Once cured, carefully remove the stones from the mold. This is such a rewarding moment! I always feel a rush of excitement as I peel back the silicone to reveal my creations.
Step 9: Smooth Edges
If necessary, use sandpaper to smooth any rough edges for a polished finish. This final touch makes a big difference in how your color-changing crystal treasure stones will look. I love running my fingers over the smooth surfaces; it feels so satisfying!
And there you have it! You’ve just created your very own color-changing crystal treasure stones. I can’t wait for you to experience the joy of crafting these beautiful pieces. Happy crafting!
Tips for Best Results
To ensure your color-changing crystal treasure stones turn out beautifully, I’ve gathered some practical tips that I’ve learned through my own crafting adventures. These little nuggets of wisdom can make a big difference in your crafting experience!
- Experiment with Different Colors: Don’t be afraid to mix and match! I’ve found that using various colors of pigment can create stunning effects. For instance, combining a vibrant blue with a soft purple can yield a mesmerizing gradient. The possibilities are endless, and it’s a great way to personalize your stones!
- Work in a Well-Ventilated Area: Safety first! Always make sure to craft in a space with good airflow. I learned this the hard way when I didn’t open a window and found myself feeling a bit lightheaded. A well-ventilated area not only keeps you safe but also makes the crafting process more enjoyable.
- Test the Color-Changing Effect: Once your stones are ready, have some fun testing their magical properties! Place them in warm and cold water to see the color change in action. I remember the first time I did this; it felt like I was unveiling a secret! It’s a delightful way to share the magic with friends and family.
By keeping these tips in mind, you’ll be well on your way to creating stunning color-changing crystal treasure stones that you can proudly display or gift to loved ones. Happy crafting!
Project Variations
Get creative with your color-changing crystal treasure stones! One of the most exciting aspects of crafting is the ability to personalize your projects, and these stones are no exception. Here are some fun variations to try that will add your unique flair to each piece:
- Style Variations: Don’t limit yourself to just one mold! Use different molds to create various shapes, such as hearts, stars, or geometric designs. I once made a batch of star-shaped stones for a friend’s birthday, and they were a hit! The different shapes added a playful touch that everyone loved.
- Color Changes: Mix multiple pigments to create a stunning gradient effect or swirl colors together for a marbled look. I remember experimenting with a blue and green swirl, and the result was breathtaking! It felt like I was capturing the ocean in my stones. The beauty of crafting is that you can let your imagination run wild!
- Seasonal Adaptations: Create themed stones for holidays or special occasions. For instance, use red and green pigments for Christmas or pastel colors for Easter. I love making seasonal decorations, and these stones are perfect for adding a festive touch to my home. They also make great gifts for friends who appreciate handmade items!
These variations not only enhance the visual appeal of your color-changing crystal treasure stones but also allow you to express your creativity in new ways. So gather your materials, let your imagination soar, and enjoy the process of crafting something truly special!
Decoration and Usage Ideas
Once your color-changing crystal treasure stones are complete, the fun doesn’t stop there! I love finding creative ways to showcase these beautiful pieces, and I’m excited to share some of my favorite ideas with you. Each stone holds a unique charm, and there are countless ways to incorporate them into your life.
- Home Decor: One of the simplest yet most effective ways to display your stones is by placing them in a decorative bowl on your coffee table or shelf. I often use a clear glass bowl to let the colors shine through, and it becomes a conversation starter whenever guests come over. The way they catch the light and change color adds a magical touch to my living space!
- Garden Accents: If you have a garden or potted plants, consider using your color-changing crystal treasure stones as colorful accents. I love scattering them among my flowers; they add a whimsical element that brightens up the entire area. Plus, watching them change color in the sunlight is a delightful surprise!
- Gift Ideas: These stones make for unique and thoughtful gifts. I’ve wrapped them up for birthdays, holidays, and even as “just because” surprises for friends. The joy of giving something handmade is truly special, and the recipients always appreciate the personal touch. You can even create a set of stones in different colors for a more personalized gift!
- Party Favors: If you’re hosting an event or gathering, consider creating small stones as party favors. I once made a batch for a friend’s bridal shower, and they were a hit! Guests loved taking home a little piece of magic, and it added a memorable touch to the celebration.
These ideas are just the beginning! The beauty of crafting is that you can let your imagination run wild. I encourage you to think outside the box and find new ways to incorporate your color-changing crystal treasure stones into your life. Whether it’s for decoration, gifting, or simply enjoying their beauty, these stones are sure to bring joy and creativity into your home!
FAQs about Color-Changing Crystal Treasure Stones
As I’ve dived into the world of color-changing crystal treasure stones, I’ve encountered a few common questions that many crafters have. I remember feeling a bit overwhelmed with all the information at first, so I hope these FAQs help clarify any uncertainties you might have!
Q: How long does it take for the stones to cure?
A: The curing time typically takes around 24 hours, but always check the manufacturer’s instructions for specifics. I’ve found that patience is key here; it’s so rewarding to see the final product after waiting for it to set!
Q: Can I use other types of pigments?
A: Yes, you can experiment with different types of pigments! I’ve tried various brands and colors, and it’s always fun to see how they interact with the resin. Just make sure they are compatible with resin to achieve the best results.
Q: Are these stones safe for children?
A: While the finished stones are safe, the resin should be kept away from children and pets during the crafting process. I always make sure to craft in a space where little hands can’t reach, as safety is a top priority when working with materials like resin.
These FAQs are just a starting point, and I encourage you to reach out if you have more questions as you embark on your crafting journey. The world of color-changing crystal treasure stones is full of possibilities, and I can’t wait for you to explore it!
Final Thoughts
Creating color-changing crystal treasure stones is not just a craft; it’s an opportunity to express your creativity and bring a touch of magic into your home. I can’t tell you how fulfilling it feels to see my ideas come to life, especially when I know I’ve made something unique with my own hands. As busy moms and professionals, we often juggle so many responsibilities, and taking time to engage in a fun DIY project can be incredibly rewarding.
Every time I sit down to craft, I find a sense of peace and joy that helps me recharge. It’s a moment where I can focus solely on the task at hand, letting my worries fade away. I encourage you to gather your materials, unleash your creativity, and enjoy the process of making these stunning treasures. Whether you’re crafting alone or with friends, the experience is sure to be filled with laughter and inspiration.
Remember, it’s not just about the final product; it’s about the journey of creating. You’ll not only create beautiful pieces but also memories that will last a lifetime! So, let your imagination run wild, and don’t be afraid to experiment. Happy crafting!
Print
Color-Changing Crystal Treasure Stones: Create Stunning Crafts!
Description
Create beautiful color-changing crystal treasure stones that can be used as decorative pieces or gifts. These stones change color based on temperature, adding a magical touch to your crafts.
Instructions
- Prepare your workspace by laying down a drop cloth.
- Put on gloves to protect your hands.
- Measure 1 cup of clear resin and pour it into the mixing bowl.
- Add 2 teaspoons of color-changing pigment to the resin and mix thoroughly with the mixing stick.
- Pour the mixture into the silicone mold, filling it to the top.
- Use a heat gun to remove any bubbles that may form on the surface (optional).
- Allow the resin to cure according to the manufacturer’s instructions, usually 24 hours.
- Once cured, carefully remove the stones from the mold.
- Use sandpaper to smooth any rough edges if necessary.
Keywords: Color-Changing, Crystal, Treasure Stones, DIY Crafts, Home Decor