
Introduction to Coconut Truffles Recipe
Ah, coconut truffles! Just the thought of them brings a smile to my face. I remember the first time I tasted these delightful little bites of heaven. It was during a family gathering, and my aunt had made a batch that disappeared faster than you could say “coconut.” The sweet, creamy texture combined with the rich flavor of chocolate was simply irresistible. From that moment on, I was hooked!
As a passionate home cook, I love experimenting with flavors and textures. Coconut truffles have become one of my go-to recipes for special occasions and even just for a cozy night in. They are not only delicious but also incredibly easy to make. Plus, they require minimal ingredients, which is a win in my book!
What I adore most about this coconut truffles recipe is its versatility. You can customize it to suit your taste buds. Whether you prefer a classic coconut flavor or want to jazz it up with some nuts or spices, the possibilities are endless. I often find myself adding a pinch of sea salt or a dash of vanilla extract to elevate the flavor even more.
In this article, I’ll guide you through the process of making these delightful treats. I’ll share my favorite tips and tricks, ensuring that your coconut truffles turn out perfectly every time. So, roll up your sleeves, and let’s dive into the sweet world of coconut truffles!
Ingredients for Coconut Truffles Recipe
Before we embark on our coconut truffle adventure, let’s gather our ingredients. I always believe that the quality of ingredients can make or break a recipe. So, let’s make sure we’re using the best! Here’s what you’ll need:
Main Ingredients
- 1 cup unsweetened shredded coconut
- 1/2 cup sweetened condensed milk
- 1 cup semi-sweet chocolate chips
- 1 teaspoon vanilla extract
- 1/4 cup cocoa powder (for dusting)
When choosing shredded coconut, I recommend looking for organic options if possible. The flavor is richer, and it’s free from any additives. As for the sweetened condensed milk, I always opt for a brand that uses real milk and sugar, as it makes a world of difference in taste.
Optional Add-ons
- Chopped nuts (like almonds or walnuts) for added crunch
- Pinch of sea salt to enhance the sweetness
- 1/2 teaspoon almond extract for a nutty twist
- Colored sprinkles for a festive touch
These optional add-ons can really elevate your coconut truffles. I love adding a sprinkle of sea salt to balance the sweetness. And if you’re feeling adventurous, try mixing in some chopped nuts for a delightful crunch. The almond extract gives a lovely depth of flavor, too! Remember, the beauty of this recipe lies in its flexibility, so feel free to get creative!
How to Prepare Coconut Truffles Recipe
Now that we have our ingredients ready, it’s time to roll up our sleeves and get cooking! Making coconut truffles is a fun and straightforward process. I promise you’ll be amazed at how quickly these little delights come together. Let’s dive into the steps!
Step 1: Prepare the Coconut Mixture
First things first, we need to create that luscious coconut mixture. In a mixing bowl, combine the unsweetened shredded coconut, sweetened condensed milk, and vanilla extract. Stir everything together until it’s well combined. The mixture should be sticky and hold together nicely.
Tips for Step 1
- Use your hands! Sometimes, getting in there with your fingers helps to mix everything thoroughly.
- If the mixture feels too dry, add a splash more of sweetened condensed milk. You want it to be moist but not runny.
- For an extra flavor boost, consider adding a pinch of sea salt at this stage. It really enhances the sweetness!
Step 2: Form the Truffles
Once your coconut mixture is ready, it’s time to shape it into truffles. I like to use a small cookie scoop or my hands to form bite-sized balls. Aim for about one inch in diameter. Place each ball on a parchment-lined baking sheet. This part is where the magic happens!
Tips for Step 2
- Keep your hands slightly damp to prevent the mixture from sticking to your fingers.
- If you want to add nuts, now’s the time! Just press a few chopped nuts into the center of each ball before rolling it.
- Don’t worry if they aren’t perfectly round; a little imperfection adds character!
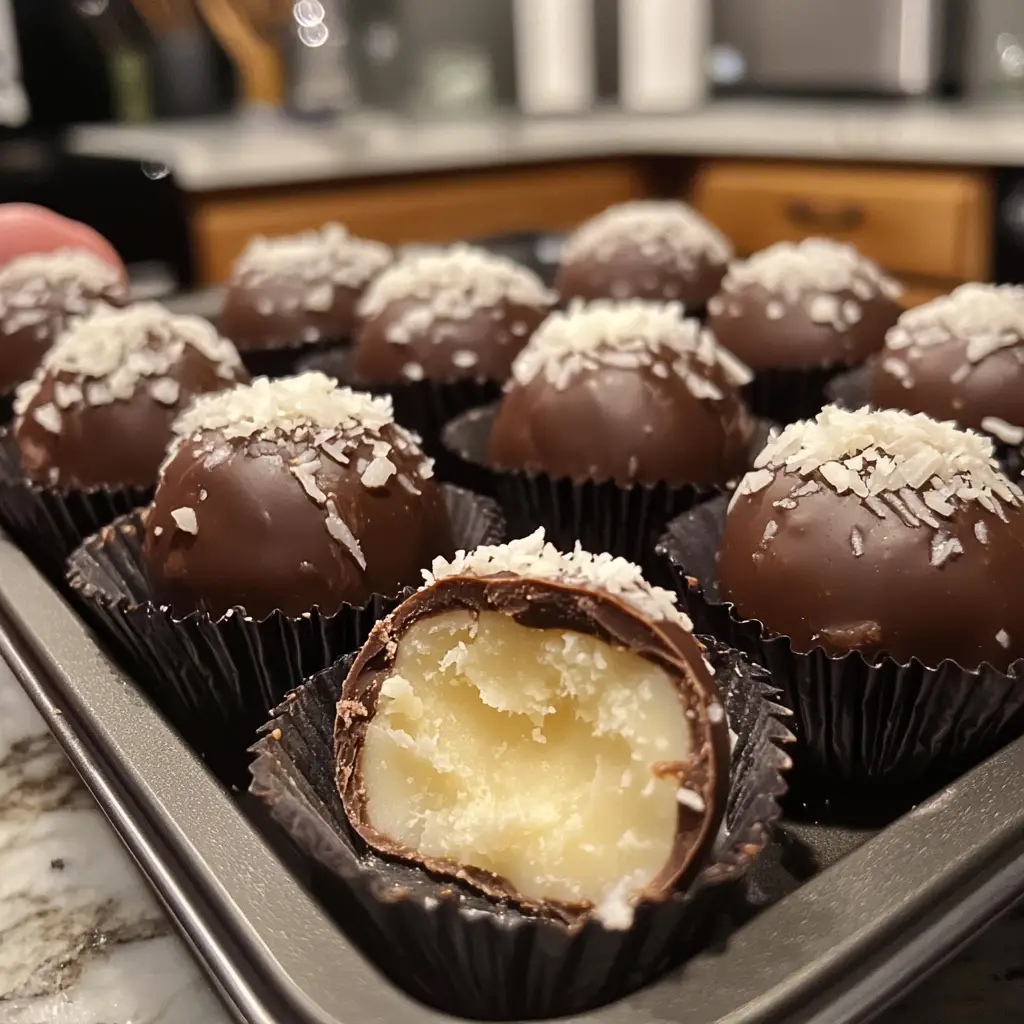
Step 3: Coat the Truffles
Now comes the fun part—coating the truffles! Melt the semi-sweet chocolate chips in a microwave-safe bowl, heating in 30-second intervals and stirring in between until smooth. Once melted, dip each coconut ball into the chocolate, ensuring it’s fully coated. Place them back on the parchment-lined sheet to set.
Tips for Step 3
- For a beautiful finish, you can drizzle some melted chocolate over the top of the coated truffles.
- If you want to add a festive touch, sprinkle some colored sprinkles or cocoa powder on top before the chocolate sets.
- Let the truffles cool in the fridge for about 30 minutes to firm up. Trust me, the wait is worth it!
And there you have it! Your coconut truffles are now ready to be enjoyed. I can already imagine the smiles on everyone’s faces when they take that first bite. Let’s move on to the next section, where I’ll share the equipment you’ll need for this delightful recipe!
Equipment Needed for Coconut Truffles Recipe
Before we dive into the kitchen, let’s make sure we have all the necessary tools at our fingertips. Having the right equipment can make the process smoother and more enjoyable. Here’s what you’ll need to whip up these delightful coconut truffles:
- Mixing Bowl: A medium-sized bowl will do the trick for combining your coconut mixture. If you have a large bowl, that works too!
- Cookie Scoop or Hands: A small cookie scoop is perfect for portioning out the truffles. If you don’t have one, your hands are just as effective for shaping the mixture.
- Parchment Paper: Line your baking sheet with parchment paper to prevent the truffles from sticking. If you’re out of parchment, a silicone baking mat is a great alternative.
- Microwave-Safe Bowl: You’ll need this for melting the chocolate chips. If you prefer, you can also use a double boiler on the stove.
- Spatula or Spoon: A spatula or a spoon will help you mix the ingredients and coat the truffles with chocolate.
With these simple tools, you’re all set to create your coconut truffles. I find that having everything organized and ready to go makes the cooking experience much more enjoyable. So, gather your equipment, and let’s keep the momentum going as we explore the variations of this delightful recipe!
Variations of Coconut Truffles Recipe
One of the things I love most about coconut truffles is their adaptability. You can easily switch things up to suit your taste or the occasion. Here are a few variations that I’ve tried and absolutely adore:
- Chocolate-Covered Almond Coconut Truffles: Add chopped almonds to the coconut mixture for a delightful crunch. Once coated in chocolate, sprinkle some crushed almonds on top for an extra nutty flavor.
- Matcha Coconut Truffles: For a unique twist, mix in a teaspoon of matcha powder into the coconut mixture. The vibrant green color and earthy flavor will surprise your taste buds!
- Spiced Coconut Truffles: Add a pinch of cinnamon or nutmeg to the coconut mixture for a warm, cozy flavor. It’s like a hug in a truffle!
- Fruit-Infused Coconut Truffles: Incorporate dried fruits like cranberries or apricots into the mixture. They add a chewy texture and a burst of sweetness that pairs beautifully with coconut.
These variations not only keep things exciting but also allow you to showcase your creativity in the kitchen. I often find myself experimenting with different flavors, and it’s always a joy to see how they turn out. So, don’t hesitate to try something new and make this coconut truffles recipe your own!
Cooking Notes for Coconut Truffles Recipe
As I’ve learned through my culinary adventures, a few cooking notes can make all the difference in achieving the perfect coconut truffles. Here are some insights I’ve gathered along the way:
- Chill Time: After forming the truffles, I recommend chilling them in the fridge for at least 30 minutes. This helps them firm up and makes them easier to coat in chocolate.
- Chocolate Melting: When melting chocolate, be patient! Stirring frequently and using short intervals in the microwave prevents burning. If you notice any lumps, just keep stirring until smooth.
- Storage: Store your coconut truffles in an airtight container in the fridge. They can last up to a week, but I doubt they’ll last that long—they’re just too delicious!
- Experiment with Coatings: While I love using semi-sweet chocolate, feel free to try white chocolate or dark chocolate for a different flavor profile. Each type brings its own unique twist!
These cooking notes are little gems I’ve picked up over time. They help ensure that my coconut truffles turn out perfectly every single time. So, keep these tips in mind as you embark on your own truffle-making journey!
Serving Suggestions for Coconut Truffles Recipe
Now that your coconut truffles are ready, it’s time to think about how to serve them! Presentation can elevate the experience, and I love getting creative with it. Here are some of my favorite serving suggestions that will surely impress your family and friends:
- On a Decorative Platter: Arrange the truffles on a beautiful platter, perhaps with a sprinkle of shredded coconut or cocoa powder around them. It adds a lovely touch and makes them look extra inviting.
- Gift Boxes: If you’re feeling generous, package the truffles in small gift boxes or mason jars. Tie them with a ribbon for a charming homemade gift that’s perfect for any occasion.
- With Fresh Fruit: Serve the truffles alongside fresh fruit like strawberries or raspberries. The tartness of the fruit complements the sweetness of the truffles beautifully.
- As a Dessert Table Feature: If you’re hosting a gathering, place the truffles on a dessert table with other treats. They’ll stand out and be a hit among your guests!
These serving suggestions not only enhance the visual appeal but also create a delightful experience for everyone. I always find that a little extra thought in presentation can make a simple treat feel like a special occasion. So, get creative and enjoy sharing your delicious coconut truffles!
Tips for Making Coconut Truffles Recipe
As I’ve whipped up countless batches of coconut truffles, I’ve gathered a treasure trove of tips that can help you achieve truffle perfection. Here are some of my favorite nuggets of wisdom to keep in mind:
- Use Fresh Ingredients: Always opt for fresh shredded coconut and high-quality chocolate. The flavor of your truffles will shine through when you use the best ingredients.
- Don’t Rush the Chilling: Patience is key! Allowing the truffles to chill properly helps them hold their shape and makes coating them in chocolate a breeze.
- Experiment with Flavors: Don’t be afraid to play around! Add spices, extracts, or even a splash of your favorite liqueur to the coconut mixture for a unique twist.
- Keep It Clean: If your hands get too sticky while forming the truffles, a quick rinse under cold water can help. Just dry them off before continuing!
- Make a Double Batch: Trust me, you’ll want more than one batch! These truffles disappear quickly, so making extra ensures you have some to share—or to keep all to yourself!
These tips have made my coconut truffle-making experience even more enjoyable. I hope they inspire you to create your own delicious treats with confidence. Happy cooking!
Breakdown of Time for Coconut Truffles Recipe
Now that we’ve covered all the delicious details, let’s talk about the time it takes to whip up these delightful coconut truffles. I know that time management in the kitchen can be a bit tricky, especially when you’re excited to indulge in something sweet. Here’s a quick breakdown to help you plan your truffle-making adventure:
- Prep Time: 15 minutes
- Chilling Time: 30 minutes
- Cooking Time: 10 minutes (for melting chocolate and coating)
- Total Time: 55 minutes
As you can see, making coconut truffles is a relatively quick process! The majority of the time is spent letting them chill, which gives you a perfect opportunity to tidy up the kitchen or enjoy a cup of tea while you wait. I often find that the anticipation makes the first bite even sweeter! So, gather your ingredients, and let’s get started on this delightful journey of coconut truffle creation!
Nutritional Information for Coconut Truffles Recipe
As a passionate home cook, I always find it helpful to know the nutritional content of the treats I make. While coconut truffles are a delightful indulgence, they can also be enjoyed in moderation as part of a balanced diet. Here’s a quick overview of the nutritional information for one coconut truffle, based on the ingredients listed:
- Calories: Approximately 100 calories
- Fat: 6 grams (mostly from coconut and chocolate)
- Carbohydrates: 10 grams
- Fiber: 1 gram
- Sugar: 7 grams
- Protein: 1 gram
Keep in mind that these values can vary based on the specific brands and types of ingredients you use. If you decide to add optional ingredients like nuts or dried fruits, the nutritional content will change accordingly. I always encourage enjoying these truffles as a treat, savoring each bite while being mindful of portion sizes. After all, a little sweetness can brighten up any day!
Frequently Asked Questions about Coconut Truffles Recipe
As I’ve shared my coconut truffles recipe with friends and family, I’ve noticed a few common questions pop up. It’s always great to clarify any doubts, especially when it comes to creating these delightful treats. Here are some frequently asked questions that I hope will help you on your coconut truffle journey!
Can I use sweetened shredded coconut instead of unsweetened?
Absolutely! While I prefer unsweetened shredded coconut for a more balanced flavor, using sweetened coconut will give your truffles an extra sweetness. Just keep in mind that you might want to adjust the amount of sweetened condensed milk to avoid making them too sweet.
How long do coconut truffles last?
When stored in an airtight container in the fridge, coconut truffles can last up to a week. However, I can almost guarantee they won’t last that long—they’re just too delicious to resist!
Can I freeze coconut truffles?
Yes, you can! Freezing coconut truffles is a great way to enjoy them later. Just place them in a single layer on a baking sheet until frozen, then transfer them to an airtight container. They can last for up to three months in the freezer. Just remember to let them thaw in the fridge before enjoying!
What can I use instead of chocolate chips for coating?
If you’re looking for alternatives, white chocolate or dark chocolate can work beautifully! You can also try using candy melts for a colorful twist. Just melt them the same way you would with chocolate chips, and you’ll have a fun coating for your truffles!
Can I make these truffles vegan?
Yes, you can! To make vegan coconut truffles, simply use dairy-free chocolate chips and substitute the sweetened condensed milk with a vegan alternative, like coconut cream or a homemade version using coconut milk and sugar. They’ll still be just as delicious!
These FAQs should help clear up any uncertainties you might have about making coconut truffles. I love sharing this recipe, and I hope you find joy in creating your own batch. If you have any other questions, feel free to reach out! Now, let’s wrap up our coconut truffle adventure with a sweet conclusion.
Conclusion on Coconut Truffles Recipe
As we wrap up our delightful journey into the world of coconut truffles, I can’t help but feel a sense of joy. This recipe is not just about creating a sweet treat; it’s about the memories we make while cooking and sharing with loved ones. The simplicity of the ingredients combined with the rich flavors makes these truffles a true crowd-pleaser.
What I love most is how versatile this coconut truffles recipe is. Whether you’re celebrating a special occasion or simply indulging in a cozy night at home, these truffles can be tailored to fit any mood. Plus, they’re a fantastic way to get creative in the kitchen! From adding nuts to experimenting with different coatings, the possibilities are endless.
So, gather your ingredients, roll up your sleeves, and let the magic happen. I hope you find as much joy in making and sharing these coconut truffles as I do. They’re not just a treat; they’re a little piece of happiness wrapped in chocolate and coconut. Happy cooking, and may your kitchen always be filled with love and sweetness!


