Sensory-Rich Introduction with Immediate Craving
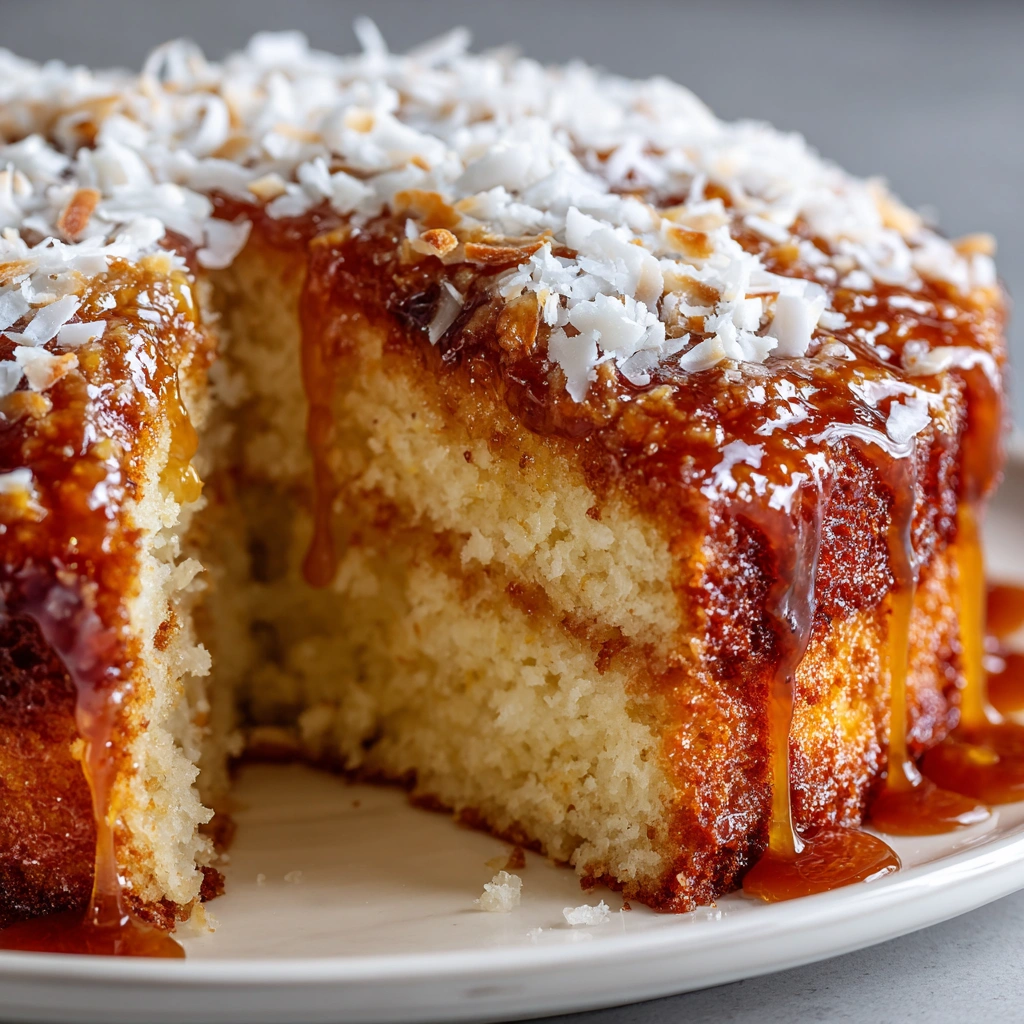
Imagine slicing into a Coconut Layer Cake, where each fluffy layer reveals a moist, tender crumb that practically melts in your mouth. The creamy frosting, rich with coconut flavor, envelops the cake like a soft cloud, while the toasted coconut topping adds a delightful crunch and a hint of nuttiness. The aroma wafting from the oven is intoxicating, a sweet promise of the tropical bliss that awaits.
This cake isn’t just a dessert; it’s a cherished family tradition that has graced our table for generations. I remember the first time I made it for my grandmother’s birthday. As I carefully layered the cake, I could hear her laughter echoing in the kitchen, a sound that always filled our home with warmth. When I presented the cake, her eyes sparkled with delight, and I knew I had created something special. It was more than just a cake; it was a vessel of love and memories.
Sharing this Coconut Layer Cake with loved ones during celebrations is a joy like no other. Whether it’s a birthday, a wedding, or a summer gathering, this cake brings people together, sparking laughter and stories over each slice. The smiles on faces as they take their first bite are priceless, and it’s moments like these that remind us of the power of food to create connections.
Perfect for any occasion, this cake is a showstopper that will elevate your dessert table. Whether you’re celebrating a milestone or simply indulging in a sweet treat on a sunny afternoon, the Coconut Layer Cake is sure to impress and satisfy. So, let’s dive into this delightful recipe and create some sweet memories together!
Why You’ll Love This Coconut Layer Cake
Let me tell you, this Coconut Layer Cake is not just a dessert; it’s an experience that tantalizes your taste buds and warms your heart. Here’s why you’ll fall head over heels for this delightful creation:
- Texture Contrast: The fluffy cake layers are like little clouds of joy, perfectly complemented by the creamy frosting that envelops them. Each bite offers a delightful mouthfeel, where the softness of the cake meets the lusciousness of the frosting, creating a symphony of textures that dance on your palate.
- Flavor Balance: The sweetness of the cake is beautifully balanced by the rich coconut flavor, with subtle hints of vanilla that elevate the overall taste. It’s a tropical paradise in every slice, where the flavors harmonize to create a blissful indulgence.
- Versatility: This cake is a true chameleon, suitable for any occasion. Whether you’re hosting a casual gathering, celebrating a milestone, or throwing a formal event, this Coconut Layer Cake will steal the show and leave your guests raving.
- Ease of Preparation: Don’t let the stunning appearance fool you! The steps to create this cake are simple and straightforward, making it accessible for bakers of all skill levels. Even if you’re a novice in the kitchen, you’ll find joy in the process of bringing this cake to life.
- Universal Appeal: Whether you’re a coconut enthusiast or someone who’s just dipping their toes into tropical flavors, this cake has something for everyone. Its delightful taste and beautiful presentation make it a crowd-pleaser that will have everyone coming back for seconds.
So, are you ready to embark on this delicious journey? Trust me, once you try this Coconut Layer Cake, it will become a beloved staple in your baking repertoire!
Essential Tools & Preparation Strategy
Before we dive into the baking process, let’s gather the essential tools that will make your Coconut Layer Cake a breeze to create. Having the right equipment not only streamlines your workflow but also ensures that your cake turns out perfectly every time. Here’s what you’ll need:
- Mixing Bowls: A set of various sizes will help you efficiently combine ingredients without any mess. I recommend using glass or stainless steel for durability.
- Electric Mixer: This is a game-changer for achieving a light and fluffy batter and frosting. Whether you opt for a stand mixer or a hand mixer, your arms will thank you!
- Measuring Cups and Spoons: Precision is key in baking, so make sure you have a reliable set for accurate ingredient measurements. Trust me, it makes a world of difference!
- Spatula: A good spatula is essential for folding in ingredients and spreading frosting evenly. I love using a silicone spatula for its flexibility and ease of cleaning.
- Wire Rack: This allows your cakes to cool evenly, preventing sogginess. It’s a simple tool that can make a big difference in the texture of your cake.
- 9-inch Round Cake Pans: The perfect size for even baking and stacking layers. Make sure they are of good quality to ensure your cakes rise beautifully.
- Serrated Knife: This is your best friend for leveling cake layers to ensure even stacking. A sharp knife will make the job much easier and cleaner.
- Parchment Paper: While optional, lining your pans with parchment paper can prevent sticking and make for a smoother cake release. It’s a small step that yields big results!
With these tools at your disposal, you’ll be well-equipped to tackle the Coconut Layer Cake with confidence. Remember, preparation is half the battle, so take a moment to gather everything before you start mixing and baking. Let’s get ready to create some magic in the kitchen!
Ingredients & Their Roles in This Coconut Layer Cake
Understanding the role of each ingredient in your Coconut Layer Cake is key to achieving that perfect balance of flavor and texture. Let’s break down the ingredients and see how they contribute to this delightful dessert:
Cake Ingredients:
- All-Purpose Flour: This is the backbone of your cake, providing structure and stability. It helps the cake rise and gives it that lovely crumb.
- Baking Powder: Acting as a leavening agent, baking powder ensures your cake has a light and airy texture. It’s the magic that makes your cake rise beautifully!
- Salt: A pinch of salt enhances the overall flavor balance, bringing out the sweetness of the cake and making every bite more delicious.
- Unsalted Butter: This ingredient adds richness and moisture, creating a tender crumb. The creamy texture of butter is essential for that melt-in-your-mouth experience.
- Granulated Sugar: Not only does sugar sweeten the cake, but it also contributes to its texture, helping to create that perfect moistness.
- Eggs: Eggs bind the ingredients together and add moisture, ensuring your cake has a rich and satisfying texture.
- Vanilla Extract: This adds depth of flavor, enhancing the overall taste of the cake and complementing the coconut beautifully.
- Coconut Milk: Infusing the cake with tropical flavor, coconut milk adds moisture and richness, making each bite a taste of paradise.
- Shredded Coconut: This ingredient not only enhances the coconut flavor but also adds delightful texture, giving your cake that signature coconut crunch.
Frosting Ingredients:
- Unsalted Butter: The base for a creamy frosting, unsalted butter provides a rich and smooth texture that spreads beautifully.
- Powdered Sugar: This sweetens and thickens the frosting, creating that luscious, spreadable consistency we all love.
- Coconut Milk: Adding creaminess and a hint of coconut flavor, coconut milk elevates the frosting to new heights of deliciousness.
- Vanilla Extract: Just like in the cake, vanilla extract enhances the overall flavor of the frosting, making it irresistible.
- Toasted Shredded Coconut: For garnish and added texture, toasted coconut brings a nutty flavor that perfectly complements the creamy frosting.
With these ingredients working together, your Coconut Layer Cake will not only look stunning but also taste absolutely divine. Each component plays a vital role in creating a dessert that’s sure to impress!
Step-by-Step Guide to Perfect Coconut Layer Cake
Now that you’re ready to dive into the world of baking, let’s get started on creating this Coconut Layer Cake that will have everyone asking for seconds! Follow these detailed steps, and I promise you’ll be rewarded with a cake that’s as beautiful as it is delicious.
- Preheat your oven to 350°F (175°C). This is crucial for ensuring your cake rises perfectly.
- Grease and flour three 9-inch round cake pans. This will help your cakes release easily after baking. I like to use a bit of parchment paper at the bottom for extra insurance!
- In a bowl, whisk together 2 ½ cups of all-purpose flour, 2 ½ teaspoons of baking powder, and ½ teaspoon of salt. This dry mix is the foundation of your cake.
- In a large mixing bowl, cream 1 cup of softened unsalted butter and 2 cups of granulated sugar until light and fluffy, about 5 minutes. The aroma of butter and sugar coming together is simply heavenly!
- Add 4 large eggs one at a time, mixing well after each addition. Then stir in 1 teaspoon of vanilla extract. This step adds richness and depth to your cake.
- Gradually add the dry ingredients to the butter mixture, alternating with 1 cup of coconut milk. Start and end with the flour mixture. This method keeps your batter light and fluffy.
- Fold in 1 cup of shredded coconut until evenly distributed. This will give your cake that delightful coconut texture.
- Divide the batter evenly among the prepared pans and smooth the tops with a spatula. It’s like giving your cake a little spa treatment!
- Bake for 25-30 minutes, or until a toothpick inserted in the center comes out clean. The smell of coconut wafting through your kitchen will be irresistible!
- Let the cakes cool in the pans for 10 minutes, then transfer to wire racks to cool completely. This step is essential to prevent sogginess.
- For the frosting, beat 1 cup of softened unsalted butter until creamy. Gradually add 4 cups of powdered sugar and ¼ cup of coconut milk until smooth and fluffy. The frosting should be light and spreadable, with a luscious coconut flavor.
- Once the cakes are cool, frost the top of one layer, add the second layer, and frost again. Repeat with the third layer and cover the entire cake with frosting. Don’t worry about perfection; a little rustic charm adds character!
- Top with toasted shredded coconut for garnish. This adds a beautiful texture and a nutty flavor that complements the cake perfectly.
And there you have it! A stunning Coconut Layer Cake that’s sure to impress. Remember, baking is as much about the journey as it is about the destination. Enjoy every moment!
Chef’s Notes & Pro Tips for Flawless Results
As you embark on your baking adventure with this Coconut Layer Cake, I want to share some invaluable tips that will help you achieve flawless results every time. Trust me, these little nuggets of wisdom can make a world of difference in your baking journey!
- Make-ahead instructions: If you’re planning for a special occasion, consider baking the cake a day in advance. Once cooled, store it in an airtight container in the refrigerator. This not only saves you time on the day of the event but also allows the flavors to meld beautifully, enhancing the overall taste.
- Storage: Leftover cake can be stored in the fridge for up to 5 days. Just make sure to keep it covered to maintain its moisture. If you find yourself with extra slices, you can also freeze them for a delightful treat later on!
- Equipment recommendations: For the best mixing results, I highly recommend using a stand mixer. It takes the hard work out of creaming butter and sugar, ensuring a light and fluffy batter. Plus, you can multitask while it does the mixing for you!
- Customization options: If you’re looking for a lighter version of the frosting, try substituting half of the butter with Greek yogurt. This not only reduces the fat content but also adds a lovely tang that complements the sweetness of the cake.
With these tips in your back pocket, you’ll be well on your way to creating a Coconut Layer Cake that’s not only delicious but also a true showstopper. Happy baking!
Avoid These Common Cooking Mistakes
Even the most seasoned bakers can run into a few hiccups when making a Coconut Layer Cake. To help you achieve that perfect, fluffy masterpiece, here are some common mistakes to avoid:
- Overmixing the batter: This is a classic pitfall that can lead to a dense cake. Remember, mix just until combined! You want to keep that light, airy texture that makes each bite melt in your mouth.
- Not measuring flour correctly: Too much flour can dry out your cake, leaving it crumbly instead of moist. Use the spoon and level method for accurate measurements—trust me, it makes a world of difference!
- Underbaking: A gooey center is not what we’re aiming for! Always check with a toothpick; it should come out clean or with a few moist crumbs attached. If it’s wet, give it a few more minutes in the oven.
- Using cold ingredients: Cold butter and eggs can hinder proper incorporation, leading to a less-than-ideal batter. Make sure your butter is softened and your eggs are at room temperature for the best results.
- Not cooling cakes completely before frosting: If you frost a warm cake, the frosting will melt and slide off. Allow your cakes to cool completely on a wire rack—patience is key here!
- Skipping the toasting of coconut: Toasting coconut adds depth of flavor and a delightful crunch. Always take the time to toast it; your taste buds will thank you!
- Not leveling the cake layers: Uneven layers can make stacking difficult and lead to a lopsided cake. Use a serrated knife to level your layers for a professional finish.
By keeping these tips in mind, you’ll be well on your way to creating a Coconut Layer Cake that’s not only beautiful but also delicious. Happy baking!
Creative Variations & Customizations
One of the best things about the Coconut Layer Cake is its versatility! You can easily customize this delightful dessert to suit your taste or the occasion. Here are some creative variations that will take your cake to the next level:
- Lemon Coconut Layer Cake: For a refreshing citrus twist, add the zest of one lemon to the batter. The bright, tangy flavor pairs beautifully with the coconut, creating a cake that’s both vibrant and delicious.
- Chocolate Coconut Layer Cake: If you’re a chocolate lover, this variation is for you! Simply incorporate ½ cup of unsweetened cocoa powder into the batter. The rich chocolate flavor combined with coconut will satisfy any sweet tooth.
- Gluten-Free Coconut Layer Cake: For those with gluten sensitivities, you can easily make this cake gluten-free by substituting all-purpose flour with a gluten-free blend. Just ensure that your baking powder is also gluten-free!
- Vegan Coconut Layer Cake: To create a vegan version, replace the eggs with flax eggs (1 tablespoon of ground flaxseed mixed with 2.5 tablespoons of water per egg) and use coconut oil instead of butter. This will give you a moist and delicious cake without any animal products.
- Seasonal Coconut Layer Cake: Embrace the flavors of the season by adding fresh berries or tropical fruits like mango or pineapple to the layers. Not only do they add a pop of color, but they also bring a refreshing taste that complements the coconut beautifully.
These variations allow you to put your own spin on the classic Coconut Layer Cake, making it a delightful treat for any occasion. So, don’t be afraid to experiment and let your creativity shine in the kitchen!
Perfect Pairings: What to Serve With Coconut Layer Cake
When it comes to enjoying your Coconut Layer Cake, the right accompaniments can elevate the experience to new heights. Here are some delightful pairings that will complement the cake’s tropical flavors and enhance your dessert experience:
- Vanilla Ice Cream: A classic pairing that enhances the cake’s sweetness and provides a creamy contrast to the fluffy layers. The cold ice cream melts into the cake, creating a delightful combination that’s hard to resist.
- Fresh Tropical Fruits: Think juicy pineapple or ripe mango. These fruits add a refreshing contrast to the rich coconut flavor, making each bite feel like a mini-vacation in the tropics.
- Coconut Sorbet: For a double coconut experience, serve your cake with a scoop of coconut sorbet. The light, icy texture complements the cake beautifully, making it a perfect summer treat.
- Coconut-Flavored Coffee: Pairing your cake with a cup of coconut-flavored coffee creates a cozy dessert experience. The warm, aromatic coffee enhances the cake’s flavors, making it a comforting choice for any occasion.
- Tropical Fruit Salad: A vibrant mix of seasonal fruits adds freshness and color to your dessert table. The natural sweetness of the fruits balances the richness of the cake, creating a harmonious dessert experience.
- Sweet Riesling Wine: This wine’s fruity notes enhance the cake’s sweetness and tropical flavors, making it a delightful pairing for celebrations or special occasions.
- Whipped Cream: A dollop of freshly whipped cream adds richness and creaminess, making each slice even more indulgent. It’s a simple yet effective way to elevate your cake.
- Chocolate Sauce: For those who love a decadent twist, drizzle some chocolate sauce over your cake. The rich chocolate contrasts beautifully with the coconut, creating a delightful flavor combination.
These pairings not only enhance the Coconut Layer Cake but also create a memorable dessert experience for you and your guests. So, gather your loved ones, serve up a slice, and enjoy the delightful flavors together!
Storage & Meal Prep Instructions
Once you’ve created your stunning Coconut Layer Cake, you might be wondering how to store it properly to maintain its deliciousness. Here are some handy tips for storage and meal prep that will keep your cake fresh and delightful for days to come:
- Fridge Storage: To keep your cake fresh, store it in an airtight container in the refrigerator. It will stay delicious for up to 5 days. Just make sure to cover it well to prevent it from drying out or absorbing any unwanted odors from the fridge.
- Freezer Storage: If you want to save some slices for later, wrap them tightly in plastic wrap and then in aluminum foil. This will protect the cake from freezer burn. Your Coconut Layer Cake can be frozen for up to 3 months, making it a perfect make-ahead dessert for special occasions!
- Reheating Methods: When you’re ready to enjoy your frozen cake, simply thaw it in the fridge overnight. For a warm treat, you can serve it at room temperature or warm it slightly in the microwave for about 10-15 seconds. Just be careful not to overheat it, as you want to preserve that lovely texture!
With these storage and meal prep instructions, you can enjoy your Coconut Layer Cake at your leisure, savoring each bite of its tropical goodness whenever the craving strikes. Happy baking and storing!
Nutrition Facts & Health Insights
Understanding the nutritional profile of your Coconut Layer Cake can help you enjoy it mindfully. Here’s a detailed breakdown of the nutrition facts, so you can indulge with confidence:
| Nutrient | Amount per Serving (1 slice, 1/12 of the cake) |
|---|---|
| Calories | 450 |
| Sugar | 35 grams |
| Sodium | 200 milligrams |
| Fat | 22 grams |
| Saturated Fat | 15 grams |
| Unsaturated Fat | 5 grams |
| Trans Fat | 0 grams |
| Carbohydrates | 60 grams |
| Fiber | 1 gram |
| Protein | 4 grams |
| Cholesterol | 80 milligrams |
Now, let’s talk about the health insights! Coconut, the star of this cake, is not just a delicious addition; it also brings along some health benefits. It provides healthy fats that can support heart health and fiber that aids digestion. While this Coconut Layer Cake is certainly a treat, enjoying it in moderation allows you to savor its rich flavors without compromising your health goals.
So, whether you’re celebrating a special occasion or simply indulging in a sweet moment, remember that this cake can be part of a balanced lifestyle. Enjoy every bite, and don’t forget to share the joy with loved ones!
Frequently Asked Questions
As you embark on your baking journey with the Coconut Layer Cake, you might have a few questions along the way. Here are some common queries and their answers to help you achieve the best results:
- Can I substitute coconut milk with regular milk?
Yes, you can substitute coconut milk with regular milk, but keep in mind that it will alter the flavor profile. Coconut milk adds a rich, tropical taste that enhances the cake’s overall flavor. If you want to maintain that coconut essence, consider using a coconut-flavored milk alternative. - How can I make the cake more moist?
To ensure your cake is extra moist, make sure not to overbake it. Additionally, you can add a tablespoon of sour cream or yogurt to the batter, which will enhance moisture and richness. Another tip is to brush the cake layers with a simple syrup (equal parts sugar and water) after baking. - What can I use instead of eggs for a vegan version?
For a vegan version, you can use flax eggs (1 tablespoon of ground flaxseed mixed with 2.5 tablespoons of water per egg) or unsweetened applesauce (1/4 cup per egg). Both options will help bind the ingredients while keeping the cake moist. - How do I prevent the cake from sticking to the pans?
To prevent sticking, make sure to grease and flour your cake pans thoroughly. You can also line the bottom of the pans with parchment paper for added protection. This ensures a smooth release after baking, leaving you with perfectly intact cake layers. - Can I use sweetened shredded coconut instead of unsweetened?
Yes, you can use sweetened shredded coconut, but be aware that it will increase the overall sweetness of the cake. If you prefer a less sweet cake, stick with unsweetened shredded coconut, which allows the natural flavors to shine through. - How long can I store the cake in the freezer?
You can store the Coconut Layer Cake in the freezer for up to 3 months. Just wrap the slices tightly in plastic wrap and then in aluminum foil to prevent freezer burn. When you’re ready to enjoy, simply thaw in the fridge overnight. - What’s the best way to level cake layers?
The best way to level cake layers is to use a serrated knife. Gently saw back and forth across the top of the cake to create an even surface. This will ensure that your layers stack neatly and create a beautiful presentation. - Can I make this cake in advance for a party?
Absolutely! You can bake the cake a day in advance and store it in an airtight container in the refrigerator. This not only saves you time on the day of the event but also allows the flavors to meld beautifully. - How do I troubleshoot a dense cake?
If your cake turns out dense, it could be due to overmixing the batter or using too much flour. Make sure to mix just until combined and use the spoon and level method for measuring flour. Also, ensure your baking powder is fresh, as expired leavening agents can affect the rise. - What are some other flavor combinations I can try?
The Coconut Layer Cake is versatile! You can try adding lemon zest for a citrus twist, incorporating cocoa powder for a chocolate version, or even mixing in fresh berries for a fruity touch. The possibilities are endless!
With these FAQs answered, you’re well-equipped to tackle your Coconut Layer Cake with confidence. Happy baking!
Final Inspiration & Kitchen Confidence
As you stand back and admire your beautiful Coconut Layer Cake, take a moment to celebrate your baking achievements! Each layer, each swirl of frosting, and every sprinkle of toasted coconut is a testament to your hard work and creativity. Baking is not just about the end result; it’s about the joy of creating something delicious that brings people together.
Remember, every baking experience is a learning opportunity. Whether your cake turned out perfectly or had a few hiccups along the way, each attempt is a chance to grow and improve your skills. Embrace the process, and don’t be afraid to experiment! After all, each cake you bake is a chance to share love and happiness with those around you.
So, I encourage you to dive into this delightful Coconut Layer Cake recipe with confidence. Try it out, share your results with friends and family, and enjoy the sweet moments that come from baking. Whether it’s a special occasion or just a cozy afternoon treat, this cake is sure to bring smiles and create lasting memories. Happy baking!
Print
Coconut Layer Cake: Indulge in Creamy Bliss Now!
- Total Time: 1 hour
- Yield: 12 servings 1x
- Diet: Vegetarian
Description
This Coconut Layer Cake is a heavenly delight, featuring layers of moist, fluffy cake infused with rich coconut flavor. Each bite melts in your mouth, complemented by a creamy coconut frosting that adds a luscious texture and a tropical sweetness.
Ingredients
- Cake:
- 2 1/2 cups all-purpose flour
- 2 1/2 tsp baking powder
- 1/2 tsp salt
- 1 cup unsalted butter, softened
- 2 cups granulated sugar
- 4 large eggs
- 1 tsp vanilla extract
- 1 cup coconut milk
- 1 cup shredded coconut
- Frosting:
- 1 cup unsalted butter, softened
- 4 cups powdered sugar
- 1/4 cup coconut milk
- 1 tsp vanilla extract
- 1 cup shredded coconut, toasted
Instructions
- Preheat your oven to 350°F (175°C).
- Grease and flour three 9-inch round cake pans.
- In a bowl, whisk together flour, baking powder, and salt.
- In a large mixing bowl, cream the butter and sugar until light and fluffy, about 5 minutes.
- Add eggs one at a time, mixing well after each addition, then stir in vanilla extract.
- Gradually add the dry ingredients to the butter mixture, alternating with coconut milk, starting and ending with the flour mixture.
- Fold in shredded coconut until evenly distributed.
- Divide the batter evenly among the prepared pans and smooth the tops.
- Bake for 25-30 minutes, or until a toothpick inserted in the center comes out clean.
- Let the cakes cool in the pans for 10 minutes, then transfer to wire racks to cool completely.
- For the frosting, beat the butter until creamy, then gradually add powdered sugar and coconut milk until smooth and fluffy.
- Once the cakes are cool, frost the top of one layer, add the second layer, and frost again. Repeat with the third layer and cover the entire cake with frosting.
- Top with toasted shredded coconut for garnish.
Notes
- This cake can be made a day in advance; store it in an airtight container in the refrigerator.
- Leftover cake can be stored in the fridge for up to 5 days.
- For a lighter version, substitute half of the butter in the frosting with Greek yogurt.
- Prep Time: 30 minutes
- Cook Time: 30 minutes
- Category: desserts
- Method: baking
- Cuisine: American
Nutrition
- Serving Size: 1 slice (1/12 of the cake)
- Calories: 450
- Sugar: 35 grams
- Sodium: 200 milligrams
- Fat: 22 grams
- Saturated Fat: 15 grams
- Unsaturated Fat: 5 grams
- Trans Fat: 0 grams
- Carbohydrates: 60 grams
- Fiber: 1 gram
- Protein: 4 grams
- Cholesterol: 80 milligrams
Keywords: Coconut Layer Cake, Coconut Cake, Tropical Dessert, Layer Cake, Creamy Frosting, Coconut Milk, Shredded Coconut, Baking, American Dessert, Moist Cake, Sweet Treat, Party Cake, Celebration Cake, Homemade Cake, Easy Cake Recipe