
Introduction to Classic Russian Potato Salad Recipe
Ah, the Classic Russian Potato Salad! Just the thought of it brings back a flood of memories from family gatherings and festive celebrations. I remember the first time I tasted this delightful dish at my grandmother’s house. The aroma of boiled potatoes mixed with fresh vegetables and a creamy dressing filled the air, making my mouth water in anticipation. It was a dish that brought everyone together, and I knew I had to learn how to make it myself.
This salad, known as “Olivier” in Russia, is more than just a recipe; it’s a tradition. Each bite is a burst of flavors and textures, from the soft potatoes to the crunchy pickles. It’s a dish that tells a story, one that has been passed down through generations. I love how it can be served at any occasion, whether it’s a holiday feast or a simple summer picnic. It’s versatile, comforting, and oh-so-satisfying!
As a passionate home cook, I find joy in sharing this recipe with friends and family. It’s not just about the ingredients; it’s about the love and care that goes into making it. I often find myself experimenting with different variations, but I always return to the classic version that holds a special place in my heart. So, grab your apron, and let’s dive into the world of this delicious Classic Russian Potato Salad Recipe!
Ingredients for Classic Russian Potato Salad Recipe
Gathering the right ingredients is the first step to creating a delicious Classic Russian Potato Salad. I always believe that quality matters, so I recommend sourcing fresh, organic vegetables whenever possible. Here’s what you’ll need:
Main Ingredients
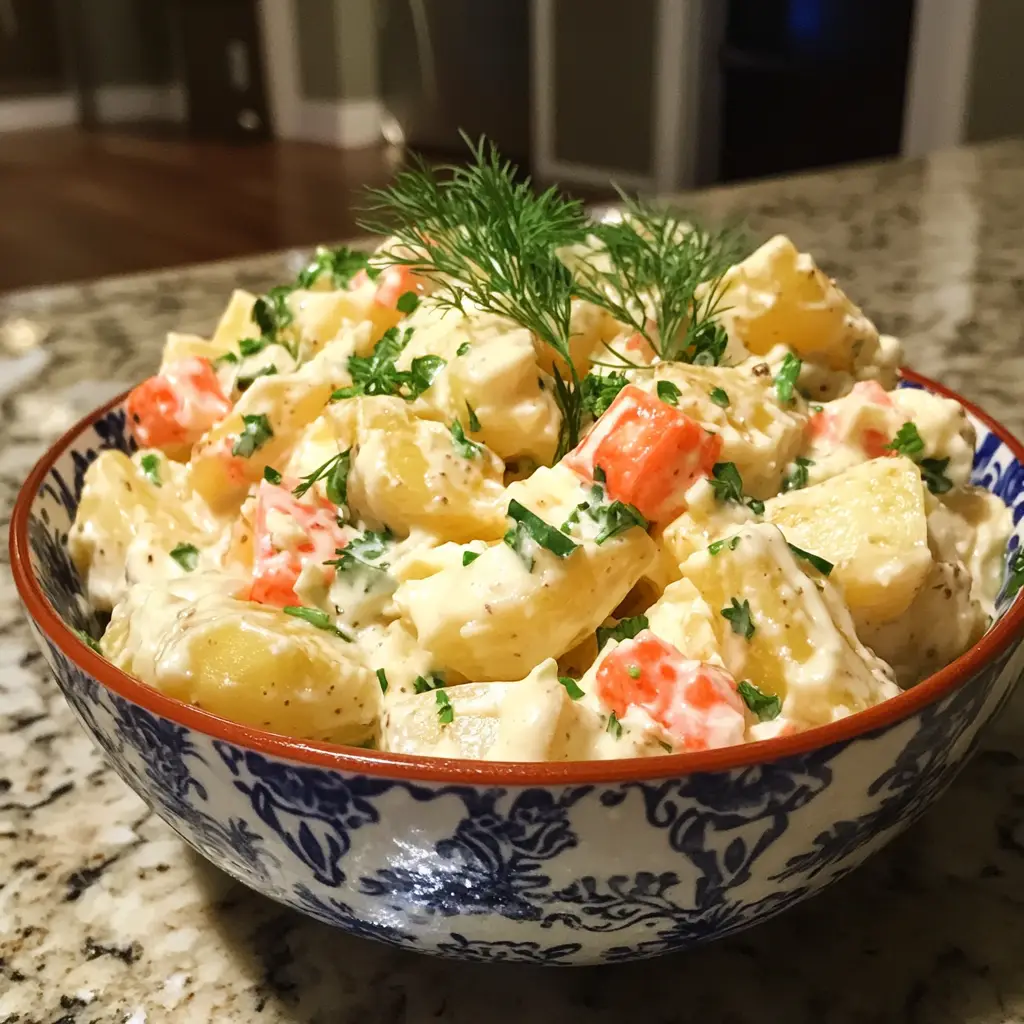
- 4 medium-sized potatoes (about 2 pounds), preferably Yukon Gold for their creamy texture
- 2 large carrots, peeled and diced
- 1 cup frozen peas, thawed (or fresh if you can find them)
- 4 large eggs, hard-boiled and chopped
- 1 cup dill pickles, finely chopped (I love using homemade pickles for an extra zing!)
- 1 small onion, finely chopped (red onions add a nice color)
- 1 cup mayonnaise (feel free to use a light version or Greek yogurt for a healthier twist)
- Salt and pepper to taste
- Fresh dill for garnish (optional, but it adds a lovely touch)
Optional Add-ons
While the classic version is delightful on its own, I enjoy adding a few optional ingredients to give it a personal flair. Here are some ideas:
- 1/2 cup cooked chicken or ham, diced (for a heartier salad)
- 1/4 cup capers, rinsed and chopped (for a briny kick)
- 1 tablespoon mustard (for a tangy flavor)
- 1/2 cup apple, diced (for a sweet crunch)
Feel free to mix and match these ingredients based on your taste preferences. The beauty of this salad is its adaptability! I often find myself experimenting with what I have on hand, and it always turns out delicious. Now that we have our ingredients ready, let’s move on to the preparation!
How to Prepare Classic Russian Potato Salad Recipe
Now that we have our ingredients ready, it’s time to roll up our sleeves and get cooking! Preparing the Classic Russian Potato Salad is a delightful journey filled with colorful vegetables and creamy goodness. Let’s break it down step by step.
Step 1: Boil the Potatoes
First things first, we need to boil the potatoes. I like to start with Yukon Gold potatoes because they have a buttery flavor and creamy texture. Here’s how to do it:
- Wash the potatoes thoroughly to remove any dirt.
- Place them in a large pot and cover with cold water. Add a pinch of salt to enhance the flavor.
- Bring the water to a boil over medium-high heat, then reduce to a simmer.
- Cook for about 15-20 minutes, or until a fork easily pierces through the potatoes.
- Drain the potatoes and let them cool before peeling and dicing.
Tips for Boiling Potatoes
To ensure perfectly boiled potatoes, I recommend checking them a few minutes before the timer goes off. Overcooked potatoes can turn mushy, which isn’t ideal for our salad. Also, peeling them after boiling makes the process much easier!
Step 2: Prepare the Vegetables
While the potatoes are cooling, it’s time to prepare the other vegetables. This is where the salad starts to come alive with color and crunch!
- Peel and dice the carrots into small cubes.
- If using fresh peas, blanch them in boiling water for about 2 minutes, then cool them in ice water.
- Finely chop the onion and pickles.
- Chop the hard-boiled eggs into small pieces.
Tips for Chopping Vegetables
When chopping, I like to keep my pieces uniform in size. This not only makes the salad look appealing but also ensures that every bite is balanced. A sharp knife is your best friend here—trust me, it makes the process much smoother!
Step 3: Mix the Ingredients
Now comes the fun part—mixing everything together! In a large mixing bowl, combine all the prepared ingredients:
- Add the diced potatoes, carrots, peas, onions, pickles, and eggs.
- Gently fold in the mayonnaise, ensuring everything is coated evenly.
- Season with salt and pepper to taste.
Tips for Mixing
Be gentle when mixing to avoid mashing the potatoes. I like to use a spatula for this, as it helps to keep the ingredients intact while blending them together. If you’re feeling adventurous, you can add a splash of lemon juice for a zesty kick!
Step 4: Chill the Salad
Once everything is mixed, it’s time to let the flavors meld together. Cover the bowl with plastic wrap and refrigerate for at least an hour. This chilling time is crucial for the best taste!
Tips for Chilling
Chilling not only enhances the flavors but also allows the salad to firm up a bit. If you can, let it chill overnight. The longer it sits, the better it gets! Just remember to give it a good stir before serving to redistribute the ingredients.
Equipment Needed for Classic Russian Potato Salad Recipe
Before we dive into the kitchen, let’s gather the essential tools for making this Classic Russian Potato Salad. Having the right equipment can make the cooking process smoother and more enjoyable. Here’s what you’ll need:
- Large Pot: A sturdy pot is essential for boiling the potatoes. If you don’t have a large one, a medium pot will work, but you may need to boil the potatoes in batches.
- Cutting Board: A good cutting board provides a safe surface for chopping your vegetables. I prefer a wooden one for its durability and ease of cleaning.
- Sharp Knife: A sharp knife is crucial for chopping vegetables and hard-boiled eggs. It makes the process quicker and safer.
- Mixing Bowl: A large mixing bowl is necessary for combining all the ingredients. If you don’t have one, any large bowl will do, even a salad bowl!
- Spatula: A spatula is perfect for gently mixing the salad without mashing the potatoes. If you don’t have one, a wooden spoon can work just as well.
- Plastic Wrap: This is handy for covering the salad while it chills in the fridge. If you prefer, you can use a lid if your mixing bowl has one.
With these tools in hand, you’re all set to create a delicious Classic Russian Potato Salad. Remember, cooking is all about improvisation, so feel free to use what you have available. Let’s keep the culinary adventure going!
Variations of Classic Russian Potato Salad Recipe
As much as I adore the traditional Classic Russian Potato Salad, I can’t help but experiment with different variations. Each twist brings a new flavor profile that can surprise and delight your taste buds! Here are a few of my favorite adaptations:
- Seafood Twist: For a coastal flair, try adding cooked shrimp or crab meat. The seafood adds a lovely brininess that pairs beautifully with the creamy dressing.
- Vegan Version: Swap out the mayonnaise for a plant-based alternative or a creamy avocado dressing. You can also add chickpeas for extra protein and texture.
- Spicy Kick: If you enjoy a bit of heat, toss in some diced jalapeños or a dash of hot sauce. It’s a fun way to spice things up!
- Herbed Delight: Experiment with fresh herbs like parsley, chives, or tarragon. They add a burst of freshness that brightens the salad.
These variations not only keep things interesting but also allow you to cater to different dietary preferences. I love how versatile this salad can be, making it a perfect dish for any gathering. So, don’t hesitate to get creative and make it your own!
Cooking Notes for Classic Russian Potato Salad Recipe
As I dive into the world of cooking, I’ve learned that a few simple notes can make a big difference in the outcome of a dish. Here are some cooking notes that I keep in mind when preparing my Classic Russian Potato Salad:
- Potato Choice: While Yukon Gold potatoes are my go-to, you can also use red potatoes for a firmer texture. Just remember to adjust the cooking time slightly, as different varieties may require more or less time to boil.
- Eggs: Hard-boiled eggs are a key ingredient, but I recommend using eggs that are a few days old. They peel more easily than fresh eggs, making your prep work smoother.
- Seasoning: Don’t be shy with the salt and pepper! Taste as you go, and adjust the seasoning to your liking. A little extra salt can really enhance the flavors.
- Chilling Time: If you’re short on time, even a quick 30-minute chill can help the flavors meld. However, I find that letting it sit overnight is the secret to achieving that perfect taste!
- Serving Temperature: This salad is best served cold, so make sure to keep it in the fridge until you’re ready to serve. It’s refreshing and perfect for warm days!
These cooking notes have become my little secrets to making the Classic Russian Potato Salad even more delightful. I hope they help you create a dish that’s not only delicious but also filled with love and care. Happy cooking!
Serving Suggestions for Classic Russian Potato Salad Recipe
When it comes to serving my Classic Russian Potato Salad, I love to get a little creative! This dish is not only a feast for the taste buds but also a visual delight. Here are some of my favorite serving suggestions that elevate the experience:
- Chilled Bowl: Serve the salad in a large, chilled bowl. The coolness enhances the refreshing flavors, making it perfect for hot summer days.
- Garnish with Fresh Herbs: A sprinkle of fresh dill or parsley on top adds a pop of color and a burst of flavor. It’s like a little green crown for your salad!
- Accompany with Bread: Pair the salad with crusty bread or soft dinner rolls. The bread is perfect for scooping up the creamy goodness.
- As a Side Dish: This salad shines as a side dish at barbecues, picnics, or holiday gatherings. It complements grilled meats beautifully, adding a creamy contrast to smoky flavors.
- Individual Servings: For a more elegant presentation, serve the salad in small cups or jars. It’s a fun way to make it feel special, especially for parties!
These serving suggestions not only enhance the visual appeal but also make the dining experience more enjoyable. I love how this Classic Russian Potato Salad can fit into any occasion, bringing people together around the table. So, whether it’s a casual family dinner or a festive celebration, this salad is sure to impress!
Tips for Making Classic Russian Potato Salad Recipe
As I’ve spent countless hours perfecting my Classic Russian Potato Salad, I’ve gathered a treasure trove of tips that can elevate your dish to new heights. Here are some of my favorite nuggets of wisdom to ensure your salad turns out perfectly every time:
- Use Starchy Potatoes: Opt for starchy potatoes like Yukon Gold or Russets. They hold their shape well and create a creamy texture that’s simply irresistible.
- Cool Ingredients: Allow your boiled potatoes and vegetables to cool completely before mixing. This prevents the mayonnaise from becoming runny and keeps the salad nice and thick.
- Season Gradually: Taste as you go! Start with a little salt and pepper, then adjust to your liking. This way, you can find that perfect balance of flavors.
- Experiment with Textures: Don’t be afraid to play with the crunch factor! Adding ingredients like celery or bell peppers can give your salad an extra layer of texture.
- Let It Rest: If you can, let the salad sit in the fridge for a few hours or overnight. This resting time allows the flavors to meld beautifully, making each bite even more delicious.
These tips have become my secret weapons in the kitchen, helping me create a Classic Russian Potato Salad that’s always a hit. I hope they inspire you to make your own version that’s bursting with flavor and love!
Breakdown of Time for Classic Russian Potato Salad Recipe
When it comes to preparing my Classic Russian Potato Salad, I always like to keep track of the time. Knowing how long each step takes helps me plan better, especially when I’m cooking for a gathering. Here’s a quick breakdown of the time involved:
- Prep Time: Approximately 20 minutes. This includes washing, peeling, and chopping all the vegetables and hard-boiled eggs. I find that having everything prepped and ready makes the cooking process much smoother.
- Cooking Time: About 20-25 minutes. This is mainly for boiling the potatoes and any other vegetables you choose to cook. Keep an eye on the potatoes to ensure they don’t overcook!
- Chilling Time: At least 1 hour. This is crucial for allowing the flavors to meld together. If you have the time, letting it chill overnight is even better!
Total Time: Roughly 1 hour and 45 minutes, including prep, cooking, and chilling. This makes it a perfect dish to prepare ahead of time, allowing you to enjoy the company of your guests without being stuck in the kitchen.
With this time breakdown, you can easily fit the Classic Russian Potato Salad into your cooking schedule. I love how this dish can be made in advance, giving you more time to relax and enjoy the festivities!
Nutritional Information for Classic Russian Potato Salad Recipe
As a passionate home cook, I always pay attention to the nutritional value of the dishes I prepare. The Classic Russian Potato Salad is not only delicious but also packed with nutrients. Here’s a quick overview of the nutritional information per serving (approximately 1 cup):
- Calories: 250-300 calories
- Protein: 6-8 grams
- Carbohydrates: 30-35 grams
- Fat: 12-15 grams (depending on the mayonnaise used)
- Fiber: 3-4 grams
- Sodium: 400-600 mg (varies based on added salt and pickles)
This salad is a great source of vitamins and minerals, thanks to the fresh vegetables and eggs. Potatoes provide potassium, while carrots add a boost of vitamin A. The peas contribute fiber and protein, making this dish a well-rounded option for any meal. If you’re looking to lighten it up, consider using Greek yogurt instead of mayonnaise, which can reduce the calorie and fat content while still keeping it creamy.
Enjoying this Classic Russian Potato Salad not only satisfies your taste buds but also nourishes your body. It’s a delightful way to bring flavor and nutrition to your table!
Frequently Asked Questions about Classic Russian Potato Salad Recipe
As I’ve shared my love for the Classic Russian Potato Salad, I often get questions from friends and family eager to try their hand at this delightful dish. Here are some of the most frequently asked questions, along with my answers to help you navigate your culinary adventure:
Can I make Classic Russian Potato Salad ahead of time?
Absolutely! In fact, I recommend making it a day in advance. The flavors meld beautifully when it sits in the fridge overnight. Just remember to give it a good stir before serving to redistribute the ingredients!
What type of potatoes are best for this salad?
I love using Yukon Gold potatoes for their creamy texture and buttery flavor. However, you can also use red potatoes or Russets. Just keep in mind that different varieties may require slight adjustments in cooking time.
Can I substitute mayonnaise for a healthier option?
Yes! If you’re looking to lighten things up, Greek yogurt is a fantastic substitute. It adds creaminess while reducing calories and fat. You can also try avocado for a unique twist!
Is it possible to make this salad vegan?
Definitely! To make a vegan version, simply replace the mayonnaise with a plant-based alternative. You can also add chickpeas for extra protein and texture. It’s a delicious way to enjoy the salad without any animal products!
What can I serve with Classic Russian Potato Salad?
This salad pairs wonderfully with grilled meats, sandwiches, or as part of a buffet spread. I often serve it alongside crusty bread or soft dinner rolls. It’s a versatile dish that complements many meals!
How long can I store leftovers?
Leftovers can be stored in an airtight container in the fridge for up to 3-4 days. Just be sure to give it a good stir before serving again, as the ingredients may settle. If it seems a bit dry, you can add a touch more mayonnaise or yogurt to refresh it!
These questions reflect the curiosity and excitement that come with making the Classic Russian Potato Salad. I hope my answers help you feel more confident in your cooking journey. Remember, cooking is all about experimenting and having fun, so don’t hesitate to make this recipe your own!
Conclusion on Classic Russian Potato Salad Recipe
As I reflect on my journey with the Classic Russian Potato Salad, I can’t help but smile at the joy it brings to my table. This dish is more than just a recipe; it’s a celebration of flavors, memories, and togetherness. Each bite is a reminder of family gatherings, laughter, and the love that goes into cooking.
The beauty of this salad lies in its versatility. Whether you stick to the classic ingredients or add your own twist, it’s a dish that can adapt to any occasion. From summer picnics to holiday feasts, the Classic Russian Potato Salad is always a crowd-pleaser. Plus, it’s packed with nutrients, making it a wholesome choice for any meal.
So, whether you’re a seasoned cook or just starting your culinary adventure, I encourage you to give this recipe a try. Embrace the process, enjoy the flavors, and share it with those you love. After all, cooking is about creating connections, and this salad is the perfect way to do just that. Happy cooking!


