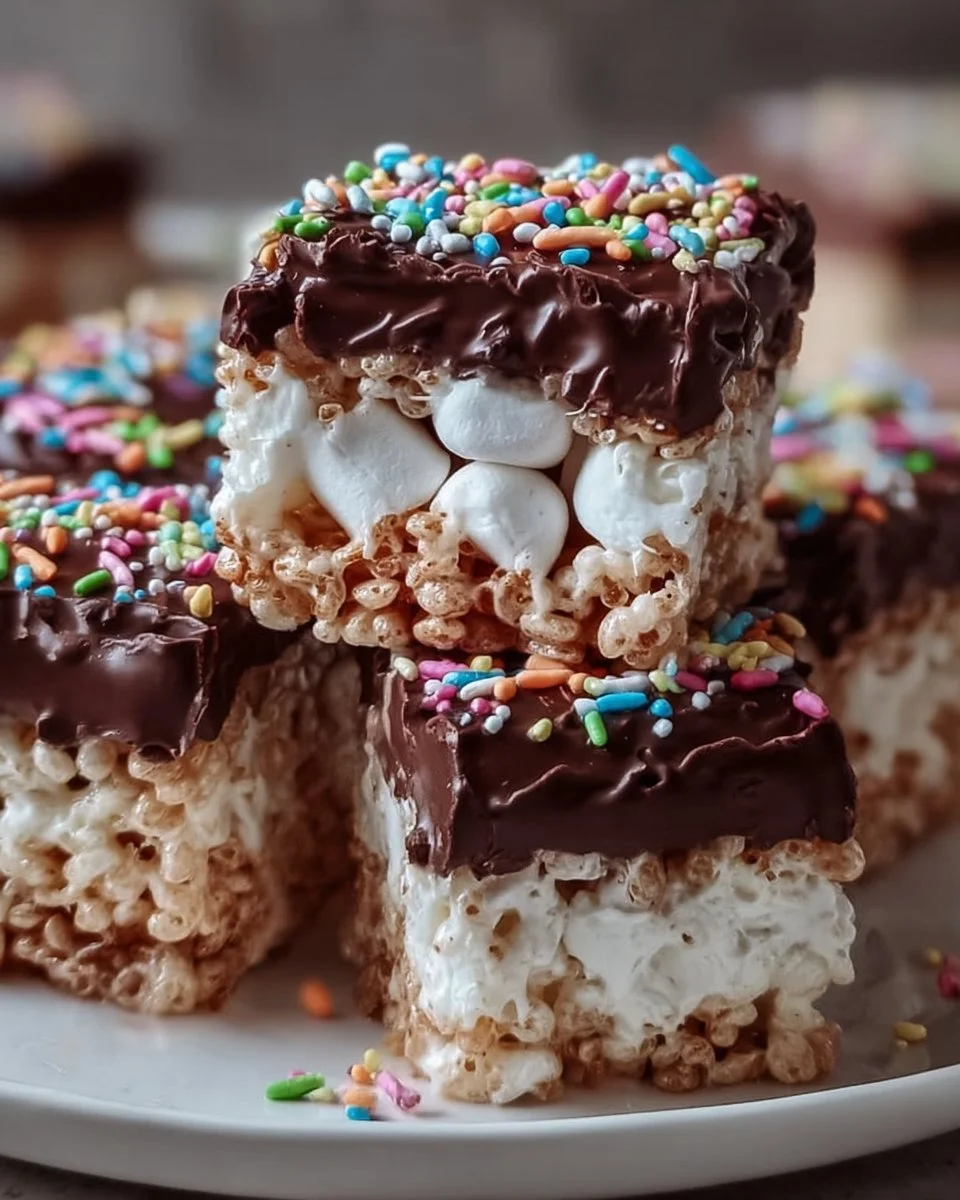
There’s something irresistibly nostalgic about the sweet aroma of marshmallows melting in the kitchen, intertwining with the crisp note of delightful Rice Krispies. The moment you sink your teeth into these Chocolate Covered Rice Krispies, a wave of childhood joy washes over you. Each crispy bite envelops your senses, contrasting the crunch of the cereal with the smooth and velvety chocolate coating. As the sweet taste dances on your palate, you experience a satisfying explosion of textures, where the rich chocolate envelopes the crispy clusters, creating the perfect harmony of crunch and creaminess.
Imagine sharing these treats with loved ones on a sunny afternoon, enjoying laughter and the warm feeling of home as you indulge in this delightful confection. Whether it’s an afternoon pick-me-up, a dessert at a family gathering, or a sweet gesture for friends, each square is more than just a snack; it serves as a bridge connecting you to cherished memories and new experiences alike. They boast versatility, easily transforming from a playful treat for kids to an elevated dessert for adults with just a sprinkle of creativity.
Why You’ll Love This Chocolate Covered Rice Krispy
The magic of Chocolate Covered Rice Krispies lies not just in their heavenly taste but in their wonderful simplicity. With just a handful of ingredients, you can whip up a batch of these delightful squares that will have everyone around you clamoring for more. Every bite strikes a perfect balance – the chocolate layer provides a deep flavor that complements the airy crunch of the Rice Krispies, creating an explosion of taste as it melts in your mouth.
These treats are the epitome of celebration, ideal for birthdays, holidays, or simply as a sweet surprise on a Tuesday afternoon. Their vibrant look adorned with sprinkles instantly brightens any gathering, making them a favorite among both kids and adults. The best part? You can easily customize them with different toppings or flavors, ensuring that they can be tailored to any occasion or preference.
Preparation Phase & Tools to Use
Before diving into the delightful world of Chocolate Covered Rice Krispies, let’s ensure you’re equipped for success. Here’s a list of essential tools that will make your cooking experience seamless and enjoyable:
- Large Saucepan: A sturdy saucepan is essential for melting the butter and marshmallows smoothly, preventing any sticking or burning.
- Spatula: A high-quality spatula helps to fold in the Rice Krispies evenly, ensuring every piece gets coated in that magical marshmallow mixture.
- Baking Pan: An 8×8-inch or 9×9-inch square baking pan serves as the perfect vessel for your treats, giving them structure as they set.
- Microwave-Safe Bowl: This is necessary for melting the chocolate – choose a bowl that is both deep and wide to make mixing easier.
- Parchment Paper (optional): Lining the pan with parchment paper can help you lift out the treats easily once set.
Practical Preparation Tips
- Greasing: Don’t skimp on greasing the pan with butter to prevent the treats from sticking.
- Constant Stirring: Stir the butter and marshmallows constantly while melting to avoid burning and to achieve a silky-smooth texture.
- Cooling Time: Be patient during the cooling phase; it’s crucial to let the Rice Krispies cool before adding the chocolate to maintain that decadent coating.
Ingredients for Chocolate Covered Rice Krispies
Gathering your ingredients is as simple as deciding to indulge in this treat yourself. Here’s what you’ll need:
- 6 tablespoons unsalted butter: This is the rich foundation that starts the melting magic.
- 1 package (10 ounces) mini marshmallows: These provide the sweetness and stickiness that bind everything together.
- 6 cups Rice Krispies cereal: The star ingredient that introduces a delightful crispness and playful texture.
- 1/4 teaspoon fine sea salt (optional): A hint of salt elevates the flavors beautifully.
- 1 1/2 cups semisweet or dark chocolate chips: The luscious chocolate layer that blankets the square, rich and decadent.
- 1 teaspoon vegetable oil or coconut oil: This helps achieve a silky consistency for the melted chocolate.
- 2 tablespoons rainbow sprinkles or chopped nuts (optional): A fun touch to personalize your treats; add a pop of color or a crunchier bite.
Key Ingredients and Possible Substitutions
- Butter: If you prefer a non-dairy option, consider using coconut butter for a hint of tropical flavor.
- Marshmallows: Vegan marshmallows work beautifully to keep the treats plant-based.
- Rice Krispies: You can substitute with a similar puffed cereal if you’re looking for a gluten-free alternative.
- Chocolate Chips: Experiment with white chocolate or flavored chips for a unique twist.
How to Make Chocolate Covered Rice Krispies
Creating your own Chocolate Covered Rice Krispies is just a few simple steps away. Let’s embark on this sweet journey together!
Prepare the Pan
Begin by lightly greasing an 8×8-inch or 9×9-inch square baking pan with butter. This will ensure that when you’re ready to cut your treats, they’ll slide out effortlessly.
Melt the Butter
In a large saucepan over low heat, melt the butter while stirring constantly to prevent it from browning. The gentle heat helps dissolve the butter evenly, allowing it to work its magic.
Add Marshmallows
Once melted, add the mini marshmallows to your butter. Stir continuously until they become completely melted and smooth, forming a gooey mixture. The enchanting aroma of marshmallows wafting through your kitchen will tantalize your senses.
Season the Mixture
Remove the saucepan from heat and, if desired, incorporate the fine sea salt. This little sprinkle ramps up the flavor, enhancing the sweetness of your delightful concoction.
Incorporate Cereal
Now it’s time to gently fold in the Rice Krispies cereal using a spatula. Take your time here; ensure each Rice Krispie gets coated in that gooey marshmallow mixture without crushing them.
Press into Pan
Transfer this luscious mixture to your greased baking pan. Using a buttered spatula or your clean hands, evenly and firmly press it into the pan, creating a solid base for your chocolate layer.
Cool the Base
Let the mixture sit at room temperature for about 10 minutes to cool slightly before pouring on the chocolate layer. This patience will yield delightful results and prevent the chocolate from melting away the marshmallow layer.
Melt Chocolate
In a microwave-safe bowl, combine the chocolate chips with vegetable oil. Microwave on medium power in 30-second intervals, stirring after each, until the chocolate is melted and glossy. This will create a perfect coating that glistens with anticipation.
Spread Chocolate Layer
Pour the melted chocolate over your cooled Rice Krispy layer, spreading it evenly with an offset spatula or the back of a spoon. The warm chocolate will start melting into the mixture, creating a decadent bond.
Add Garnish
Immediately sprinkle your optional rainbow sprinkles or chopped nuts on top of the melted chocolate. This not only adds a cheerful pop of color but also a delightful crunch.
Set the Treats
Allow the treats to set at room temperature for at least 1 hour, or refrigerate for 20-30 minutes until the chocolate is firm. During this time, the anticipation will build, promising an indulgent experience.
Cut into Bars
Once set, gently lift the block from the pan using the parchment overhang (if used), or invert it onto a cutting board. With a sharp knife, cut into 12-16 bars, reveling in the looks of satisfaction as you unveil your creations.
Chef’s Notes & Helpful Tips
- Make-Ahead Tips: Feel free to make these treats a day in advance. They hold their shape and taste wonderfully, allowing you to enjoy them during busy days.
- Cooking Alternatives: If you prefer, you could use an air fryer to give these treats a slight crisp on the outside. Just ensure the temperature is lowered to prevent burning.
- Customization Ideas: Experiment with flavoring your chocolate with peppermint extract for a seasonal touch, or incorporate crushed candy canes or toffee bits for an added crunch.
Common Mistakes to Avoid
Every great cook learns from their missteps. Here are some common mistakes and how to avoid them:
- Overheating the Butter: Melting too quickly can lead to burnt butter, impacting taste. Always use low heat, stirring constantly.
- Skipping the Cooling Step: If the Rice Krispies mixture is too warm when adding the chocolate, it can melt, losing its distinctive layers. Be patient—allow it to cool slightly!
- Not Using Enough Grease: If you forget to grease the pan, you risk tearing your treats when trying to lift them out. Always liberally grease, or use parchment paper for an easier release.
- Cutting Too Soon: Patience is your ally! Cutting before the chocolate fully sets leads to messy, uneven bars. Give the treats the time they need to firm up.
What to Serve With Chocolate Covered Rice Krispies
These irresistible treats shine on their own, but pairing them with other snacks can elevate your experience. Consider these delightful accompaniments:
- A Glass of Cold Milk: There’s nothing quite like the classic pairing of milk with a sweet treat. The coolness and creaminess balances the rich chocolate perfectly.
- Coffee or Espresso: The deep notes of coffee contrast beautifully with the sweetness of the bars, making for a sophisticated afternoon treat.
- Fruit Salad: A vibrant mix of fresh fruit adds a refreshing touch that balances out the sweetness of the Rice Krispies.
- Ice Cream: Serve these treats atop a scoop of vanilla or chocolate ice cream for a fun twist, creating an indulgent dessert adventure.
- Hot Chocolate: For a cozy winter evening, pair these treats with a steaming mug of hot chocolate for an extra cocoa delight.
- Charcuterie Board: Incorporate these squares on a dessert charcuterie board alongside assorted cheeses and dried fruits for a fantastic gathering centerpiece.
Storage & Reheating Instructions
Proper storage ensures your Chocolate Covered Rice Krispies remain as delectable as when you first made them:
- Fridge: Store the bars in an airtight container in the fridge where they can last up to a week. The cool environment keeps the chocolate from melting whilst preserving texture.
- Freezer: For longer storage, wrap the bars individually in plastic wrap and store them in a freezer-safe container for up to 3 months. To enjoy, simply thaw at room temperature or heat in the microwave for a few seconds.
- Reheating: If you prefer a warm treat, pop them in the microwave for about 10-15 seconds, just enough to soften the chocolate without making them mushy.
Estimated Nutrition Information
Each serving (assuming 16 bars) contains approximately:
- Calories: 150
- Protein: 1g
- Carbohydrates: 23g
- Dietary Fiber: 0.5g
- Total Fat: 7g
- Saturated Fat: 4.5g
- Sugars: 10g
Note: Nutritional values may vary based on specific ingredient brands and quantities used.
FAQs
1. Can I use gluten-free Rice Krispies?
Absolutely! Many brands offer gluten-free alternatives, making this a perfect treat for those with gluten sensitivities.
2. How can I make these treats vegan?
Simply substitute the marshmallows with vegan marshmallows and use coconut oil instead of butter. You’ll achieve the same delicious end result without the animal products.
3. What variations can I try?
Endless possibilities exist—from adding peanut butter to the marshmallow mixture for a nutty twist to swirling in flavored melted chocolate like mint or orange. Get creative!
4. How should I store leftover treats?
Keep them in an airtight container at room temperature if you plan to eat them within a week. For longer storage, wrap them individually and place them in the freezer.
5. Can I use different types of chocolate?
Absolutely! Feel free to experiment with milk chocolate, white chocolate, or even dark chocolate for a richer flavor. Each will bring a unique sweetness to the bars.
Conclusion
In the world of sweet delights, Chocolate Covered Rice Krispies hold a special place, blending nostalgia, simplicity, and a delightful crunch. With their perfect marriage of textures and flavors, these treats invite you to roll up your sleeves and create something magical. Whether you savor them solo or share the joy with loved ones, each bar promises a delightful experience that warms the heart. So, gather your ingredients, spread a little love through your kitchen, and enjoy a treat that truly embodies the spirit of happiness!
Print
Chocolate Covered Rice Krispies
- Total Time: 25 minutes
- Yield: 16 servings 1x
- Diet: Vegetarian
Description
Indulge in the nostalgic flavors of Chocolate Covered Rice Krispies, combining crispy cereal with a rich chocolate layer.
Ingredients
- 6 tablespoons unsalted butter
- 1 package (10 ounces) mini marshmallows
- 6 cups Rice Krispies cereal
- 1/4 teaspoon fine sea salt (optional)
- 1 1/2 cups semisweet or dark chocolate chips
- 1 teaspoon vegetable oil or coconut oil
- 2 tablespoons rainbow sprinkles or chopped nuts (optional)
Instructions
- Lightly grease an 8×8-inch or 9×9-inch square baking pan with butter.
- In a large saucepan over low heat, melt the butter while stirring constantly.
- Add mini marshmallows and stir until completely melted and smooth.
- Remove from heat and incorporate sea salt if desired.
- Gently fold in the Rice Krispies cereal using a spatula.
- Transfer the mixture to the greased baking pan and press evenly into the pan.
- Let the mixture cool at room temperature for about 10 minutes.
- In a microwave-safe bowl, combine chocolate chips and vegetable oil. Microwave in 30-second intervals until melted and glossy.
- Pour the melted chocolate over the cooled Rice Krispy layer and spread evenly.
- Immediately sprinkle optional toppings on top.
- Allow to set at room temperature for at least 1 hour or refrigerate for 20-30 minutes.
- Once set, cut into 12-16 bars and enjoy.
Notes
Best stored in an airtight container in the fridge to maintain freshness. Can be made a day in advance.
- Prep Time: 15 minutes
- Cook Time: 10 minutes
- Category: Dessert
- Method: No-Bake
- Cuisine: American
Nutrition
- Serving Size: 1 bar
- Calories: 150
- Sugar: 10g
- Sodium: 50mg
- Fat: 7g
- Saturated Fat: 4.5g
- Unsaturated Fat: 2.5g
- Trans Fat: 0g
- Carbohydrates: 23g
- Fiber: 0.5g
- Protein: 1g
- Cholesterol: 15mg
Keywords: chocolate, rice krispies, dessert, treats, no-bake