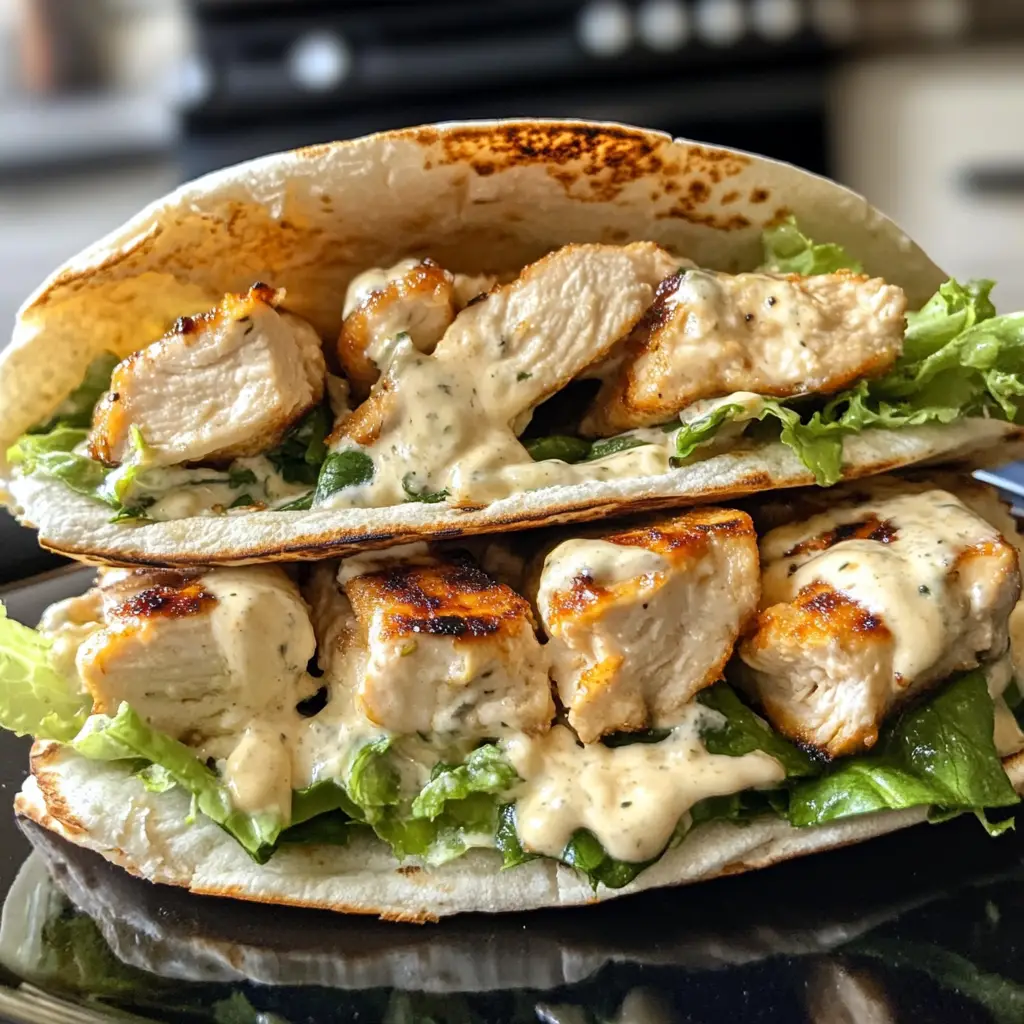
Introduction to Chicken Caesar Pita
As a passionate home cook, I find joy in creating meals that are not only delicious but also easy to prepare. One of my all-time favorites is the Chicken Caesar Pita. This dish is a delightful twist on the classic Caesar salad, wrapped up in a warm, fluffy pita. It’s like a hug for your taste buds! I remember the first time I made it; I was hosting a casual get-together with friends. I wanted something that was both fun and satisfying, and this recipe was a hit!
The beauty of the Chicken Caesar Pita lies in its simplicity. It combines tender, juicy chicken with the creamy, tangy flavors of Caesar dressing, all nestled in a soft pita pocket. It’s perfect for lunch, dinner, or even a quick snack. Plus, it’s a fantastic way to sneak in some greens without anyone noticing! I often find myself experimenting with different ingredients, making it a versatile dish that can adapt to whatever I have on hand.
What I love most about this recipe is how it brings people together. Whether you’re enjoying it at a picnic, a family dinner, or a cozy night in, the Chicken Caesar Pita is sure to spark joy and conversation. So, roll up your sleeves and let’s dive into this culinary adventure together. I promise you’ll want to make this again and again!
Ingredients for Chicken Caesar Pita
Before we embark on our Chicken Caesar Pita journey, let’s gather all the ingredients. Having everything ready makes the cooking process smoother and more enjoyable. Here’s what you’ll need:
Main Ingredients
- 2 cups cooked chicken breast, shredded or diced (I love using rotisserie chicken for its flavor and convenience!)
- 1/2 cup Caesar dressing (homemade or store-bought; I often whip up my own for that fresh taste)
- 1 cup romaine lettuce, chopped (crisp and crunchy, it adds a refreshing touch)
- 1/4 cup grated Parmesan cheese (the more, the merrier, I say!)
- 4 whole wheat or regular pita pockets (soft and warm, they cradle all the goodness inside)
Optional Add-ons
One of the things I adore about the Chicken Caesar Pita is its flexibility. You can easily customize it to suit your taste or what you have on hand. Here are some optional add-ons:
- Cherry tomatoes, halved (for a burst of sweetness)
- Avocado slices (creamy and rich, they elevate the dish)
- Bacon bits (for that smoky crunch)
- Croutons (for extra texture; I sometimes crush them and sprinkle them in!)
- Fresh herbs like parsley or basil (a sprinkle adds a lovely aroma)
When selecting your ingredients, I recommend going for high-quality chicken and fresh produce. It truly makes a difference in flavor. If you can, try to source organic or locally grown items. They not only taste better but also support your community. Now that we have our ingredients ready, let’s move on to the fun part—preparing our Chicken Caesar Pita!
How to Prepare Chicken Caesar Pita
Now that we have all our ingredients lined up like eager little soldiers, it’s time to dive into the preparation! I find that breaking it down into steps makes the process feel less daunting and more enjoyable. Let’s get started!
Step 1: Prepare the Chicken
First things first, we need to get our chicken ready. If you’re using rotisserie chicken, simply shred or dice it into bite-sized pieces. If you’re cooking chicken from scratch, here’s how I do it:
- Season the chicken breasts with salt, pepper, and a sprinkle of garlic powder for extra flavor.
- Heat a skillet over medium heat and add a drizzle of olive oil.
- Cook the chicken for about 6-7 minutes on each side, or until it’s golden brown and cooked through.
- Let it rest for a few minutes before shredding or dicing.
Tips for Cooking Chicken
To keep your chicken juicy, avoid overcooking it. I like to use a meat thermometer to check for doneness; 165°F is the magic number! If you have leftover chicken, this is a great way to use it up. Just make sure it’s shredded or diced before adding it to the pita.
Step 2: Make the Caesar Dressing
Next up is the star of the show—the Caesar dressing! If you’re using store-bought, feel free to skip this step. But if you want to make your own, here’s a simple recipe:
- In a bowl, combine 1/2 cup mayonnaise, 2 tablespoons lemon juice, 1 teaspoon Dijon mustard, 1 clove minced garlic, and a pinch of salt and pepper.
- Whisk everything together until it’s smooth and creamy.
- For an extra kick, add a few dashes of Worcestershire sauce and a sprinkle of Parmesan cheese.
Tips for Dressing Consistency
If your dressing is too thick, add a splash of water or extra lemon juice to thin it out. I love a dressing that clings to the chicken and lettuce without being too runny. Taste as you go; it’s all about finding that perfect balance!
Step 3: Assemble the Pita
Now comes the fun part—putting it all together! Grab your pita pockets and let’s fill them up:
- Start by spreading a generous amount of Caesar dressing inside each pita.
- Add a handful of chopped romaine lettuce, followed by the chicken.
- Sprinkle with grated Parmesan cheese and any optional add-ons you desire.
- Drizzle a little more dressing on top for good measure!
Tips for Filling the Pita
Don’t be shy with the fillings! I like to pack mine full, so every bite is bursting with flavor. If you find it hard to close the pita, you can always serve it open-faced. It’s just as delicious and looks great on a plate!
Equipment Needed for Chicken Caesar Pita
Before we dive into the kitchen, let’s make sure we have the right tools at our disposal. Having the right equipment can make the cooking process smoother and more enjoyable. Here’s what you’ll need for our Chicken Caesar Pita:
- Cutting Board: A sturdy cutting board is essential for chopping your chicken and veggies. If you don’t have one, a clean countertop will do in a pinch!
- Sharp Knife: A good knife is key for slicing and dicing. It makes prep work quick and easy. If you’re not comfortable with a knife, kitchen scissors can be a handy alternative for cutting chicken.
- Mixing Bowl: You’ll need a bowl for mixing your Caesar dressing. A medium-sized bowl works perfectly. If you don’t have one, any large container will suffice.
- Whisk or Fork: For blending your dressing ingredients, a whisk is ideal. But if you don’t have one, a fork can do the trick just as well!
- Skillet or Grill Pan: If you’re cooking chicken from scratch, a skillet or grill pan is necessary. You can also use an oven if you prefer baking your chicken.
- Serving Plate: Once your Chicken Caesar Pita is assembled, you’ll want a nice plate to present it. A simple dinner plate works just fine!
With these tools in hand, you’re all set to create a delicious Chicken Caesar Pita. Remember, cooking is all about improvisation, so feel free to use what you have available. Let’s keep the culinary adventure going!
Variations of Chicken Caesar Pita
One of the things I love most about the Chicken Caesar Pita is its adaptability. It’s like a blank canvas waiting for your creative touch! Here are a few variations that I’ve tried and absolutely enjoyed:
- Grilled Chicken Caesar Pita: Instead of pan-searing, marinate your chicken in a zesty lemon-garlic mixture and grill it for a smoky flavor. The char adds a delightful twist!
- Vegetarian Caesar Pita: Swap the chicken for grilled vegetables like zucchini, bell peppers, and mushrooms. Toss in some chickpeas for protein, and you’ve got a hearty, meat-free option!
- Spicy Chicken Caesar Pita: Add a kick by mixing some sriracha or hot sauce into your Caesar dressing. It’s a fiery twist that spice lovers will adore!
- Caesar Pita Wrap: Instead of using pita pockets, try wrapping the filling in a large tortilla. It’s perfect for on-the-go meals and adds a different texture!
These variations not only keep things exciting but also allow you to cater to different tastes and dietary preferences. I often find myself experimenting with whatever ingredients I have on hand, and it’s always a delightful surprise! So, don’t hesitate to get creative and make this recipe your own.
Cooking Notes for Chicken Caesar Pita
As I’ve journeyed through the delightful world of Chicken Caesar Pita, I’ve picked up a few cooking notes that can make your experience even better. Here are some tips that I find helpful:
- Prep Ahead: If you’re short on time, consider prepping your ingredients in advance. You can cook the chicken and make the dressing a day before. Just store them in airtight containers in the fridge. This way, assembling your pitas becomes a breeze!
- Freshness Matters: For the best flavor, use fresh ingredients. Crisp romaine lettuce and freshly grated Parmesan cheese can elevate your dish. I always feel the difference when I use fresh produce!
- Don’t Skip the Resting: After cooking your chicken, let it rest for a few minutes before shredding. This helps retain the juices, making your chicken tender and flavorful.
- Experiment with Dressings: While Caesar dressing is classic, don’t hesitate to try different dressings. A ranch or a yogurt-based dressing can add a fun twist!
- Serving Temperature: I love serving my Chicken Caesar Pita warm. If you’ve made the chicken ahead, just give it a quick reheat before assembling. It makes the pita feel cozy and inviting!
These cooking notes are like little nuggets of wisdom I’ve gathered over time. They help me create a Chicken Caesar Pita that’s not just good but great! So, keep these in mind as you embark on your own culinary adventure. Happy cooking!
Serving Suggestions for Chicken Caesar Pita
When it comes to serving my Chicken Caesar Pita, I love to get a little creative! Presentation can elevate the dining experience, and I’ve found a few delightful ways to serve this dish that always impresses my family and friends.
- Side Salads: Pair your pitas with a light side salad. A simple mixed greens salad with a lemon vinaigrette complements the rich flavors of the Caesar dressing beautifully.
- Chips or Fries: For a fun twist, serve your Chicken Caesar Pita with a side of crispy potato chips or sweet potato fries. The crunch adds a satisfying contrast!
- Fresh Fruit: A bowl of fresh fruit, like watermelon or berries, can provide a refreshing balance to the savory pita. It’s a sweet touch that brightens up the meal.
- Extra Dressing: I like to serve a small bowl of extra Caesar dressing on the side. It allows everyone to customize their pitas and adds an extra layer of flavor!
- Garnish with Herbs: A sprinkle of fresh herbs, like parsley or basil, on top of the assembled pitas not only looks beautiful but also adds a burst of freshness.
These serving suggestions make the Chicken Caesar Pita feel like a complete meal, perfect for any occasion. Whether it’s a casual lunch or a festive dinner, these ideas will surely impress your guests and make your meal even more enjoyable!
Tips for Perfecting Chicken Caesar Pita
As I’ve whipped up countless Chicken Caesar Pitas, I’ve gathered a treasure trove of tips that can elevate your dish from good to absolutely fantastic! Here are some of my favorite secrets to perfecting this delightful meal:
- Marinate the Chicken: If you have a little extra time, marinating your chicken in a mixture of olive oil, lemon juice, and garlic can infuse it with incredible flavor. Just a couple of hours makes a world of difference!
- Warm the Pita: Before filling your pita, warm it up in a skillet or microwave for a few seconds. A warm pita is soft and pliable, making it easier to fill and enjoy!
- Layer Wisely: When assembling, layer your ingredients thoughtfully. Start with dressing, then lettuce, followed by chicken, and finish with cheese and any add-ons. This ensures every bite is packed with flavor!
- Use Fresh Ingredients: Freshness is key! Crisp lettuce, freshly grated cheese, and homemade dressing can take your Chicken Caesar Pita to the next level. I always notice the difference!
- Serve Immediately: For the best experience, serve your Chicken Caesar Pita right after assembling. This keeps the pita soft and the ingredients fresh, ensuring a delightful crunch with every bite!
These tips are like little gems I’ve discovered along my cooking journey. They help me create a Chicken Caesar Pita that’s not just a meal but a memorable experience. So, keep these in mind as you embark on your own culinary adventure, and enjoy every delicious bite!
Breakdown of Time for Chicken Caesar Pita
Time is often of the essence in the kitchen, and I love knowing exactly how long each step takes. This way, I can plan my cooking sessions better and enjoy the process without feeling rushed. Here’s a quick breakdown of the time you’ll need to whip up your Chicken Caesar Pita:
- Prep Time: 15 minutes. This includes gathering your ingredients, chopping the lettuce, and preparing the chicken if you’re cooking it from scratch.
- Cooking Time: 10-15 minutes. If you’re using rotisserie chicken, you can skip this step. Otherwise, it takes about 6-7 minutes per side to cook the chicken thoroughly.
- Total Time: 25-30 minutes. This is the total time from start to finish, making it a quick and satisfying meal option!
With this time breakdown, you can easily fit the Chicken Caesar Pita into your busy day. I often find that it’s perfect for a quick lunch or a weeknight dinner when I want something delicious without spending hours in the kitchen. So, let’s get cooking and enjoy every moment of this culinary adventure!
Nutritional Information for Chicken Caesar Pita
As a home cook, I always pay attention to the nutritional value of the meals I prepare. The Chicken Caesar Pita is not only delicious but also offers a balanced mix of nutrients. Here’s a quick overview of the nutritional information for one serving of Chicken Caesar Pita, assuming you use the main ingredients listed:
- Calories: Approximately 400-450 calories
- Protein: About 30 grams (thanks to the chicken and cheese!)
- Carbohydrates: Roughly 40 grams (mostly from the pita)
- Fat: Around 15-20 grams (depending on the dressing and cheese used)
- Fiber: Approximately 4 grams (from the whole wheat pita and lettuce)
This nutritional breakdown makes the Chicken Caesar Pita a satisfying meal that can fit into a balanced diet. It’s packed with protein to keep you full and energized, while the fresh veggies add essential vitamins and minerals. Plus, you can easily adjust the ingredients to suit your dietary needs. For instance, using low-fat dressing or adding more veggies can enhance the nutritional profile even further!
As I enjoy my Chicken Caesar Pita, I feel good knowing that I’m nourishing my body while indulging in something truly delicious. It’s a win-win in my kitchen!
Frequently Asked Questions about Chicken Caesar Pita
As I’ve shared my love for Chicken Caesar Pita, I often get questions from fellow home cooks eager to try this delightful dish. Here are some of the most common questions I encounter, along with my answers to help you on your culinary journey!
Can I use grilled chicken instead of cooked chicken?
Absolutely! Grilled chicken adds a wonderful smoky flavor to the Chicken Caesar Pita. If you have leftover grilled chicken, it’s a perfect way to use it up. Just shred or dice it, and you’re good to go!
Is there a vegetarian version of Chicken Caesar Pita?
Yes, indeed! You can easily make a vegetarian version by swapping the chicken for grilled vegetables or chickpeas. The creamy Caesar dressing pairs beautifully with roasted veggies, making it a hearty and satisfying meal.
How can I make the dressing healthier?
If you’re looking to lighten up the dressing, consider using Greek yogurt instead of mayonnaise. It gives you that creamy texture while adding protein and reducing calories. You can also use a low-fat mayonnaise for a lighter option!
Can I prepare the Chicken Caesar Pita in advance?
Yes, you can prep the ingredients ahead of time! Cook the chicken and make the dressing a day in advance. Just store them in airtight containers in the fridge. When you’re ready to eat, simply assemble the pitas for a quick meal!
What can I serve with Chicken Caesar Pita?
There are plenty of delicious sides to pair with your Chicken Caesar Pita! I love serving it with a light salad, crispy chips, or even fresh fruit. These sides complement the flavors and add a nice balance to the meal.
How do I store leftovers?
If you have any leftovers, store the components separately. Keep the chicken, dressing, and lettuce in airtight containers in the fridge. When you’re ready to enjoy it again, just assemble the pita fresh to maintain the best texture!
These FAQs cover some of the most common queries I receive about Chicken Caesar Pita. I hope they help you feel more confident as you embark on your own culinary adventure. Remember, cooking is all about experimenting and having fun, so don’t hesitate to make this recipe your own!
Conclusion on Chicken Caesar Pita
In wrapping up our culinary journey with the Chicken Caesar Pita, I can’t help but feel a sense of excitement about this dish. It’s not just a meal; it’s an experience that brings together flavors, textures, and the joy of cooking. The combination of tender chicken, crisp romaine, and creamy dressing, all nestled in a warm pita, creates a delightful harmony that’s hard to resist.
What I love most is its versatility. Whether you’re hosting a gathering, enjoying a quick lunch, or simply craving something delicious, the Chicken Caesar Pita fits the bill perfectly. Plus, it’s a fantastic way to sneak in some greens while satisfying your taste buds. With endless variations and add-ons, you can make it your own, ensuring that every bite is a new adventure.
So, whether you’re a seasoned cook or just starting out, I encourage you to give this recipe a try. It’s easy, fun, and oh-so-satisfying. I promise that once you take that first bite, you’ll understand why the Chicken Caesar Pita has a special place in my heart and kitchen. Happy cooking, and may your culinary adventures be filled with flavor and joy!