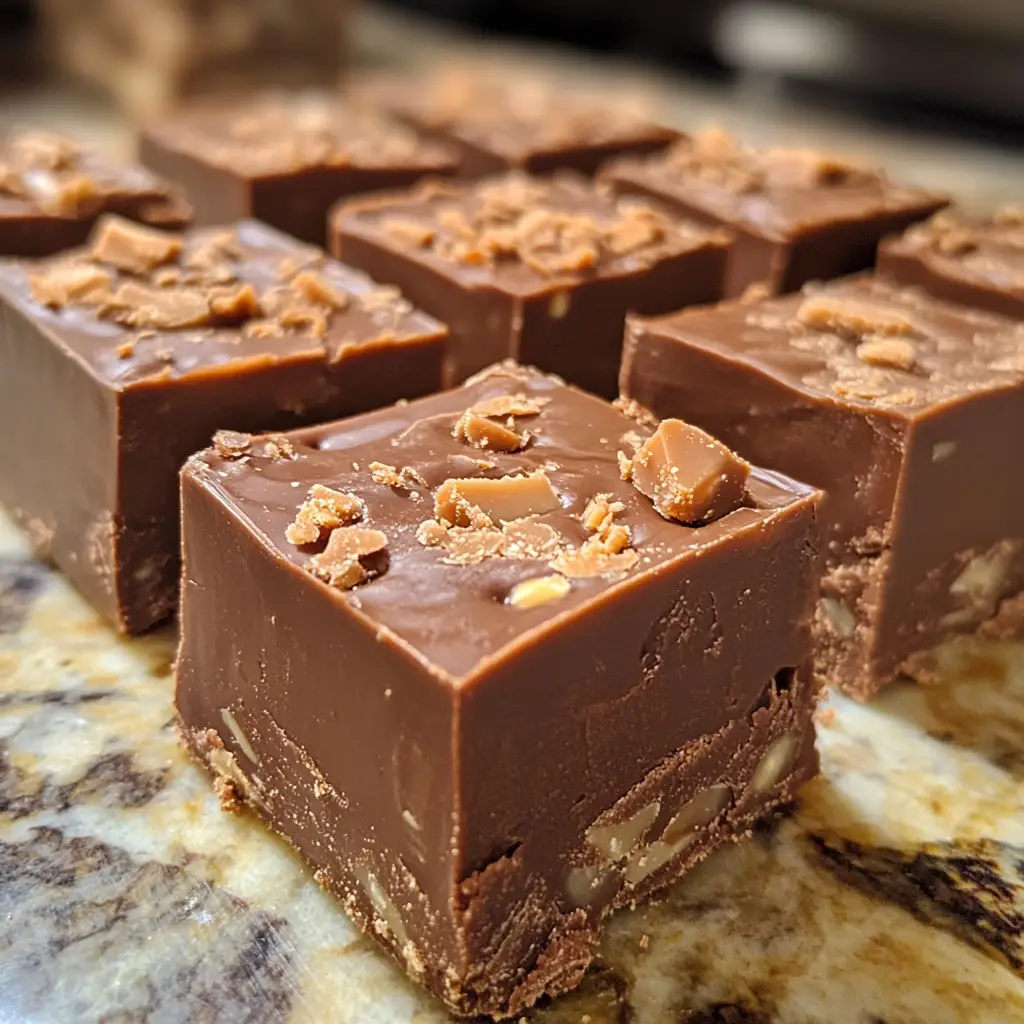
Introduction to Butterfinger Fudge Recipe
As a passionate home cook, I find joy in creating sweet treats that bring smiles to faces. One of my all-time favorites is the Butterfinger fudge recipe. It’s a delightful blend of creamy chocolate and crunchy peanut butter, with a surprise twist of Butterfinger candy that makes every bite a little piece of heaven. I remember the first time I made this fudge; it was a chilly afternoon, and the aroma of melting chocolate filled my kitchen. My family gathered around, their eyes wide with anticipation, and I knew I was onto something special.
This recipe is not just about the ingredients; it’s about the memories we create while making it. I often whip up a batch for family gatherings or cozy movie nights. The best part? It’s incredibly easy to make, and the results are always impressive. Whether you’re a seasoned baker or a novice in the kitchen, this Butterfinger fudge recipe is sure to become a staple in your home.
What I love most about this fudge is its versatility. You can enjoy it as a simple dessert or dress it up for special occasions. Plus, it’s a fantastic gift idea! Imagine wrapping up a box of homemade fudge for a friend or neighbor. It’s a sweet gesture that shows you care.
So, grab your apron and let’s dive into this delicious adventure together! I promise you’ll be hooked after the first bite.
Ingredients for Butterfinger Fudge Recipe
Before we embark on our fudge-making journey, let’s gather all the ingredients we’ll need. Having everything ready makes the process smoother and more enjoyable. Trust me, there’s nothing worse than realizing you’re missing a key ingredient halfway through! Here’s what you’ll need for this delightful Butterfinger fudge recipe.
Main Ingredients
- 1 cup of semi-sweet chocolate chips
- 1 cup of creamy peanut butter (I prefer natural peanut butter for a richer flavor)
- 1 can (14 ounces) of sweetened condensed milk
- 1 teaspoon of vanilla extract
- 2 cups of crushed Butterfinger candy bars (about 4-5 bars, depending on size)
When choosing your chocolate chips, I recommend going for high-quality brands. The better the chocolate, the more decadent your fudge will taste. And don’t skimp on the Butterfingers! The crunch and flavor they add are what make this fudge truly special.
Optional Add-ons
- 1/2 cup of chopped nuts (like peanuts or walnuts for extra crunch)
- Sea salt for sprinkling on top (it adds a delightful contrast to the sweetness)
- Drizzle of melted white chocolate for a decorative touch
Feel free to get creative! If you’re a fan of coconut, shredded coconut can be a fun addition. Or, if you want to amp up the chocolate flavor, consider adding a few tablespoons of cocoa powder. The beauty of this Butterfinger fudge recipe is that it’s flexible, allowing you to tailor it to your taste.
Now that we have our ingredients ready, let’s move on to the next exciting step: preparing our fudge!
How to Prepare Butterfinger Fudge Recipe
Now that we have our ingredients ready, it’s time to roll up our sleeves and dive into the fun part—making the fudge! This Butterfinger fudge recipe is straightforward, and I promise you’ll be amazed at how quickly it comes together. Let’s get started!
Step 1: Gather Your Ingredients
First things first, let’s make sure we have everything we need. I like to lay out all my ingredients on the counter. It not only keeps me organized but also builds excitement for the cooking process!
Tips for Step 1
- Double-check your pantry for any missing items before you start.
- Measure out your ingredients in advance. It saves time and keeps the process smooth.
- Keep a clean workspace. A tidy kitchen makes for a happy cook!
Step 2: Melt the Chocolate
Next, we’ll melt the chocolate chips. I usually do this in a microwave-safe bowl. It’s quick and easy! Just remember to stir every 30 seconds to avoid burning.
Tips for Step 2
- Use a microwave-safe bowl to prevent any mishaps.
- If you prefer, you can melt the chocolate using a double boiler on the stove. Just be careful not to let any water touch the chocolate.
- Keep an eye on the chocolate; it can go from melted to burnt in a flash!
Step 3: Mix in the Peanut Butter
Once the chocolate is melted and smooth, it’s time to mix in the creamy peanut butter. The combination of chocolate and peanut butter is like a match made in heaven!
Tips for Step 3
- Stir the peanut butter in thoroughly until it’s fully combined with the chocolate.
- If your peanut butter is too thick, you can warm it slightly in the microwave to make mixing easier.
- Don’t be shy—taste a little! It’s a great way to ensure the flavors are just right.
Step 4: Incorporate Crushed Butterfingers
Now comes the fun part—adding the crushed Butterfinger candy bars! This is where the magic happens. The crunch and flavor of the Butterfingers will elevate your fudge to a whole new level.
Tips for Step 4
- Use a rolling pin or a food processor to crush the Butterfingers into small pieces. You want some chunks for texture!
- Fold the crushed Butterfingers gently into the chocolate-peanut butter mixture to keep some of the crunch intact.
- Save a handful of crushed Butterfingers to sprinkle on top for a beautiful finish!
Step 5: Pour into a Pan and Set
Finally, it’s time to pour the fudge mixture into a lined baking pan. I usually use parchment paper for easy removal later. Spread it evenly and smooth the top with a spatula.
Tips for Step 5
- Make sure to line your pan with parchment paper or foil for easy cleanup.
- Press down gently to eliminate any air bubbles and ensure an even surface.
- Let the fudge cool at room temperature for about an hour, then refrigerate it for at least two hours to set completely.
And there you have it! Your Butterfinger fudge is almost ready to be devoured. Just wait for it to set, and soon you’ll be enjoying a delicious treat that’s sure to impress!
Equipment Needed for Butterfinger Fudge Recipe
Before we dive into the delicious world of fudge, let’s make sure we have the right tools at our disposal. Having the right equipment can make the process smoother and more enjoyable. Here’s what you’ll need for this Butterfinger fudge recipe:
- Microwave-safe bowl: Perfect for melting chocolate. If you don’t have one, a regular bowl can work, but be cautious with the heat.
- Spatula: A silicone spatula is my go-to for mixing and scraping down the sides of the bowl. It helps ensure every bit of chocolate and peanut butter is combined.
- Baking pan: An 8×8 inch square pan is ideal for this recipe. If you don’t have one, a similar-sized dish will do just fine.
- Parchment paper or aluminum foil: Lining your pan makes it easy to lift the fudge out once it’s set. If you’re out of parchment paper, greasing the pan lightly can work as an alternative.
- Rolling pin or food processor: These are handy for crushing the Butterfinger bars. If you don’t have either, placing the bars in a zip-top bag and smashing them with a heavy object works just as well!
With these tools in hand, you’re all set to create your Butterfinger fudge masterpiece. Remember, the right equipment can make all the difference in your cooking experience, so gather them up and let’s keep the fun rolling!
Variations of Butterfinger Fudge Recipe
While the classic Butterfinger fudge recipe is absolutely delightful on its own, I love to experiment with different variations to keep things exciting! Here are a few fun twists that you can try:
- Chocolate Mint Butterfinger Fudge: Add a few drops of peppermint extract to the chocolate mixture for a refreshing minty flavor. It’s like a candy cane in fudge form!
- Nutty Butterfinger Fudge: Incorporate chopped nuts, like almonds or pecans, into the fudge for an extra crunch. The nuttiness pairs beautifully with the chocolate and peanut butter.
- Cookie Butter Butterfinger Fudge: Swap out the peanut butter for cookie butter. This gives the fudge a unique flavor that’s rich and indulgent.
- Spicy Butterfinger Fudge: For a kick, add a pinch of cayenne pepper or chili powder to the chocolate mixture. The heat balances the sweetness and adds an unexpected twist!
These variations are just the tip of the iceberg! Feel free to get creative and mix in your favorite flavors. The beauty of this Butterfinger fudge recipe is that it’s versatile, allowing you to tailor it to your taste buds. So, don’t be afraid to experiment and make it your own!
Cooking Notes for Butterfinger Fudge Recipe
As I’ve made this Butterfinger fudge recipe countless times, I’ve picked up a few cooking notes that can help you achieve the best results. Here are some tips to keep in mind:
- Storage: Once your fudge is set, store it in an airtight container at room temperature for up to a week. If you want to keep it longer, refrigerate it for up to two weeks. Just make sure to let it come to room temperature before serving for the best texture!
- Cutting the Fudge: When it’s time to cut your fudge, use a sharp knife. Warming the knife slightly under hot water can help create clean cuts, making your fudge look even more appealing.
- Don’t Rush the Setting: Patience is key! Allow the fudge to set completely before cutting into it. If you’re in a hurry, you might end up with a gooey mess instead of perfectly cut squares.
- Experiment with Toppings: Feel free to get creative with toppings! A sprinkle of crushed nuts, a drizzle of chocolate, or even a dusting of cocoa powder can elevate your fudge to a whole new level.
These cooking notes are like little nuggets of wisdom I’ve gathered over the years. They’ll help you navigate the fudge-making process with ease and ensure that your Butterfinger fudge turns out delicious every time!
Serving Suggestions for Butterfinger Fudge Recipe
Now that your Butterfinger fudge is ready to be enjoyed, let’s talk about how to serve it! Presentation can make a big difference, and I love to get a little creative when it comes to serving this delightful treat.
- Fudge Squares: Cut the fudge into neat squares and arrange them on a decorative platter. You can even use colorful cupcake liners to add a pop of color!
- Gift Boxes: Package the fudge in small gift boxes or mason jars. Tie them with a ribbon for a charming homemade gift that’s perfect for any occasion.
- Ice Cream Topping: Crumble some fudge over a scoop of vanilla ice cream for an indulgent dessert. The combination of creamy ice cream and rich fudge is simply heavenly!
- Hot Chocolate Stirrer: Cut the fudge into sticks and use them as stirrers for hot chocolate. As they melt, they’ll add a delicious flavor to your drink!
These serving suggestions not only enhance the experience but also make your Butterfinger fudge a standout treat at any gathering. Whether you’re sharing with friends or enjoying it solo, these ideas will surely elevate your fudge game!
Tips for Making the Perfect Butterfinger Fudge Recipe
As I’ve whipped up countless batches of Butterfinger fudge, I’ve gathered some handy tips that can help you achieve fudge perfection. Here’s what I’ve learned along the way:
- Use Quality Ingredients: The better the ingredients, the better your fudge will taste. Opt for high-quality chocolate and fresh Butterfinger bars for the best flavor.
- Don’t Overheat the Chocolate: When melting chocolate, be patient. Stirring frequently and using low heat will prevent it from burning and ensure a smooth texture.
- Let It Set Properly: Allow your fudge to cool completely at room temperature before refrigerating. This helps it set evenly and makes cutting easier.
- Experiment with Flavors: Don’t hesitate to try different add-ins or toppings. A sprinkle of sea salt or a drizzle of caramel can take your fudge to the next level!
With these tips in your back pocket, you’ll be well on your way to creating the most delicious Butterfinger fudge that will impress everyone who gets a taste!
Breakdown of Time for Butterfinger Fudge Recipe
As a home cook, I know that time management is key in the kitchen. When it comes to making Butterfinger fudge, it’s all about enjoying the process without feeling rushed. Here’s a quick breakdown of the time you’ll need to whip up this delicious treat:
- Prep Time: 15 minutes. This includes gathering your ingredients, measuring them out, and getting everything ready for the melting and mixing process.
- Cooking Time: 10 minutes. Melting the chocolate and mixing in the peanut butter and Butterfingers doesn’t take long at all. Just keep an eye on the chocolate to avoid burning!
- Total Time: 2 hours and 25 minutes. This includes the cooling time. After you pour the fudge into the pan, it needs about an hour at room temperature and then at least two hours in the fridge to set properly.
So, in just a little over two hours, you can have a delightful batch of Butterfinger fudge ready to share (or keep all to yourself!). It’s a perfect treat for any occasion, and the time spent is well worth the delicious outcome. Happy cooking!
Nutritional Information for Butterfinger Fudge Recipe
As a passionate home cook, I always find it helpful to know the nutritional content of the treats I make. While Butterfinger fudge is undeniably a sweet indulgence, it’s nice to have an idea of what we’re enjoying. Here’s a general breakdown of the nutritional information for a typical serving of Butterfinger fudge, which is about one square (approximately 1 inch x 1 inch):
- Calories: 150
- Total Fat: 8g
- Saturated Fat: 3.5g
- Cholesterol: 5mg
- Sodium: 50mg
- Total Carbohydrates: 18g
- Dietary Fiber: 1g
- Sugars: 14g
- Protein: 3g
Keep in mind that these values can vary based on the specific brands of ingredients you use and any optional add-ons you decide to include. If you’re looking to make a lighter version, consider using reduced-fat peanut butter or sugar-free chocolate chips. Regardless, this Butterfinger fudge is a delightful treat that’s perfect for special occasions or just a sweet pick-me-up!
Frequently Asked Questions about Butterfinger Fudge Recipe
As I’ve shared my Butterfinger fudge recipe with friends and family, I’ve noticed a few common questions pop up. It’s always great to clarify any doubts, especially when it comes to making such a delicious treat! Here are some frequently asked questions about this delightful fudge:
Can I use milk chocolate instead of semi-sweet chocolate?
Absolutely! While I love the rich flavor of semi-sweet chocolate, using milk chocolate will give your fudge a sweeter taste. Just keep in mind that it may alter the overall flavor profile a bit. If you’re a milk chocolate fan, go for it!
How long does Butterfinger fudge last?
When stored in an airtight container at room temperature, your Butterfinger fudge can last up to a week. If you want to keep it longer, refrigerate it for up to two weeks. Just remember to let it come to room temperature before enjoying for the best texture!
Can I freeze Butterfinger fudge?
Yes, you can freeze it! Just wrap the fudge tightly in plastic wrap and then place it in an airtight container. It can last in the freezer for up to three months. When you’re ready to enjoy it, let it thaw in the fridge overnight.
What can I use instead of sweetened condensed milk?
If you’re looking for a substitute, you can make your own by combining 1 cup of milk with 1 cup of sugar and simmering it until it thickens. Alternatively, you can use coconut milk with sugar for a dairy-free option, but the texture may vary slightly.
Can I add other candies to the fudge?
Definitely! The beauty of this Butterfinger fudge recipe is its versatility. You can mix in other candies like M&M’s, Reese’s Pieces, or even crushed Oreos for a fun twist. Just be mindful of the total volume so it doesn’t become too crowded!
These FAQs should help clear up any uncertainties you might have about making Butterfinger fudge. If you have any other questions, feel free to reach out! I’m always here to share my love for cooking and help you create the best fudge possible.
Conclusion on Butterfinger Fudge Recipe
As I wrap up this delightful journey into the world of Butterfinger fudge, I can’t help but feel a sense of joy. This recipe is more than just a sweet treat; it’s a celebration of flavors and memories. The creamy chocolate, rich peanut butter, and crunchy Butterfinger pieces come together to create a dessert that’s simply irresistible.
What I love most about this Butterfinger fudge recipe is its simplicity. With just a handful of ingredients and a few easy steps, you can whip up a batch that will impress family and friends alike. Whether you’re making it for a special occasion or just to satisfy a sweet craving, this fudge is sure to bring smiles all around.
Moreover, the versatility of this recipe allows you to get creative. You can add your favorite flavors, mix in different candies, or even experiment with toppings. Each batch can be a new adventure, and that’s what makes cooking so much fun!
So, the next time you’re in the mood for something sweet, I encourage you to give this Butterfinger fudge a try. I promise it will become a cherished recipe in your kitchen, just as it has in mine. Happy cooking, and may your fudge-making adventures be as sweet as the treats themselves!