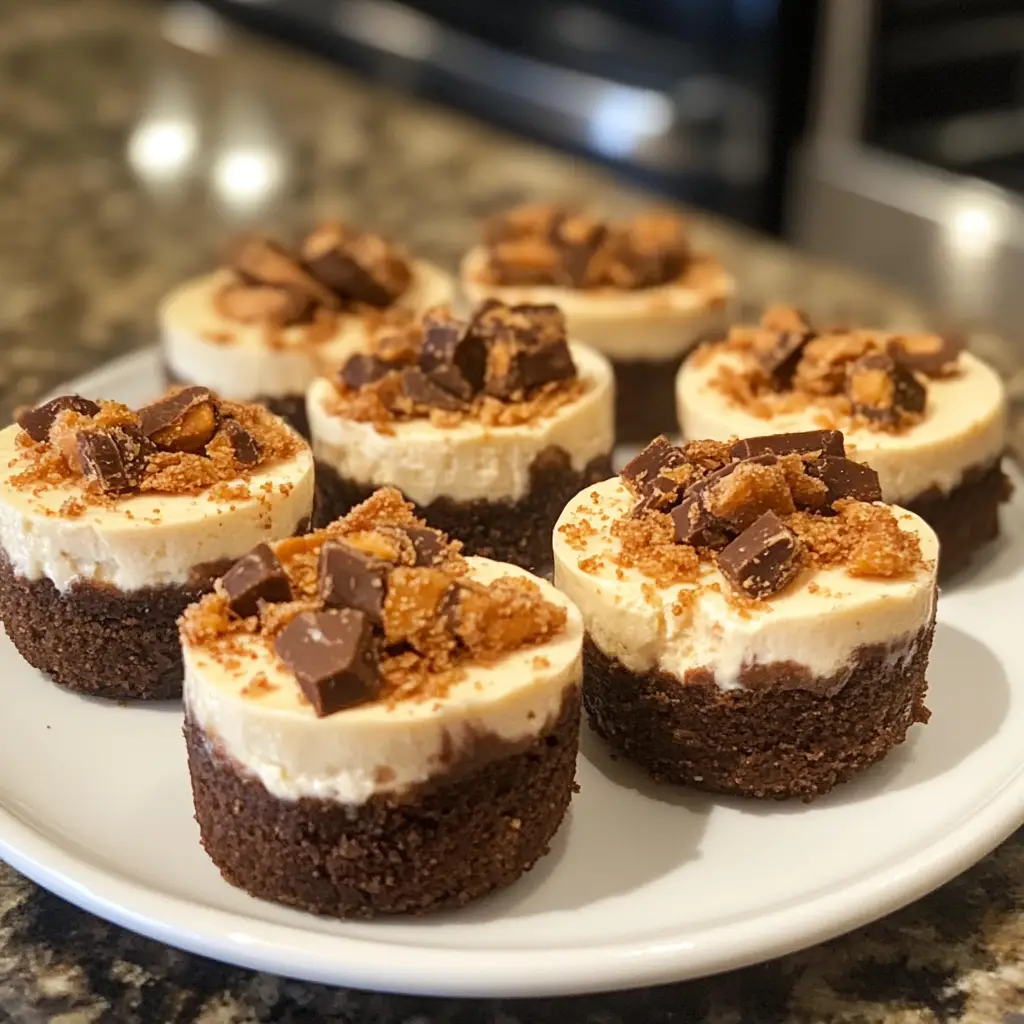
Introduction to Butterfinger Cheesecake Bites Recipe
As a passionate home cook, I find joy in creating desserts that not only taste amazing but also bring smiles to the faces of my family and friends. One of my all-time favorite treats is the Butterfinger Cheesecake Bites. These little gems are like a sweet hug, combining the creamy richness of cheesecake with the delightful crunch of Butterfinger candy. Every time I make them, I’m reminded of the first time I tasted this heavenly combination at a friend’s birthday party. The moment I bit into that creamy, crunchy bliss, I knew I had to recreate it in my own kitchen.
What I love most about this recipe is how simple it is to whip up. You don’t need to be a professional baker to impress your guests with these delightful bites. They’re perfect for parties, movie nights, or just a sweet treat after a long day. Plus, they’re bite-sized, which means you can indulge without feeling guilty—well, at least that’s what I tell myself!
In this article, I’ll guide you through the process of making these scrumptious Butterfinger Cheesecake Bites. From gathering the ingredients to the final chilling step, I’ll share my tips and tricks to ensure your cheesecake bites turn out perfectly every time. So, grab your apron, and let’s dive into this delicious adventure together!
Ingredients for Butterfinger Cheesecake Bites Recipe
Before we embark on our culinary journey, let’s gather all the ingredients we’ll need to create these delightful Butterfinger Cheesecake Bites. I always believe that the quality of ingredients can make a world of difference in the final product. So, let’s make sure we’re using the best!
Main Ingredients
- 1 cup of graham cracker crumbs
- 1/4 cup of unsalted butter, melted
- 2 (8-ounce) packages of cream cheese, softened
- 1/2 cup of granulated sugar
- 1 teaspoon of vanilla extract
- 1 cup of whipped topping (like Cool Whip)
- 1 cup of Butterfinger candy bars, crushed (about 4-5 bars)
When I make these cheesecake bites, I always opt for high-quality cream cheese. It really enhances the creaminess of the filling. And don’t skimp on the Butterfinger bars! The more, the merrier, right? I love to crush them just enough to keep some chunky bits for that satisfying crunch.
Optional Add-ons
- 1/4 cup of mini chocolate chips for extra sweetness
- 1/4 cup of chopped nuts (like pecans or walnuts) for added texture
- Drizzle of chocolate or caramel sauce for serving
Feel free to get creative with these optional add-ons! Sometimes, I like to sprinkle a few mini chocolate chips on top before serving. It adds a lovely touch and makes them look even more tempting. And if you’re feeling adventurous, a drizzle of chocolate or caramel sauce can take these bites to a whole new level of indulgence!
Now that we have our ingredients ready, let’s move on to the next exciting step: preparing our Butterfinger Cheesecake Bites!
How to Prepare Butterfinger Cheesecake Bites Recipe
Now that we have our ingredients ready, it’s time to roll up our sleeves and dive into the fun part—preparing our Butterfinger Cheesecake Bites! I always find that the process of making these treats is just as enjoyable as eating them. So, let’s get started with some easy-to-follow steps that will lead us to cheesecake bliss!
Step 1: Prepare the Crust
First things first, we need to create a delicious crust that will hold all that creamy goodness. In a mixing bowl, combine the graham cracker crumbs and melted butter. Stir until the crumbs are evenly coated. The mixture should resemble wet sand, perfect for pressing into your pan.
Tips for Step 1
- For an extra flavor boost, try adding a pinch of cinnamon to the graham cracker mixture.
- Use a measuring cup or the bottom of a glass to firmly press the crust into the bottom of your pan. This helps it hold together better.
Step 2: Make the Cheesecake Filling
Next, let’s whip up that creamy cheesecake filling! In a large mixing bowl, beat the softened cream cheese until it’s smooth and fluffy. Gradually add in the granulated sugar and vanilla extract, mixing until well combined. Then, gently fold in the whipped topping and crushed Butterfinger bars. The mixture should be light and airy, with those delightful chunks of candy peeking through.
Tips for Step 2
- Make sure your cream cheese is at room temperature. This helps it blend smoothly without lumps.
- Don’t overmix the whipped topping; you want to keep that light texture!
Step 3: Assemble the Cheesecake Bites
Now comes the fun part—assembling our cheesecake bites! Spoon the cheesecake filling over the prepared crust, spreading it evenly. I like to use a spatula for this, as it helps create a nice, smooth surface. Once it’s all spread out, you can sprinkle a few extra crushed Butterfinger pieces on top for that added crunch and visual appeal.
Tips for Step 3
- For a cleaner cut, use a sharp knife to slice the bites after they’ve chilled.
- Consider using mini muffin tins for bite-sized portions; they’re perfect for parties!
Step 4: Chill and Set
Finally, it’s time to let our cheesecake bites chill in the refrigerator. Cover the pan with plastic wrap and let them set for at least 4 hours, or overnight if you can wait! This step is crucial, as it allows the flavors to meld together and the filling to firm up.
Tips for Step 4
- For a quicker chill, place the bites in the freezer for about 1-2 hours, but keep an eye on them!
- Once set, you can cut them into squares or rectangles, depending on your preference.
And there you have it! With these simple steps, you’ll have a batch of Butterfinger Cheesecake Bites that are sure to impress. I can already picture the smiles on my loved ones’ faces as they take that first bite. Let’s move on to the next section, where we’ll discuss the equipment needed for this delightful recipe!
How to Prepare Butterfinger Cheesecake Bites Recipe
Now that we have our ingredients ready, it’s time to roll up our sleeves and dive into the fun part—preparing our Butterfinger Cheesecake Bites! I always find that the process of making these treats is just as enjoyable as eating them. So, let’s get started with some easy-to-follow steps that will lead us to cheesecake bliss!
Step 1: Prepare the Crust
First things first, we need to create a delicious crust that will hold all that creamy goodness. In a mixing bowl, combine the graham cracker crumbs and melted butter. Stir until the crumbs are evenly coated. The mixture should resemble wet sand, perfect for pressing into your pan.
Tips for Step 1
- For an extra flavor boost, try adding a pinch of cinnamon to the graham cracker mixture. It adds a warm, cozy touch!
- Use a measuring cup or the bottom of a glass to firmly press the crust into the bottom of your pan. This helps it hold together better and gives it a nice, even surface.
Step 2: Make the Cheesecake Filling
Next, let’s whip up that creamy cheesecake filling! In a large mixing bowl, beat the softened cream cheese until it’s smooth and fluffy. Gradually add in the granulated sugar and vanilla extract, mixing until well combined. Then, gently fold in the whipped topping and crushed Butterfinger bars. The mixture should be light and airy, with those delightful chunks of candy peeking through.
Tips for Step 2
- Make sure your cream cheese is at room temperature. This helps it blend smoothly without lumps, creating that dreamy texture we all love.
- Don’t overmix the whipped topping; you want to keep that light texture! A gentle fold is all it takes to incorporate it.
Step 3: Assemble the Cheesecake Bites
Now comes the fun part—assembling our cheesecake bites! Spoon the cheesecake filling over the prepared crust, spreading it evenly. I like to use a spatula for this, as it helps create a nice, smooth surface. Once it’s all spread out, you can sprinkle a few extra crushed Butterfinger pieces on top for that added crunch and visual appeal.
Tips for Step 3
- For a cleaner cut, use a sharp knife to slice the bites after they’ve chilled. It makes a world of difference in presentation!
- Consider using mini muffin tins for bite-sized portions; they’re perfect for parties! Everyone loves a little treat they can pop in their mouth.
Step 4: Chill and Set
Finally, it’s time to let our cheesecake bites chill in the refrigerator. Cover the pan with plastic wrap and let them set for at least 4 hours, or overnight if you can wait! This step is crucial, as it allows the flavors to meld together and the filling to firm up.
Tips for Step 4
- For a quicker chill, place the bites in the freezer for about 1-2 hours, but keep an eye on them! You don’t want them to freeze solid.
- Once set, you can cut them into squares or rectangles, depending on your preference. I love to make them bite-sized for easy snacking!
And there you have it! With these simple steps, you’ll have a batch of Butterfinger Cheesecake Bites that are sure to impress. I can already picture the smiles on my loved ones’ faces as they take that first bite. Let’s move on to the next section, where we’ll discuss the equipment needed for this delightful recipe!
Equipment Needed for Butterfinger Cheesecake Bites Recipe
Before we dive into the kitchen, let’s make sure we have all the necessary tools to create our Butterfinger Cheesecake Bites. Having the right equipment can make the process smoother and more enjoyable. Here’s what you’ll need:
- Mixing Bowls: A couple of medium-sized mixing bowls will do the trick. I love using glass bowls because they’re easy to clean and you can see the ingredients mixing!
- Measuring Cups and Spoons: Accurate measurements are key to a successful recipe. Make sure you have both dry and liquid measuring cups handy.
- Spatula: A rubber spatula is perfect for folding in the whipped topping and spreading the cheesecake filling evenly. It’s a must-have in my kitchen!
- 9×9-inch Baking Pan: This is ideal for setting your cheesecake bites. If you don’t have one, a similar-sized dish will work just fine.
- Plastic Wrap: You’ll need this to cover the pan while the cheesecake bites chill in the fridge. It keeps everything fresh and prevents any unwanted odors from sneaking in.
- Sharp Knife: A sharp knife is essential for cutting the bites into neat squares. Trust me, it makes a big difference in presentation!
If you’re feeling adventurous, you can also use mini muffin tins for bite-sized portions. They’re perfect for parties and make serving a breeze! Just remember to adjust the chilling time, as smaller portions may set faster.
With these tools at your side, you’re all set to create some delicious Butterfinger Cheesecake Bites. Let’s keep the momentum going and move on to the next section, where we’ll explore some fun variations of this delightful recipe!
Variations of Butterfinger Cheesecake Bites Recipe
While I absolutely adore the classic Butterfinger Cheesecake Bites, there’s something thrilling about experimenting with different flavors and textures. Each variation can bring a new twist to this beloved treat, making it even more exciting to share with friends and family. Here are a few fun ideas to inspire your culinary creativity:
- Peanut Butter Swirl: Add a swirl of creamy peanut butter into the cheesecake filling before chilling. The combination of peanut butter and Butterfinger is a match made in dessert heaven!
- Chocolate Lovers: For all the chocolate enthusiasts out there, mix in some cocoa powder into the cheesecake filling or use chocolate graham crackers for the crust. You can even top the bites with a drizzle of melted chocolate for an extra indulgent touch.
- Minty Fresh: If you’re a fan of mint, consider adding a few drops of peppermint extract to the filling. It gives a refreshing twist that pairs beautifully with the sweetness of the Butterfinger.
- Fruit Fusion: Try folding in some crushed strawberries or raspberries into the cheesecake mixture. The fruity flavor adds a delightful contrast to the rich cheesecake and crunchy candy.
These variations not only keep things interesting but also allow you to cater to different tastes and preferences. I love to surprise my guests with a new twist each time I make these bites. So, don’t hesitate to get creative and make this recipe your own!
Cooking Notes for Butterfinger Cheesecake Bites Recipe
As I’ve learned through my culinary adventures, a few cooking notes can make all the difference when preparing Butterfinger Cheesecake Bites. Here are some tips that I’ve gathered over time to ensure your bites turn out perfectly every time:
- Room Temperature Ingredients: Always remember to let your cream cheese and whipped topping sit at room temperature before mixing. This helps achieve that smooth, creamy texture we all crave.
- Chilling Time: Patience is key! Allowing the cheesecake bites to chill for the recommended time is crucial for the flavors to meld and the texture to set. If you can, resist the urge to cut into them too soon!
- Storage: These cheesecake bites can be stored in an airtight container in the fridge for up to a week. They also freeze well, so you can make a batch ahead of time for unexpected guests or sweet cravings.
- Presentation: For an extra touch, consider garnishing your cheesecake bites with a sprinkle of crushed Butterfinger or a drizzle of chocolate sauce just before serving. It adds a beautiful finishing touch!
With these cooking notes in mind, you’ll be well on your way to creating Butterfinger Cheesecake Bites that are not only delicious but also visually appealing. I can’t wait for you to experience the joy of sharing these delightful treats with your loved ones!
Serving Suggestions for Butterfinger Cheesecake Bites Recipe
When it comes to serving my Butterfinger Cheesecake Bites, I love to get a little creative! Presentation can elevate the experience, making these treats even more enticing. Here are some of my favorite serving suggestions:
- Platter Display: Arrange the cheesecake bites on a beautiful serving platter. You can even add some fresh fruit, like strawberries or raspberries, around the edges for a pop of color.
- Individual Cups: For a fun twist, serve each cheesecake bite in mini dessert cups. This makes for easy grabbing and adds a touch of elegance to your dessert table.
- Garnish: Just before serving, sprinkle some extra crushed Butterfinger on top of each bite. A drizzle of chocolate or caramel sauce can also add a delightful finishing touch!
- Pairing: Consider serving these bites with a scoop of vanilla ice cream or a dollop of whipped cream on the side. The creamy textures complement each other beautifully!
These serving suggestions not only enhance the visual appeal but also make the experience of enjoying Butterfinger Cheesecake Bites even more delightful. I can already imagine the smiles on everyone’s faces as they dig into these sweet treats!
Tips for Perfecting Butterfinger Cheesecake Bites Recipe
As I’ve spent countless hours perfecting my Butterfinger Cheesecake Bites, I’ve gathered a treasure trove of tips that can elevate your dessert game. These little nuggets of wisdom can help ensure that your cheesecake bites turn out as delicious as possible. Here are my top tips for perfecting this delightful recipe:
- Use Quality Ingredients: The better the ingredients, the better the flavor! Opt for high-quality cream cheese and fresh Butterfinger bars. Trust me, it makes a world of difference.
- Don’t Rush the Chilling: Allow your cheesecake bites to chill for the full recommended time. This step is crucial for achieving that perfect texture and flavor blend. Patience is key!
- Experiment with Texture: If you love a bit of crunch, consider adding more crushed Butterfinger to the filling or topping. It adds a delightful surprise in every bite!
- Keep It Cool: If you’re serving these bites at a party, keep them chilled until it’s time to serve. This helps maintain their shape and creamy texture.
- Slice with Care: Use a sharp knife to cut your cheesecake bites. Wipe the knife with a damp cloth between cuts for clean edges. Presentation matters!
With these tips in your back pocket, you’ll be well on your way to creating Butterfinger Cheesecake Bites that are not only delicious but also visually stunning. I can’t wait for you to share these treats with your loved ones and watch their faces light up with joy!
Breakdown of Time for Butterfinger Cheesecake Bites Recipe
As a home cook, I know that time management is key in the kitchen. When it comes to making Butterfinger Cheesecake Bites, it’s important to plan ahead. Here’s a quick breakdown of the time you’ll need to allocate for this delightful recipe:
- Prep Time: 20 minutes – This includes gathering your ingredients, preparing the crust, and mixing the cheesecake filling. It’s a fun and quick process that gets you one step closer to dessert!
- Chilling Time: 4 hours (or overnight) – This is the most crucial part! Allowing the cheesecake bites to chill ensures they set properly and the flavors meld beautifully. If you can, I highly recommend letting them chill overnight for the best results.
- Total Time: 4 hours and 20 minutes (or overnight) – While the active time is short, the chilling time is essential for achieving that perfect texture. Just think of it as a little anticipation for the deliciousness to come!
With this time breakdown in mind, you can easily plan your day around making these scrumptious Butterfinger Cheesecake Bites. I promise, the wait will be worth it when you take that first bite of creamy, crunchy bliss!
Nutritional Information for Butterfinger Cheesecake Bites Recipe
As a passionate home cook, I always find it helpful to know the nutritional information of the treats I make. It allows me to enjoy them mindfully while sharing them with family and friends. Here’s a general breakdown of the nutritional content for one Butterfinger Cheesecake Bite, assuming you cut the batch into 16 pieces:
- Calories: Approximately 150 calories
- Fat: 9 grams
- Saturated Fat: 5 grams
- Cholesterol: 30 mg
- Sodium: 100 mg
- Carbohydrates: 15 grams
- Fiber: 0.5 grams
- Sugar: 8 grams
- Protein: 2 grams
Keep in mind that these values can vary based on the specific brands of ingredients you use and any optional add-ons you choose to include. If you’re looking to lighten things up a bit, consider using reduced-fat cream cheese or a sugar substitute. Regardless, these Butterfinger Cheesecake Bites are a delightful treat that’s worth every bite!
Frequently Asked Questions about Butterfinger Cheesecake Bites Recipe
As I’ve shared my Butterfinger Cheesecake Bites with friends and family, I’ve noticed a few common questions pop up. It’s always fun to see the excitement on their faces, and I love answering their queries! Here are some frequently asked questions that might help you as you embark on your own cheesecake adventure:
Can I make these cheesecake bites ahead of time?
Absolutely! In fact, I recommend making them a day in advance. The flavors meld beautifully when they chill overnight, and it saves you time on the day of your gathering. Just store them in an airtight container in the fridge until you’re ready to serve!
Can I use a different type of candy instead of Butterfinger?
Of course! While Butterfinger adds a unique flavor and crunch, you can experiment with other candies like Snickers, Reese’s, or even crushed Oreos. Each candy will give your cheesecake bites a different twist, so feel free to get creative!
How do I store leftover cheesecake bites?
If you happen to have any leftovers (which is rare in my house!), simply place them in an airtight container and store them in the fridge. They’ll stay fresh for up to a week. You can also freeze them for longer storage—just make sure to wrap them well to prevent freezer burn.
Can I make these cheesecake bites gluten-free?
Yes! To make them gluten-free, simply use gluten-free graham crackers for the crust. There are many delicious options available now, and they work just as well in this recipe. Your gluten-free friends will thank you!
What can I serve with Butterfinger Cheesecake Bites?
These bites are delightful on their own, but you can elevate the experience by serving them with a scoop of vanilla ice cream or a dollop of whipped cream. Fresh fruit, like strawberries or raspberries, also pairs beautifully and adds a refreshing contrast to the rich cheesecake.
With these answers in mind, I hope you feel more confident as you prepare your Butterfinger Cheesecake Bites. Remember, cooking is all about having fun and experimenting, so don’t hesitate to make this recipe your own. Happy baking!
Conclusion on Butterfinger Cheesecake Bites Recipe
As I wrap up this delightful journey of creating Butterfinger Cheesecake Bites, I can’t help but feel a sense of joy and satisfaction. These little treats are not just a dessert; they’re a celebration of flavors and textures that come together in perfect harmony. The creamy cheesecake, the crunchy Butterfinger, and the buttery crust create a symphony of taste that’s hard to resist.
What I love most about this recipe is its versatility. Whether you’re hosting a party, celebrating a special occasion, or simply indulging in a sweet treat after dinner, these cheesecake bites fit the bill. They’re easy to make, fun to customize, and sure to impress anyone who takes a bite. Plus, they’re bite-sized, making them perfect for sharing—or keeping all to yourself!
So, gather your ingredients, roll up your sleeves, and dive into the world of Butterfinger Cheesecake Bites. I promise you’ll create not just a dessert, but a memorable experience filled with laughter, joy, and sweet satisfaction. Happy baking, and may your kitchen always be filled with love and delicious treats!