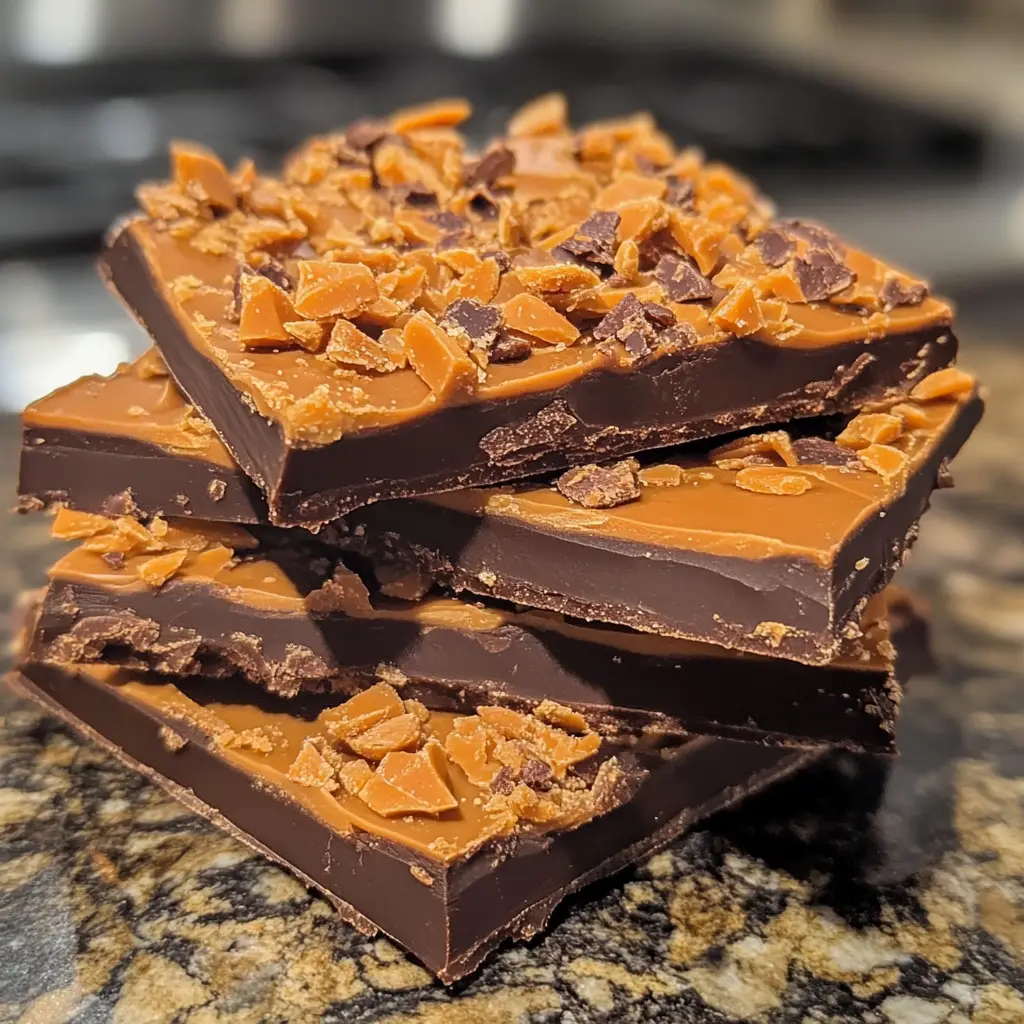
Introduction to Butterfinger Bark Recipe
Ah, Butterfinger Bark! Just the name brings back a flood of sweet memories. I remember the first time I made this delightful treat. It was a chilly afternoon, and I was looking for something fun to whip up in the kitchen. I had a few Butterfinger bars lying around, and the idea struck me like a bolt of lightning. Why not combine them with chocolate to create a delicious bark? The thought of that crunchy, peanut buttery goodness mixed with smooth chocolate made my heart race with excitement.
As I melted the chocolate, the rich aroma filled my kitchen, wrapping me in a warm embrace. I could hardly wait to mix in those crumbled Butterfinger pieces. The anticipation was almost too much! When I finally took that first bite, it was like a party in my mouth. The sweet, creamy chocolate paired perfectly with the crunchy, nutty bits of Butterfinger. It was a match made in dessert heaven!
This Butterfinger Bark recipe is not just a treat; it’s a celebration of flavors and textures. It’s perfect for sharing with friends and family during the holidays or any time you need a sweet pick-me-up. Plus, it’s incredibly easy to make! With just a few simple ingredients, you can create a delightful dessert that will impress everyone. So, grab your apron, and let’s dive into this delicious adventure together!
Ingredients for Butterfinger Bark Recipe
Before we dive into the fun of making Butterfinger Bark, let’s gather our ingredients. I always say that the best dishes start with quality ingredients. For this recipe, you’ll need a few simple items that you might already have in your pantry. Here’s what you’ll need:
Main Ingredients
- 1 cup of semi-sweet chocolate chips (or milk chocolate for a sweeter touch)
- 1 cup of white chocolate chips
- 4 Butterfinger bars, crumbled (about 1 cup when crushed)
- A pinch of sea salt (optional, but it enhances the flavor!)
When choosing your chocolate chips, I recommend going for high-quality brands. The better the chocolate, the richer your bark will taste. I often find that using a mix of semi-sweet and white chocolate creates a beautiful contrast in flavor and color. It’s like a canvas waiting for a masterpiece!
Optional Add-ons
- Chopped nuts (like peanuts or almonds for extra crunch)
- Drizzle of caramel sauce for a sweet twist
- Sprinkles or edible glitter for a festive touch
Feel free to get creative! I once added a sprinkle of sea salt on top, and it took the flavor to a whole new level. The salty-sweet combination is simply divine. If you have any leftover Halloween candy, toss it in! The beauty of this Butterfinger Bark recipe is that it’s versatile and can be tailored to your taste. So, let your imagination run wild!
How to Prepare Butterfinger Bark Recipe
Now that we have our ingredients ready, it’s time to roll up our sleeves and get cooking! Making Butterfinger Bark is a delightful process that fills your kitchen with sweet aromas and excitement. Let’s break it down step by step, so you can create this delicious treat with ease.
Step 1: Gather Your Ingredients
First things first, let’s make sure we have everything we need. I like to lay out all my ingredients on the counter. It makes the process smoother and more enjoyable. Plus, it’s a great way to double-check that I haven’t forgotten anything!
Tips for Ingredient Preparation
- Make sure your Butterfinger bars are at room temperature. This makes them easier to crumble.
- Measure out your chocolate chips ahead of time. It saves you from scrambling later!
- Have a baking sheet lined with parchment paper ready to go. This will make cleanup a breeze.
Step 2: Melt the Chocolate
Next, it’s time to melt the chocolate. I find this step to be the most magical part of the process. Watching those chocolate chips transform into a silky, smooth mixture is like witnessing a culinary miracle!
Tips for Melting Chocolate
- Use a microwave-safe bowl. Heat the chocolate in short bursts of 30 seconds, stirring in between. This helps prevent burning.
- If you prefer, you can melt the chocolate using a double boiler. Just make sure the water doesn’t touch the bowl!
- Keep an eye on the chocolate. It should be just melted, not too hot. Overheating can ruin the texture.
Step 3: Mix in Butterfinger Pieces
Once your chocolate is melted, it’s time to add the star of the show—those crumbled Butterfinger bars! This is where the fun really begins. The combination of chocolate and Butterfinger is simply irresistible.
Tips for Mixing
- Gently fold the Butterfinger pieces into the melted chocolate. You want to keep some of the crunch intact!
- Make sure every piece is coated in chocolate. This ensures that every bite is a delightful surprise.
- Don’t be afraid to taste! A little nibble of the mixture can help you gauge if you need more Butterfinger or chocolate.
Step 4: Spread the Mixture
Now comes the fun part—spreading the mixture onto your prepared baking sheet. This is where your creation starts to take shape!
Tips for Spreading Evenly
- Use a spatula to spread the mixture evenly across the baking sheet. Aim for about 1/4 inch thickness.
- If you want a rustic look, don’t worry about making it perfect. A little unevenness adds character!
- Sprinkle any optional toppings, like nuts or sprinkles, on top before it sets. This adds a lovely finishing touch.
Step 5: Chill and Set
Finally, it’s time to let your Butterfinger Bark chill and set. This is the moment where all your hard work pays off!
Tips for Proper Chilling
- Place the baking sheet in the refrigerator for about 1-2 hours. This helps the chocolate harden perfectly.
- If you’re in a hurry, you can pop it in the freezer for about 30 minutes. Just keep an eye on it!
- Once set, break the bark into pieces. I love the sound of cracking chocolate—it’s music to my ears!
And there you have it! Your Butterfinger Bark is ready to be enjoyed. The process is simple, and the results are absolutely delicious. I can’t wait for you to experience the joy of making this treat!
Equipment Needed for Butterfinger Bark Recipe
Before we dive into the sweet world of Butterfinger Bark, let’s make sure we have the right tools at our disposal. Having the right equipment can make the process smoother and more enjoyable. Here’s what you’ll need:
- Microwave-safe bowl or double boiler: This is essential for melting your chocolate. If you don’t have a double boiler, a microwave-safe bowl works just fine!
- Spatula: A good spatula is perfect for mixing and spreading the chocolate mixture evenly. I love using a silicone spatula because it’s flexible and easy to clean.
- Baking sheet: You’ll need a baking sheet lined with parchment paper to pour your mixture onto. If you don’t have parchment paper, you can lightly grease the baking sheet instead.
- Measuring cups and spoons: Accurate measurements are key to a successful recipe. Make sure you have these handy!
- Knife or kitchen scissors: These are useful for crumbling your Butterfinger bars. I often use kitchen scissors for a quick and easy chop!
And there you have it! With these simple tools, you’re all set to create your delicious Butterfinger Bark. If you find yourself missing any of these items, don’t fret! Many kitchen tools can serve multiple purposes, so get creative and make it work. Happy cooking!
Variations of Butterfinger Bark Recipe
While the classic Butterfinger Bark is a delightful treat on its own, I love to experiment with different flavors and textures. It’s like painting on a canvas—each variation adds a unique twist! Here are a few fun ideas to inspire your creativity:
- Peanut Butter Swirl: For all the peanut butter lovers out there, try swirling in some creamy peanut butter before spreading the mixture. It adds a rich, nutty flavor that pairs beautifully with the chocolate and Butterfinger.
- Minty Delight: Add a few drops of peppermint extract to the melted chocolate for a refreshing minty twist. Top it off with crushed peppermint candies for a festive touch!
- Dark Chocolate Version: Swap out the semi-sweet chocolate for dark chocolate. The deeper flavor of dark chocolate complements the sweetness of the Butterfinger perfectly.
- Fruit and Nut Bark: Mix in dried fruits like cranberries or cherries along with chopped nuts. This adds a chewy texture and a burst of fruity flavor that balances the sweetness.
These variations are just the tip of the iceberg! I encourage you to let your imagination run wild. Each time I make Butterfinger Bark, I discover new combinations that surprise and delight my taste buds. So, don’t hesitate to try something new and make this recipe your own!
Cooking Notes for Butterfinger Bark Recipe
As I’ve learned through my culinary adventures, a few cooking notes can make all the difference in achieving the perfect Butterfinger Bark. Here are some tips that I’ve gathered over the years to ensure your bark turns out just right:
- Chocolate Quality: Always opt for high-quality chocolate. It truly elevates the flavor of your bark. I’ve found that using chocolate with a higher cocoa content gives a richer taste.
- Butterfinger Crumbling: If you find crumbling the Butterfinger bars a bit tricky, try placing them in a zip-top bag and gently crushing them with a rolling pin. It’s a fun way to release some energy!
- Storage: Once your bark is set, store it in an airtight container at room temperature. It stays fresh for about a week, but I doubt it will last that long!
- Temperature Control: Be mindful of the temperature in your kitchen. If it’s too warm, the chocolate may not set properly. A cooler environment helps the chocolate harden beautifully.
- Experiment with Toppings: Don’t hesitate to get creative with toppings! I love adding a sprinkle of sea salt or a drizzle of caramel. It’s all about personal preference!
These little notes have helped me refine my Butterfinger Bark recipe over time. I hope they inspire you to create your own delicious version. Happy cooking!
Serving Suggestions for Butterfinger Bark Recipe
Now that your Butterfinger Bark is ready, it’s time to think about how to serve it! This delightful treat is not only delicious but also visually appealing, making it perfect for various occasions. Here are some of my favorite serving suggestions that will surely impress your family and friends:
- Gift it: Cut the bark into bite-sized pieces and package them in a cute box or jar. It makes a thoughtful homemade gift for birthdays, holidays, or just because!
- Party Platter: Arrange the bark on a colorful platter alongside other treats like cookies and brownies. It adds a fun pop of color and flavor to your dessert table.
- Ice Cream Topping: Crumble some of the bark over a scoop of vanilla or chocolate ice cream. The combination of creamy ice cream and crunchy bark is simply heavenly!
- Movie Night Snack: Serve the bark in a bowl during your next movie night. It’s a sweet snack that everyone will love, and it pairs perfectly with popcorn!
- Festive Touch: For special occasions, consider adding a drizzle of melted chocolate or caramel on top of the bark before serving. It elevates the presentation and adds an extra layer of flavor.
These serving suggestions are just a starting point! I love to get creative and find new ways to enjoy my Butterfinger Bark. Whether you’re sharing it with loved ones or indulging in a quiet moment alone, this treat is sure to bring a smile to your face. Enjoy every delicious bite!
Tips for Perfecting Your Butterfinger Bark Recipe
As I’ve journeyed through the world of baking, I’ve picked up a few golden nuggets of wisdom that can truly elevate your Butterfinger Bark experience. Here are my top tips to ensure your bark turns out perfectly every time:
- Chill Your Tools: If you’re working in a warm kitchen, consider chilling your mixing bowl and spatula before starting. This helps keep the chocolate from melting too quickly when you mix in the Butterfinger pieces.
- Layering Flavors: Don’t hesitate to layer flavors! Try adding a hint of vanilla extract to the melted chocolate for an extra depth of flavor. It’s like a secret ingredient that makes everything better!
- Mind the Temperature: Make sure your chocolate isn’t too hot when mixing in the Butterfinger. If it’s too warm, it can cause the candy to melt and lose its crunch. Aim for a warm but not scalding temperature.
- Use Quality Butterfingers: Fresh Butterfinger bars make a world of difference. If they’re stale, they won’t crumble as nicely, and the flavor won’t be as vibrant. Always check the expiration date!
- Break with Care: When breaking the bark into pieces, use a sharp knife for clean edges or simply snap it apart with your hands for a rustic look. Each piece should be a delightful surprise!
These tips have helped me refine my Butterfinger Bark over the years, and I hope they inspire you to create your own delicious masterpiece. Remember, cooking is all about having fun and experimenting, so don’t be afraid to make it your own!
Breakdown of Time for Butterfinger Bark Recipe
Now that we’ve covered the ingredients and steps, let’s talk about the time it takes to whip up this delightful Butterfinger Bark. I always find it helpful to know how long each part of the process will take, especially when I’m planning for a gathering or just a cozy night in. Here’s a quick breakdown:
- Prep Time: 15 minutes – This includes gathering your ingredients, measuring them out, and crumbling those delicious Butterfinger bars. It’s a fun and quick process that gets you excited for the next steps!
- Cooking Time: 10 minutes – Melting the chocolate and mixing in the Butterfinger pieces is a breeze. Just keep an eye on the chocolate to ensure it melts perfectly!
- Chilling Time: 1-2 hours – This is the hardest part! Waiting for the bark to set can feel like an eternity, but trust me, it’s worth it. If you’re in a hurry, you can chill it in the freezer for about 30 minutes.
Total Time: Approximately 1 hour and 25 minutes to 2 hours and 25 minutes, depending on your chilling method. But don’t worry, most of that time is just waiting for the chocolate to set!
With this time breakdown, you can easily plan your baking adventure. I love to use the waiting time to clean up my kitchen or prepare a cup of tea. It makes the whole experience even more enjoyable. Happy baking!
Nutritional Information for Butterfinger Bark Recipe
As a passionate home cook, I always find it helpful to know the nutritional content of the treats I make. While Butterfinger Bark is undeniably a sweet indulgence, it’s nice to have a general idea of what we’re enjoying. Here’s a breakdown of the nutritional information for a typical serving of Butterfinger Bark, based on the ingredients listed:
- Serving Size: 1 piece (approximately 1 oz)
- Calories: 150-200 calories
- Total Fat: 8-10g (Saturated Fat: 4-5g)
- Cholesterol: 5mg
- Sodium: 50mg
- Total Carbohydrates: 20-25g (Dietary Fiber: 1g, Sugars: 15-20g)
- Protein: 1-2g
Keep in mind that these values can vary based on the specific brands of chocolate and Butterfinger bars you use. If you’re looking to make a slightly healthier version, consider using dark chocolate or reducing the amount of Butterfinger. Remember, it’s all about balance! Enjoying a piece of this delightful bark every now and then can be part of a happy, healthy lifestyle. So, savor each bite and share the joy with others!
Frequently Asked Questions about Butterfinger Bark Recipe
As I’ve shared my Butterfinger Bark recipe with friends and family, I’ve noticed a few common questions pop up. It’s always fun to dive deeper into the details of this delightful treat! Here are some frequently asked questions that might help you on your baking journey:
Can I use different types of chocolate?
Absolutely! While I love the classic combination of semi-sweet and white chocolate, you can experiment with milk chocolate, dark chocolate, or even flavored chocolates like caramel or mint. Each type brings its own unique flavor to the bark!
How long does Butterfinger Bark last?
When stored in an airtight container at room temperature, your Butterfinger Bark can last about a week. However, I doubt it will stick around that long! If you want to keep it fresh for longer, you can store it in the refrigerator for up to two weeks.
Can I make this recipe ahead of time?
Yes! Butterfinger Bark is perfect for making ahead of time. I often whip up a batch a few days before a gathering. Just make sure to store it properly to keep it fresh and delicious!
What can I use instead of Butterfinger bars?
If you’re looking for alternatives, you can try using other candy bars like Reese’s, Snickers, or even crushed cookies for a different twist. Just keep in mind that the flavor and texture will change, but it can be just as delightful!
Can I freeze Butterfinger Bark?
Yes, you can freeze it! Just make sure to wrap it tightly in plastic wrap or place it in an airtight container. When you’re ready to enjoy it, let it thaw at room temperature for a bit before digging in. It’s a great way to save some for later!
Is there a way to make this recipe healthier?
Definitely! You can use dark chocolate for a richer flavor and less sugar. Additionally, consider reducing the amount of Butterfinger or mixing in some nuts and dried fruits for added nutrition. It’s all about finding the right balance that works for you!
These questions are just a glimpse into the world of Butterfinger Bark. I hope they help you feel more confident as you embark on your own baking adventure. Remember, cooking is all about having fun and experimenting, so don’t hesitate to make this recipe your own!
Conclusion on Butterfinger Bark Recipe
As I wrap up this delightful journey into the world of Butterfinger Bark, I can’t help but feel a sense of joy. This recipe is more than just a sweet treat; it’s a celebration of flavors, creativity, and the simple pleasure of cooking. The combination of smooth chocolate and crunchy Butterfinger pieces creates a symphony of taste that’s hard to resist.
What I love most about this Butterfinger Bark recipe is its versatility. Whether you’re making it for a festive gathering, a cozy movie night, or just to satisfy your sweet tooth, it’s sure to bring smiles all around. Plus, it’s incredibly easy to whip up, making it perfect for both novice cooks and seasoned bakers alike.
So, gather your ingredients, unleash your creativity, and dive into this delicious adventure. I promise that each bite will remind you of the joy of homemade treats. Happy cooking, and may your Butterfinger Bark bring sweetness to your life and those you share it with!