Introduction to Adorable Bunny Oreo Balls for Easter
As a passionate home cook, I always look forward to Easter. It’s a time filled with joy, family gatherings, and, of course, delicious treats! One of my favorite recipes to whip up during this festive season is the Adorable Bunny Oreo Balls for Easter. These delightful little bites not only taste amazing but also bring a smile to everyone’s face. Who can resist a cute bunny, especially when it’s made of chocolate and cookies?
Let me take you back to my first attempt at making these charming treats. I remember it vividly! The kitchen was filled with laughter as my kids and I rolled up our sleeves, ready to create something special. We had a blast crushing the Oreos, mixing in the cream cheese, and shaping them into bunny forms. The best part? Watching their eyes light up as we dipped them in chocolate and decorated them with tiny edible eyes and little noses. It was a moment of pure joy, and I knew I had stumbled upon a recipe that would become a family tradition.
These Adorable Bunny Oreo Balls for Easter are not just a treat; they’re a way to create memories. They’re perfect for Easter egg hunts, family brunches, or simply as a sweet surprise for loved ones. Plus, they’re incredibly easy to make! With just a few simple ingredients, you can transform ordinary Oreos into something magical. So, grab your apron, and let’s hop into this delightful recipe together!
Ingredients for Adorable Bunny Oreo Balls for Easter
Before we dive into the fun of making these Adorable Bunny Oreo Balls for Easter, let’s gather our ingredients. I always believe that using quality ingredients makes a world of difference in the final product. So, let’s make sure we have everything we need to create these delightful treats!
Main Ingredients
- 1 package (15.35 oz) of Oreo cookies
- 8 oz cream cheese, softened
- 1 cup white chocolate chips (for dipping)
- 1 tablespoon coconut oil (optional, for smoother chocolate)
- Edible eyes (for decoration)
- Pink candy melts or pink sprinkles (for noses)
When choosing your Oreos, I recommend going for the classic variety. They have the perfect balance of chocolate and cream that makes these bunny balls irresistible. As for the cream cheese, make sure it’s softened to room temperature. This helps in mixing it smoothly with the crushed Oreos, creating a delightful filling.
Optional Add-ons
- Colored sprinkles (for extra decoration)
- Chocolate drizzle (for a fancy touch)
- Mini marshmallows (for bunny tails)
Feel free to get creative with the optional add-ons! I love adding a sprinkle of color to my bunny balls, especially when I’m making them for a crowd. The mini marshmallows make adorable bunny tails, adding a fun twist to the presentation. Remember, the more colorful and playful, the better!
Now that we have our ingredients ready, let’s hop on to the next step of preparing these delightful treats!
How to Prepare Adorable Bunny Oreo Balls for Easter
Now that we have our ingredients all lined up, it’s time to roll up our sleeves and get to the fun part—preparing these Adorable Bunny Oreo Balls for Easter! I can’t tell you how much joy it brings me to see the transformation from simple ingredients to these cute little bunnies. Let’s hop right into the step-by-step process!
Step 1: Crush the Oreos
The first step is to crush those Oreos into fine crumbs. You can use a food processor for this, or if you’re like me and enjoy a little hands-on action, place them in a zip-top bag and crush them with a rolling pin. It’s a great way to relieve stress, and the sound of crunching is oddly satisfying!
Tips for Crushing Oreos
- Make sure to crush them into fine crumbs; larger pieces can make it hard to form the balls.
- If using a food processor, pulse in short bursts to avoid over-processing.
- For a fun twist, try mixing in some chocolate graham crackers for added flavor!
Step 2: Mix with Cream Cheese
Next, we’ll mix the crushed Oreos with softened cream cheese. This is where the magic happens! The cream cheese binds everything together, creating a rich and creamy filling. I usually use a large mixing bowl and a spatula, but you can also use your hands for a more personal touch.
Tips for Achieving the Right Consistency
- Ensure the cream cheese is at room temperature for easy mixing.
- Mix until fully combined; you want a dough-like consistency that holds together well.
- If it feels too dry, add a little more cream cheese; if too wet, add more crushed Oreos.
Step 3: Form the Bunny Shapes
Now comes the fun part—shaping the mixture into adorable bunny forms! I like to roll them into balls and then slightly elongate one end to create the bunny shape. It’s like sculpting, but with a delicious reward at the end!
Tips for Shaping the Balls
- Keep your hands slightly damp to prevent the mixture from sticking.
- Make sure they are all roughly the same size for even dipping later.
- For extra fun, you can make some smaller ones for bunny tails!
Step 4: Dip in Chocolate
Once your bunny shapes are ready, it’s time to dip them in melted white chocolate. This step adds a beautiful coating and makes them look extra special. I usually melt the chocolate in a microwave-safe bowl, stirring every 30 seconds until smooth.
Tips for Melting Chocolate
- Be careful not to overheat the chocolate; it can seize up quickly.
- Add a tablespoon of coconut oil to the chocolate for a smoother finish.
- Use a fork to dip the bunnies, allowing excess chocolate to drip off before placing them on parchment paper.
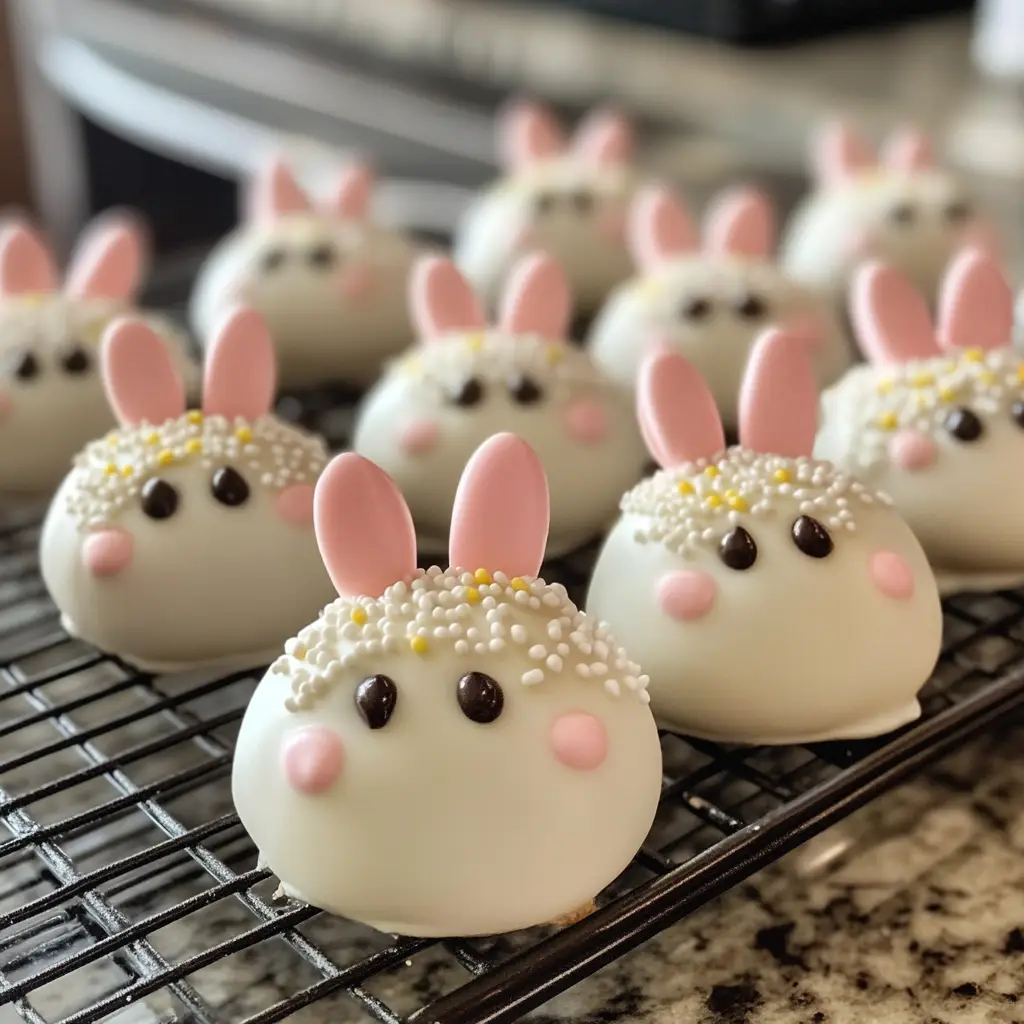
Step 5: Decorate the Bunny Faces
Finally, it’s time to bring your bunnies to life! Use edible eyes and pink candy melts or sprinkles for the noses. This is where you can really let your creativity shine. I love to make each bunny unique, giving them different expressions and personalities!
Tips for Decorating
- Work quickly before the chocolate sets; you want the decorations to stick!
- Use a toothpick to help place small decorations if needed.
- Don’t be afraid to get creative—add little ears made from chocolate or fondant for an extra touch!
And there you have it! Your Adorable Bunny Oreo Balls for Easter are ready to hop into the fridge to set. I can hardly wait to see the smiles on my family’s faces when they see these delightful treats!
How to Prepare Adorable Bunny Oreo Balls for Easter
Now that we have our ingredients all lined up, it’s time to roll up our sleeves and get to the fun part—preparing these Adorable Bunny Oreo Balls for Easter! I can’t tell you how much joy it brings me to see the transformation from simple ingredients to these cute little bunnies. Let’s hop right into the step-by-step process!
Step 1: Crush the Oreos
The first step is to crush those Oreos into fine crumbs. You can use a food processor for this, or if you’re like me and enjoy a little hands-on action, place them in a zip-top bag and crush them with a rolling pin. It’s a great way to relieve stress, and the sound of crunching is oddly satisfying!
Tips for Crushing Oreos
- Make sure to crush them into fine crumbs; larger pieces can make it hard to form the balls.
- If using a food processor, pulse in short bursts to avoid over-processing.
- For a fun twist, try mixing in some chocolate graham crackers for added flavor!
Step 2: Mix with Cream Cheese
Next, we’ll mix the crushed Oreos with softened cream cheese. This is where the magic happens! The cream cheese binds everything together, creating a rich and creamy filling. I usually use a large mixing bowl and a spatula, but you can also use your hands for a more personal touch.
Tips for Achieving the Right Consistency
- Ensure the cream cheese is at room temperature for easy mixing.
- Mix until fully combined; you want a dough-like consistency that holds together well.
- If it feels too dry, add a little more cream cheese; if too wet, add more crushed Oreos.
Step 3: Form the Bunny Shapes
Now comes the fun part—shaping the mixture into adorable bunny forms! I like to roll them into balls and then slightly elongate one end to create the bunny shape. It’s like sculpting, but with a delicious reward at the end!
Tips for Shaping the Balls
- Keep your hands slightly damp to prevent the mixture from sticking.
- Make sure they are all roughly the same size for even dipping later.
- For extra fun, you can make some smaller ones for bunny tails!
Step 4: Dip in Chocolate
Once your bunny shapes are ready, it’s time to dip them in melted white chocolate. This step adds a beautiful coating and makes them look extra special. I usually melt the chocolate in a microwave-safe bowl, stirring every 30 seconds until smooth.
Tips for Melting Chocolate
- Be careful not to overheat the chocolate; it can seize up quickly.
- Add a tablespoon of coconut oil to the chocolate for a smoother finish.
- Use a fork to dip the bunnies, allowing excess chocolate to drip off before placing them on parchment paper.
Step 5: Decorate the Bunny Faces
Finally, it’s time to bring your bunnies to life! Use edible eyes and pink candy melts or sprinkles for the noses. This is where you can really let your creativity shine. I love to make each bunny unique, giving them different expressions and personalities!
Tips for Decorating
- Work quickly before the chocolate sets; you want the decorations to stick!
- Use a toothpick to help place small decorations if needed.
- Don’t be afraid to get creative—add little ears made from chocolate or fondant for an extra touch!
And there you have it! Your Adorable Bunny Oreo Balls for Easter are ready to hop into the fridge to set. I can hardly wait to see the smiles on my family’s faces when they see these delightful treats!
Equipment Needed for Adorable Bunny Oreo Balls for Easter
Before we dive into the delightful process of making our Adorable Bunny Oreo Balls for Easter, let’s take a moment to gather the necessary equipment. Having the right tools on hand makes everything smoother and more enjoyable. Here’s what you’ll need:
- Mixing Bowl: A large mixing bowl is essential for combining the crushed Oreos and cream cheese. If you don’t have one, any large bowl will do!
- Food Processor or Rolling Pin: A food processor makes quick work of crushing Oreos, but if you prefer a more hands-on approach, a rolling pin and a zip-top bag work just as well.
- Microwave-Safe Bowl: This is perfect for melting the white chocolate. If you don’t have one, a small saucepan over low heat can also do the trick.
- Fork: A fork is handy for dipping the bunny balls into chocolate and letting the excess drip off. If you don’t have one, a slotted spoon can work too!
- Parchment Paper: Line your baking sheet with parchment paper to prevent sticking. If you’re out of parchment paper, a silicone baking mat is a great alternative.
- Toothpicks: These are useful for placing small decorations on your bunnies. If you don’t have toothpicks, a small skewer or even your fingers can work in a pinch!
With these tools ready, you’re all set to create your adorable bunny treats. I can already feel the excitement building as we prepare to bring these delightful creations to life!
Variations of Adorable Bunny Oreo Balls for Easter
While the classic Adorable Bunny Oreo Balls for Easter are simply delightful, I love to mix things up and add my own twist to the recipe! Here are a few fun variations that you can try to make these treats even more exciting:
- Chocolate Bunny Balls: Swap out the white chocolate for milk or dark chocolate. This gives a rich flavor that chocolate lovers will adore!
- Peanut Butter Bunny Balls: Mix in some creamy peanut butter with the cream cheese for a nutty twist. It adds a delicious depth to the filling that’s hard to resist.
- Minty Bunny Balls: Add a few drops of peppermint extract to the cream cheese mixture. This refreshing flavor is perfect for spring and adds a delightful surprise!
- Rainbow Bunny Balls: Use colored candy melts instead of white chocolate for dipping. This not only makes them vibrant but also adds a fun pop of color to your Easter table.
- Fruit-Flavored Bunny Balls: Incorporate crushed freeze-dried strawberries or raspberries into the Oreo mixture for a fruity twist. It adds a lovely tartness that balances the sweetness.
These variations are just the tip of the iceberg! Feel free to get creative and experiment with different flavors and decorations. The beauty of these Adorable Bunny Oreo Balls for Easter is that they can be tailored to suit your taste and the preferences of your loved ones. Happy hopping into the world of delicious possibilities!
Cooking Notes for Adorable Bunny Oreo Balls for Easter
As I dive into the delightful world of making Adorable Bunny Oreo Balls for Easter, I’ve picked up a few cooking notes that can help ensure your treats turn out perfectly every time. These little tips can make a big difference in your baking adventure!
- Chill Time: After shaping the bunny balls, I recommend chilling them in the fridge for about 30 minutes before dipping. This helps them hold their shape better and makes the chocolate coating easier.
- Quality Chocolate: Using high-quality chocolate for dipping can elevate the flavor of your bunny balls. I always opt for good brands that melt smoothly and taste delicious.
- Storage: If you have any leftovers (which is rare in my house!), store them in an airtight container in the fridge. They can last up to a week, but I doubt they’ll stick around that long!
- Experiment with Shapes: Don’t feel limited to just bunny shapes! You can use cookie cutters to create other fun shapes for different occasions. Think eggs, flowers, or even little chicks!
- Involve the Kids: Making these treats is a fantastic way to involve the little ones. They love getting their hands messy and decorating their own bunny balls. It’s a fun family activity!
With these cooking notes in mind, you’re all set to create your own batch of Adorable Bunny Oreo Balls for Easter. I can’t wait for you to experience the joy of making and sharing these delightful treats with your loved ones!
Serving Suggestions for Adorable Bunny Oreo Balls for Easter
Now that your Adorable Bunny Oreo Balls for Easter are ready, it’s time to think about how to present them! I love to make the serving experience as delightful as the treats themselves. Here are some fun serving suggestions that will make your bunny balls the star of the show:
- Easter Basket: Arrange the bunny balls in a colorful Easter basket, surrounded by shredded paper or grass. This adds a festive touch and makes for a beautiful centerpiece.
- Platter Display: Place the bunny balls on a decorative platter. You can sprinkle some edible flowers or colorful sprinkles around them for an extra pop of color.
- Individual Treat Bags: For a fun party favor, package each bunny ball in a small clear bag tied with a ribbon. This makes them easy to grab and enjoy on the go!
- On a Cake Stand: Elevate your presentation by placing the bunny balls on a cake stand. This adds height and makes them look even more enticing.
- With Fresh Fruit: Serve the bunny balls alongside fresh fruit like strawberries or blueberries. The fruity flavors complement the sweetness of the treats beautifully.
These serving suggestions not only enhance the visual appeal but also create a festive atmosphere for your Easter celebrations. I can already picture the smiles on my family’s faces as they dig into these adorable treats!
Tips for Making Adorable Bunny Oreo Balls for Easter
As I’ve whipped up countless batches of Adorable Bunny Oreo Balls for Easter, I’ve gathered a treasure trove of tips that can help you create the perfect treats. These little nuggets of wisdom can make your baking experience smoother and more enjoyable. Here’s what I’ve learned along the way:
- Prep Ahead: If you’re short on time, you can crush the Oreos and mix them with cream cheese a day in advance. Just store the mixture in the fridge until you’re ready to shape and dip!
- Use a Melting Pot: If you have a melting pot, it’s a game-changer for keeping your chocolate warm and smooth while you work. It prevents the chocolate from hardening too quickly.
- Chill Between Steps: If your bunny balls start to get too soft while you’re working, pop them in the fridge for a few minutes. This helps maintain their shape during dipping and decorating.
- Get Creative with Flavors: Don’t hesitate to experiment with different flavors of Oreos, like mint or peanut butter. Each variation brings a unique twist to your bunny balls!
- Have Fun with Decorations: Let your imagination run wild! Use different candies, sprinkles, or even edible glitter to make your bunny balls stand out. The more colorful, the better!
With these tips in your back pocket, you’re all set to create the most delightful Adorable Bunny Oreo Balls for Easter. I can’t wait for you to experience the joy of making these treats and sharing them with your loved ones!
Breakdown of Time for Adorable Bunny Oreo Balls for Easter
As a passionate home cook, I know that time management is key when preparing any recipe. For these Adorable Bunny Oreo Balls for Easter, the process is not only fun but also quite efficient! Here’s a quick breakdown of the time you’ll need to whip up these delightful treats:
- Prep Time: Approximately 30 minutes. This includes crushing the Oreos, mixing with cream cheese, and shaping the bunny balls.
- Chilling Time: About 30 minutes. Chilling the bunny balls helps them hold their shape during dipping.
- Cooking Time: 10 minutes. This is the time it takes to melt the chocolate and dip the bunny balls.
- Total Time: Roughly 1 hour and 10 minutes. This includes all the steps from start to finish, plus chilling time.
With this time breakdown, you can easily plan your Easter festivities. I love how these Adorable Bunny Oreo Balls for Easter come together quickly, allowing you to spend more time enjoying the holiday with family and friends. Happy hopping into the kitchen!
Nutritional Information for Adorable Bunny Oreo Balls for Easter
As I whip up my Adorable Bunny Oreo Balls for Easter, I often think about the nutritional aspects of these delightful treats. While they are undeniably a sweet indulgence, it’s good to know what we’re enjoying. Here’s a quick overview of the nutritional information for one bunny ball, assuming you make about 20 balls from the recipe:
- Calories: Approximately 120 calories
- Fat: 7g (Saturated Fat: 4g)
- Carbohydrates: 14g (Sugars: 10g)
- Protein: 1g
- Fiber: 0g
Keep in mind that these values can vary based on the specific ingredients you use, especially if you opt for different types of chocolate or add-ons. While these bunny balls are a treat, I believe in enjoying them in moderation. They’re perfect for sharing during Easter celebrations, and the smiles they bring are worth every bite!
Frequently Asked Questions about Adorable Bunny Oreo Balls for Easter
As I’ve shared my recipe for Adorable Bunny Oreo Balls for Easter, I’ve received quite a few questions from fellow home cooks eager to try their hand at these delightful treats. I love connecting with others in the kitchen, so I’ve compiled some of the most frequently asked questions to help you on your baking journey!
Can I make these bunny balls ahead of time?
Absolutely! You can prepare the bunny balls a day in advance. Just shape them and store them in an airtight container in the fridge. When you’re ready to serve, dip them in chocolate and decorate. They’ll be just as delicious!
What if I don’t have white chocolate for dipping?
No worries! You can use milk chocolate or dark chocolate instead. Each type brings its own unique flavor, and I’ve found that they all work beautifully with the Oreo filling. Just melt it the same way you would with white chocolate!
How do I store leftover bunny balls?
If you happen to have any leftovers (which is rare in my house!), store them in an airtight container in the fridge. They can last up to a week, but I doubt they’ll stick around that long with all the smiles they bring!
Can I use gluten-free Oreos for this recipe?
Yes, you can! Gluten-free Oreos are a fantastic alternative, and they work just as well in this recipe. It’s a great way to ensure everyone can enjoy these adorable treats, regardless of dietary restrictions.
What can I use instead of cream cheese?
If you’re looking for a dairy-free option, you can substitute cream cheese with a vegan cream cheese alternative. Just make sure it’s softened for easy mixing. You can also try using nut butter for a different flavor profile!
Can I freeze the bunny balls?
Yes, you can freeze them! Just make sure they are fully set after dipping in chocolate. Place them in a single layer on a baking sheet to freeze, then transfer them to an airtight container. They can last up to three months in the freezer. Just thaw them in the fridge before serving!
I hope these FAQs help you feel more confident as you embark on your journey to create Adorable Bunny Oreo Balls for Easter. Remember, the most important ingredient is the joy of sharing these treats with your loved ones. Happy baking!
Conclusion on Adorable Bunny Oreo Balls for Easter
As I wrap up this delightful journey of creating Adorable Bunny Oreo Balls for Easter, I can’t help but reflect on the joy these treats bring to my family and friends. They are not just a sweet indulgence; they are a canvas for creativity, a way to bond with loved ones, and a delightful addition to any Easter celebration. The smiles that light up the room when these charming bunnies make their appearance are truly priceless.
With their simple ingredients and easy preparation, these bunny balls are perfect for both seasoned bakers and those just starting their culinary adventures. Plus, the variations and decorating options allow for endless creativity, making each batch uniquely yours. Whether you’re hosting a festive gathering or simply looking to spread some cheer, these adorable treats are sure to hop right into everyone’s hearts.
So, gather your loved ones, roll up your sleeves, and dive into the fun of making these Adorable Bunny Oreo Balls for Easter. I promise you’ll create not just delicious treats, but also cherished memories that will last a lifetime. Happy Easter baking!